











4. Penguin Holiday Coaster
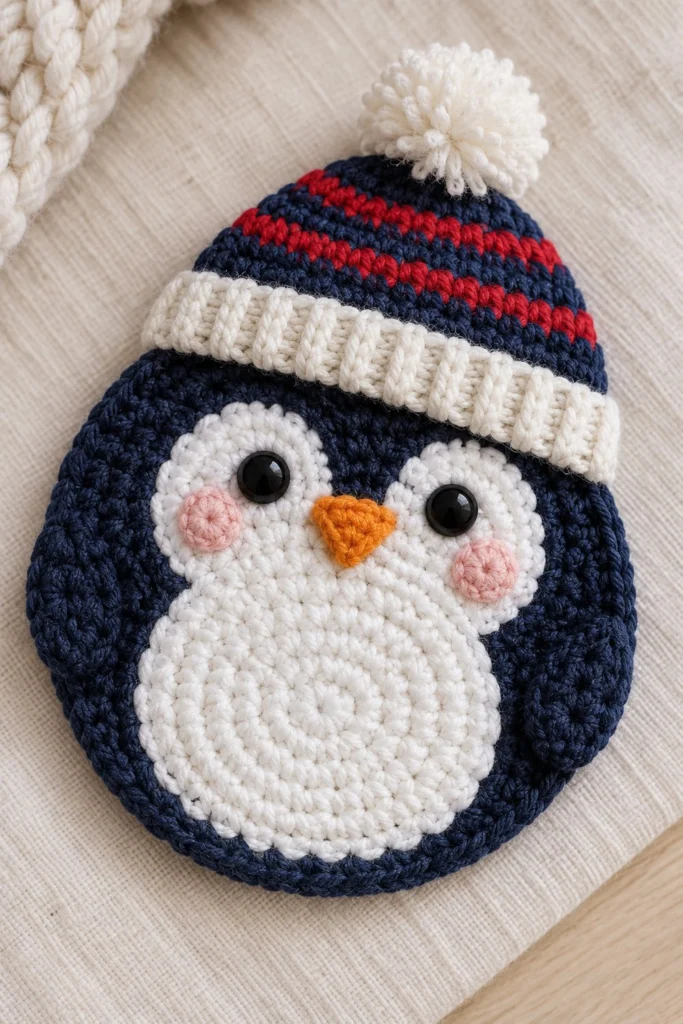
Meet the charming Penguin Holiday Coaster, a delightful and festive drink coaster that doubles as a cheerful winter decoration. Featuring a classic red-and-blue striped winter beanie complete with a textured white pom-pom, this adorable project works up quickly and brings instant holiday warmth to your home. It measures approximately 4 inches across and takes about one hour to complete.
Quick Facts
| Skill level | Finished size | Yarn | Hook | Time |
|---|---|---|---|---|
| Easy-Intermediate | 4 in / 10 cm across | DK cotton (Cat. 3) | 3.5 mm (US E/4) | 1 hour |
Materials You Will Need
- DK weight 100% cotton yarn in Navy Blue (approx. 20 grams, 50 metres), White (approx. 15 grams, 35 metres), Red (approx. 5 grams, 12 metres), and Orange (approx. 2 grams, 5 metres).
- Scrap of light pink yarn for the cheeks (approx. 1 gram).
- 3.5 mm (US E/4) crochet hook.
- Two 6 mm black safety eyes with backings (or small black embroidery floss).
- Tapestry needle for weaving in ends.
- Stitch marker.
- Small amount of fiberfill stuffing for the beak.
Gauge
The first 3 rounds of the penguin body measure about 3.5 cm across. Working with even tension matters more than exact gauge for this coaster.
Abbreviations (US Terms)
- ch: chain
- sc: single crochet
- hdc: half double crochet
- dc: double crochet
- sl st: slip stitch
- inc: increase (work 2 sc in the same stitch)
- dec: decrease (single crochet 2 stitches together)
- BLO: back loop only
- FLO: front loop only
- st(s): stitch(es)
- Rnd(s): round(s)
UK terms: sc = dc, hdc = htr, dc = tr.
Pattern Notes
- The penguin body and belly are worked in continuous spiral rounds without joining, unless otherwise stated. Use a stitch marker to track the first stitch of each round.
- Stitch counts are provided in brackets at the end of every round.
- The coaster is flat; stuffing is only used lightly inside the beak to give it dimension.
Instructions
Penguin Body – Navy Blue, make 1
Rnd 1: 6 sc in a magic ring (6)
Rnd 2: inc x 6 (12)
Rnd 3: (1 sc, inc) x 6 (18)
Rnd 4: (2 sc, inc) x 6 (24)
Rnd 5: (3 sc, inc) x 6 (30)
Rnd 6: (4 sc, inc) x 6 (36)
Rnd 7: (5 sc, inc) x 6 (42)
Rnd 8: (6 sc, inc) x 6 (48)
Rnd 9: (7 sc, inc) x 6 (54)
Rnd 10: (8 sc, inc) x 6 (60)
Fasten off, weave in ends.
Belly Patch – White, make 1
Rnd 1: 6 sc in a magic ring (6)
Rnd 2: inc x 6 (12)
Rnd 3: (1 sc, inc) x 6 (18)
Rnd 4: (2 sc, inc) x 6 (24)
Rnd 5: (3 sc, inc) x 6 (30)
Rnd 6: (4 sc, inc) x 6 (36)
Fasten off, leaving a long tail for sewing.
Eye Patches (Facial Mask) – White, make 2 (one left, one right)
Rnd 1: 6 sc in a magic ring (6)
Rnd 2: inc x 6 (12)
Rnd 3: (1 sc, inc) x 6 (18)
Fasten off, leaving a long tail for sewing.
Beak – Orange, make 1
Rnd 1: 4 sc in a magic ring (4)
Rnd 2: (1 sc, inc) x 2 (6)
Rnd 3: (2 sc, inc) x 2 (8)
Lightly stuff the beak with a small pinch of fiberfill before closing.
Fasten off, leaving a long tail for sewing.
Cheeks – Light Pink, make 2
Rnd 1: 6 sc in a magic ring (6), join with a sl st to first sc (6).
Fasten off, leaving a long tail for sewing.
Wings – Navy Blue, make 2
Row 1: Ch 5, working in the 2nd ch from hook, 4 sc, turn (4)
Row 2: Ch 1, dec, 2 sc, turn (3)
Row 3: Ch 1, dec, 1 sc, turn (2)
Row 4: Ch 1, dec (1)
Fasten off, leaving a long tail for sewing.
Beanie Hat Base and Brim – White and Navy/Red, make 1
Note: The brim is worked in ribbed rows, then hat body is worked in joined rounds off the brim edge.
Row 1 (Brim): With White, ch 7, working in 2nd ch from hook, 6 sc, turn (6)
Row 2 to 40: Ch 1, working in BLO, 6 sc, turn (6)
Bring both short ends of the ribbed band together and sl st them closed to form a ring.
Rnd 1 (Hat Body): Join Navy Blue yarn along the long edge of the brim band, work 24 sc evenly spaced across the top edge, join with sl st to first sc (24)
Rnd 2: Ch 1, 24 sc, join with sl st (24)
Rnd 3: Switch to Red, ch 1, 24 sc, join with sl st (24)
Rnd 4: Switch to Navy Blue, ch 1, 24 sc, join with sl st (24)
Rnd 5: Switch to Red, ch 1, 24 sc, join with sl st (24)
Rnd 6: Switch to Navy Blue, ch 1, (2 sc, dec) x 6, join with sl st (18)
Rnd 7: Ch 1, (1 sc, dec) x 6, join with sl st (12)
Rnd 8: Ch 1, dec x 6, join with sl st (6)
Fasten off, pull yarn tightly through remaining 6 stitches to close the top.
Pom-Pom – White, make 1
Make a small yarn pom-pom approximately 2.5 cm in diameter by wrapping white yarn around a small fork or cardboard template, tying tightly in the center, and trimming neatly into a sphere.
Assembly
1. Attach the white belly patch to the lower center of the navy blue penguin body using the long tail and whipstitch.
2. Position the two white eye patches near the upper portion of the belly patch, slightly overlapping the top edge. Secure with sewing.
3. Insert safety eyes through the center of each white eye patch and secure the backings firmly on the reverse side. If making for a young child, embroider French knots with black yarn instead.
4. Sew the orange beak centrally between the two white eye patches, overlapping their inner edges slightly.
5. Stitch the light pink cheek circles just below and to the outside of each eye patch.
6. Sew the two navy blue wings to the left and right outer sides of the penguin body.
7. Position the finished beanie hat over the top of the penguin’s head, tilting slightly, and sew the bottom brim securely to the body.
8. Securely attach the white pom-pom to the peak of the beanie.
Finishing
Weave in all remaining loose yarn ends on the back of the coaster. Press gently with a warm iron and damp cloth if needed to ensure the coaster lies completely flat.
Tip: Keep your tension consistent when working the continuous rounds of the body so the coaster remains perfectly flat without curling at the edges.
Tips and Common Mistakes
- Coaster curling: If your coaster starts to cup or curl like a bowl, your stitches are too tight. Switch up half a hook size or relax your yarn tension.
- Eye placement: Always place the safety eye backings on securely before attaching the patches to the body, as adding them afterward is difficult.
- Uneven stripes: When changing colors on the beanie hat, carry the unused yarn loosely inside or fasten off securely each time to maintain a clean edge.
Frequently Asked Questions
Can I use this as a hot pad instead of a drink coaster?
This pattern creates a lightweight decorative coaster designed for cold or warm mugs. If you want to use it as a thick hot pad for heavy baking dishes, line the back with felt or use a heavier wool yarn with a smaller hook.
How do I wash my penguin coaster?
Spot clean gently with mild soap and cold water. Lay flat to dry on a towel and reshape while damp. Do not put it in the washing machine or tumble dryer.
What should I do if my stitch count on the hat brim doesn’t match?
The hat brim is worked in rows of ribbing. As long as you have worked 20 ridges (40 rows total) and can space about 24 stitches evenly along the long edge for the hat base, the hat will fit the head nicely.
Are safety eyes safe to use if children are around?
Safety eyes can pose a choking hazard for infants and toddlers under three years old. For a child-friendly version, embroider the eyes using black embroidery floss or yarn instead of using plastic safety eyes.
📄 Your free PDF pattern