











3. Koala Coaster
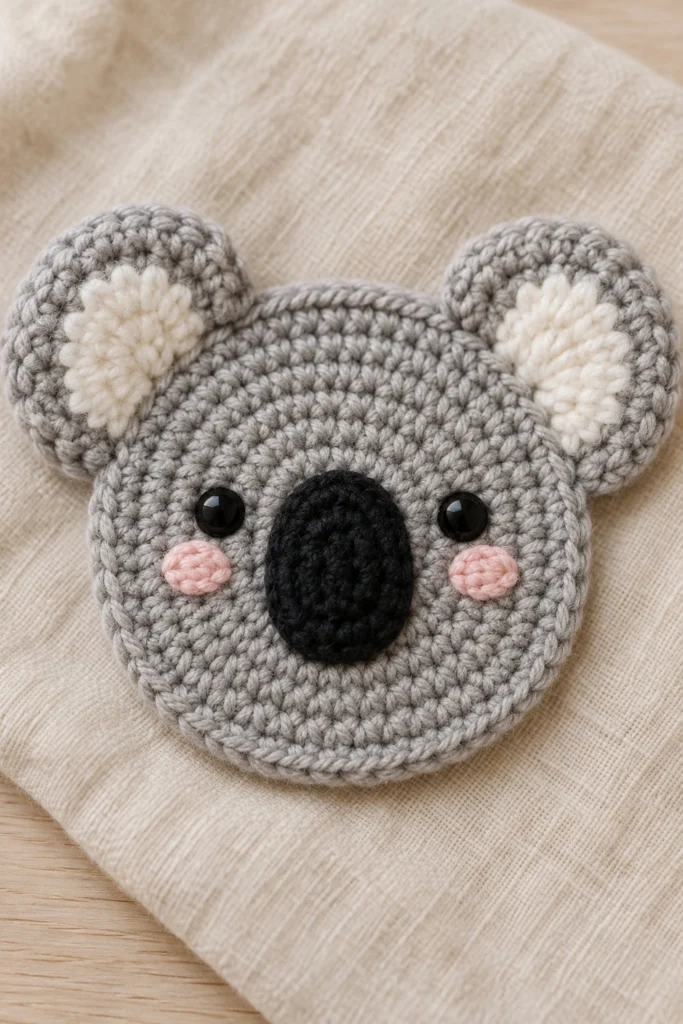
Bring a touch of Australian charm to your coffee table with this adorable crochet koala coaster! Featuring fluffy grey-and-white rounded ears, a textured oval nose, and sweet rosy blush accents, this piece doubles as a decorative applique and a functional mug rug. Designed to work up quickly in sturdy cotton yarn, it makes a delightful handmade gift for animal lovers of all ages.
Quick Facts
| Skill level | Finished size | Yarn | Hook | Time |
|---|---|---|---|---|
| Easy | 4 in / 10 cm diameter | DK cotton (Cat. 3) | 3.5 mm (US E/4) | 45 minutes |
Materials You Will Need
- DK weight cotton yarn (Cat. 3): approx. 20g (50 meters) in Main Colour (Grey), 5g (12 meters) in Contrast Colour 1 (White), 5g (12 meters) in Contrast Colour 2 (Charcoal/Black), small scrap of Pink yarn
- 3.5 mm (US E/4) crochet hook
- Two 6 mm black safety eyes with backings (or black embroidery floss if preferred for child safety)
- Tapostry needle
- Scissors
- Stitch marker
Gauge
First 3 rounds of the Coaster Base measure 3.5 cm across. Exact gauge is not critical for this decorative item, but maintaining a firm, even tension ensures your coaster sits flat and protects surfaces effectively from hot mugs.
Abbreviations (US Terms)
- ch = chain
- sl st = slip stitch
- sc = single crochet
- hdc = half double crochet
- dc = double crochet
- inc = increase (work 2 sc in the same stitch)
- dec = decrease (work 2 sc together)
- BLO = back loop only
- st(s) = stitch(es)
- Rnd(s) = round(s)
UK terms: sc = dc, hdc = htr, dc = tr.
Pattern Notes
- The main body and ears are worked in continuous spirals without joining rounds unless specified. Use a stitch marker to track the beginning of each round.
- Stitch counts are provided in brackets at the end of every round or row.
- Ensure all yarn tails are securely fastened and woven in to keep the coaster flat and neat.
Instructions
Coaster Base – Grey, make 1
Rnd 1: 6 sc in a magic ring (6)
Rnd 2: inc x 6 (12)
Rnd 3: (sc in next st, inc) x 6 (18)
Rnd 4: (sc in next 2 sts, inc) x 6 (24)
Rnd 5: (sc in next 3 sts, inc) x 6 (30)
Rnd 6: (sc in next 4 sts, inc) x 6 (36)
Rnd 7: (sc in next 5 sts, inc) x 6 (42)
Rnd 8: (sc in next 6 sts, inc) x 6 (48)
Rnd 9: (sc in next 7 sts, inc) x 6 (54)
Fasten off, weave in ends. (54)
Ears (Inner White Part) – White, make 2
Rnd 1: 6 sc in a magic ring (6)
Rnd 2: inc x 6 (12)
Fasten off, leaving a 20 cm tail for sewing. (12)
Ears (Outer Grey Part) – Grey, make 2
Rnd 1: 6 sc in a magic ring (6)
Rnd 2: inc x 6 (12)
Rnd 3: (sc in next st, inc) x 6 (18)
Do not fasten off. Place the White inner ear piece on top of the Grey outer piece, and sc through both layers around the edge: working 18 sc through both sets of stitches. Fasten off, leaving a 30 cm tail for assembly. (18)
Nose – Charcoal, make 1
Rnd 1: Ch 4, working in the second ch from hook, sc in next 2 ch, 3 sc in last ch, rotate to work along opposite side of foundation chain, sc in next st, inc in last st (8)
Rnd 2: inc, sc in next st, inc x 3, sc in next st, inc x 2 (14)
Fasten off, leaving a 25 cm tail for sewing. (14)
Assembly
Position the charcoal nose centrally across Rnds 4 to 7 of the Coaster Base and sew firmly in place. Insert the 6 mm safety eyes directly above the nose, about 4 stitches apart on Rnd 7, and secure the backs. Using pink yarn and a tapestry needle, embroider small oval blush spots on Rnds 6 and 7 just below and outside each safety eye. Position the finished ears at the top outer edges of the Coaster Base (spanning Rnds 7 to 9) and sew securely through the back of the coaster.
Finishing
Check all sewn components to ensure they are firmly attached and secure. Weave in any remaining loose yarn tails on the back of the coaster. Lightly steam block the finished piece if needed to ensure it lies completely flat.
Tip: Keep your tension slightly tighter than normal when working the coaster base so that mug condensation won’t easily seep through.
Tips and Common Mistakes
- Do not over-stuff or add stuffing behind pieces; these appliqués are meant to lie flat as functional coasters.
- Ensure safety eye backs are pushed on completely flat against the back of the fabric so mugs sit level on top.
- Count your stitches at the end of every round on the base to avoid warping or rippling.
- Use stitch markers religiously when starting new rounds in continuous spirals.
Frequently Asked Questions
Can I use acrylic yarn instead of cotton?
Cotton is recommended because it absorbs moisture well, handles heat better, and provides a firmer, flatter surface for cups. Acrylic can melt slightly with very hot mugs and is more slippery.
Can I make this for a baby or toddler?
If making this item for a child under three, embroider the eyes using black yarn or embroidery floss instead of using plastic safety eyes to eliminate any choking hazards.
How do I wash my koala coaster?
Hand wash gently in lukewarm water with mild soap, reshape while damp, and lay flat to dry. Do not tumble dry.
Can I resize this coaster to make it larger?
Yes, you can continue the flat circle increase formula for additional rounds (e.g., Rnd 10: [sc in next 8 sts, inc] x 6), then add correspondingly larger ears.
📄 Your free PDF pattern