











20. Giraffe Coaster
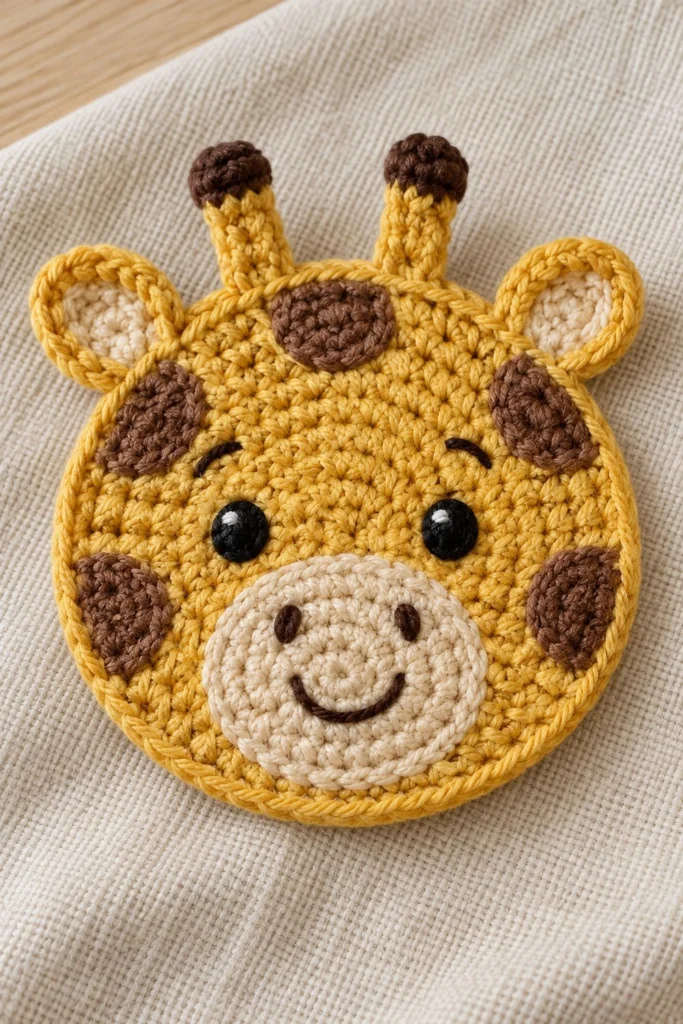
Brighten your coffee table with this charming, friendly giraffe coaster, featuring cute little horns and playful patch spots. Quick to crochet in soft cotton, this cheerful little project takes just forty-five minutes and makes a wonderful handmade gift.
Quick Facts
| Skill level | Finished size | Yarn | Hook | Time |
|---|---|---|---|---|
| Easy | 4 in / 10 cm diameter | DK cotton (Cat. 3) | 3.5 mm (US E/4) | 45 minutes |
Materials You Will Need
- DK weight cotton yarn in Golden Yellow (Main Color, 15 grams / 35 metres)
- DK weight cotton yarn in Brown (Contrast Color, 5 grams / 12 metres)
- DK weight cotton yarn in Dark Brown (Small amounts for face embroidery and horn tips)
- DK weight cotton yarn in Pink (Small amounts for cheek blushes)
- 3.5 mm (US E/4) crochet hook
- Tapestry needle
- Scissors
- Stitch marker
Gauge
The first 3 rounds of the Coaster Base measure 3 cm across. Gauge is not critical for this project, but work with a consistent tension so the coaster lies completely flat.
Abbreviations (US Terms)
- ch: chain
- sc: single crochet
- hdc: half double crochet
- dc: double crochet
- sl st: slip stitch
- inc: single crochet increase (work 2 sc in the same stitch)
- dec: single crochet decrease (sc 2 stitches together)
- BLO: back loop only
- st(s): stitch(es)
UK terms: sc = dc, hdc = htr, dc = tr.
Pattern Notes
- The Coaster Base is worked in continuous spiral rounds without joining. Use a stitch marker to keep track of the first stitch of each round.
- Stitch counts are given in brackets at the end of every round or row.
- All appliqué pieces are worked flat in rows or simple small rounds as indicated.
Instructions
Coaster Base – Golden Yellow, make 1
Rnd 1: 6 sc in a magic ring (6)
Rnd 2: inc x 6 (12)
Rnd 3: (sc in next st, inc) x 6 (18)
Rnd 4: (sc in next 2 sts, inc) x 6 (24)
Rnd 5: (sc in next 3 sts, inc) x 6 (30)
Rnd 6: (sc in next 4 sts, inc) x 6 (36)
Rnd 7: (sc in next 5 sts, inc) x 6 (42)
Rnd 8: (sc in next 6 sts, inc) x 6 (48)
Rnd 9: (sc in next 7 sts, inc) x 6 (54)
Rnd 10: (sc in next 8 sts, inc) x 6 (60)
Fasten off cleanly, leaving a 30 cm tail for weaving in. Invisibly join to the first stitch.
Ossicones (Horns) – Dark Brown and Golden Yellow, make 2
Rnd 1 (Dark Brown): 4 sc in a magic ring (4)
Rnd 2 (Change to Golden Yellow): inc in each st around (8)
Rnd 3: sc in each st around (8)
Fasten off, leaving a 20 cm tail for sewing.
Ears – Golden Yellow, make 2
Row 1: Ch 5, starting in 2nd ch from hook, sc in next 2 sts, hdc in next 2 sts, ch 1, turn (4)
Row 2: dec, dec (2)
Fasten off, leaving a 20 cm tail for sewing.
Patch Spots – Brown, make 3
Rnd 1: 6 sc in a magic ring (6)
Rnd 2: inc x 6 (12)
Fasten off, leaving a 15 cm tail for sewing.
Assembly
Sew the three brown patch spots onto different areas of the coaster base, placing them securely around the center. Sew the two ears onto rounds 8 and 9 near the top outer edges of the head. Sew the two small ossicones centered between the ears directly on the top edge of round 10. Using dark brown yarn, embroider friendly sleeping or curved eyes with eyelashes, eyebrows, and a small smiling muzzle with nostrils right in the center. Use pink yarn to add small oval cheek blushes just beneath the eyes.
Finishing
Weave in all loose yarn ends securely on the back side of the coaster. Lightly steam press the coaster under a damp cloth if needed to ensure it lies completely flat.
Tip: Press your finished coaster with a warm iron over a damp towel to give it a crisp, professional finish that stays flat.
Tips and Common Mistakes
- Do not pull your magic ring too tightly before completing round 1, or you may struggle to fit your stitches inside.
- Always count your stitches at the end of each round to prevent the circle from ruffling or cupping.
- Make sure to weave your yarn tails thoroughly through the back stitches so they do not show on the front.
- Keep your tension even throughout the whole coaster base to maintain a neat circular shape.
Frequently Asked Questions
Can I use acrylic yarn instead of cotton?
Yes, you can use acrylic yarn, but cotton yarn is recommended because it is more absorbent, heat-resistant, and holds its flat shape much better as a coaster.
Are safety eyes safe to use for this coaster if a child plays with it?
For children under three years old, it is strongly recommended to embroider the eyes using dark yarn instead of using plastic safety eyes to eliminate any choking hazards.
How do I wash my handmade coaster?
Hand wash gently in cool water with mild soap, lay flat to dry in its original shape, and do not tumble dry.
📄 Your free PDF pattern