












17. Tiger Coaster
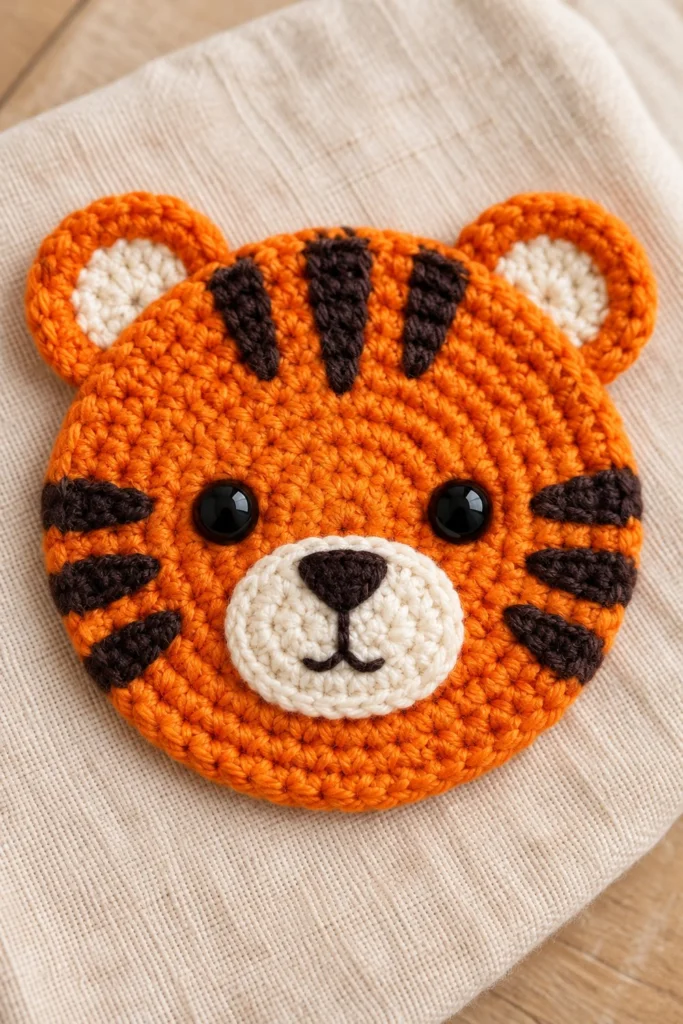
Bring the king of the jungle to your coffee table with this bright and fierce tiger coaster! Featuring bold contrast stripes, sweet rounded ears, and friendly embroidered details, this quick project adds a roaring good touch of handmade charm to your home. It measures 4 inches in diameter and takes just 40 minutes from start to finish.
Quick Facts
| Skill level | Finished size | Yarn | Hook | Time |
|---|---|---|---|---|
| Easy | 4 in / 10 cm diameter | DK cotton (Cat. 3) | 3.5 mm (US E/4) | 40 minutes |
Materials You Will Need
- DK weight cotton yarn in Bright Orange (approx. 12 grams, 30 metres)
- DK weight cotton yarn in White (approx. 5 grams, 12 metres)
- DK weight cotton yarn in Dark Brown or Black (approx. 4 grams, 10 metres)
- 3.5 mm (US E/4) crochet hook
- Two 6 mm black safety eyes with backings
- Embroidery floss in Black and Pink
- Yarn needle
- Scissors
- Stitch marker
Gauge
The first 3 rounds of the main coaster base measure approximately 3.8 cm across. Working tightly with even tension matters more than exact gauge so your coaster lies flat and protects furniture from hot mugs.
Abbreviations (US Terms)
- ch – chain
- sc – single crochet
- hdc – half double crochet
- dc – double crochet
- inc – single crochet increase (work 2 sc in the same stitch)
- dec – single crochet decrease (join 2 stitches together using the invisible decrease method)
- sl st – slip stitch
- st(s) – stitch(es)
- BLO – back loop only
- FO – fasten off
UK terms: sc = dc, hdc = htr, dc = tr.
Pattern Notes
- The main body is worked in continuous spiral rounds without joining. Use a stitch marker to track the first stitch of each round.
- Stitch counts are given in brackets at the end of every round or row.
- Colour changes for stripes are worked directly into the designated stitches of the main coaster base.
Instructions
Coaster Base – Bright Orange, White, and Dark Brown, make 1
Rnd 1: With Bright Orange, 6 sc in a magic ring (6)
Rnd 2: inc x 6 (12)
Rnd 3: (1 sc, inc) x 6 (18)
Rnd 4: (2 sc, inc) x 6 (24)
Rnd 5: (3 sc, inc) x 6 (30)
Rnd 6: (4 sc, inc) x 6 (36)
Rnd 7: (5 sc, inc) x 6 (42)
Rnd 8: (6 sc, inc) x 6 (48)
Rnd 9: Working the outer edge in pattern with stripes: (7 sc, inc) x 6, working a mix of Bright Orange and Dark Brown st for side stripes as you go (54)
Rnd 10: 54 sc around in spiral, maintaining clean colour integration for remaining face stripes
FO, weave in all ends securely (54)
Muzzle – White, make 1
Rnd 1: 6 sc in a magic ring (6)
Rnd 2: inc x 6 (12)
Rnd 3: (1 sc, inc) x 6 (18)
FO, leaving a 25 cm tail for sewing (18)
Ears – Bright Orange and Dark Brown, make 2
Rnd 1: With Dark Brown, 6 sc in a magic ring (6)
Rnd 2: Switch to Bright Orange, (1 sc, inc) x 3 (9)
Rnd 3: (2 sc, inc) x 3 (12)
Rnd 4: 12 sc around (12)
FO, leaving a 20 cm tail for sewing (12)
Assembly
Position the white muzzle centrally onto the lower half of the tiger face base, aligning it roughly between rounds 4 and 8. Whipstitch the outer edge of the muzzle securely in place using the yarn tail, leaving a small gap to lightly shape if desired before closing completely. Attach the two ears to the top edge of the head coaster base at approximately rounds 8 and 9, spacing them about 6 stitches apart. Insert the 6 mm safety eyes into the upper portion of the white muzzle or directly above it on the orange face base, securing the backs firmly on the reverse side.
Finishing
Using black embroidery floss, stitch a small triangular nose and a friendly smiling mouth centered on the white muzzle. Add tiny pink accent lines beneath the eyes if desired. Check that all loose yarn tails are securely woven into the back of the work. Block lightly with a cool steam iron if needed to ensure the coaster lies completely flat.
Tip: When working multiple color changes for the tiger stripes, carry the unused yarn loosely across the back of your work rather than cutting it every time.
Tips and Common Mistakes
- Make sure your tension stays consistent across color changes so the coaster maintains a perfectly flat circle without curling edges.
- Do not over-stuff the muzzle; it should remain relatively flat to serve as a functional coaster surface.
- Double-check safety eye placement and secure the backings completely before finishing the piece.
- Weave all ends tightly on the wrong side so loose threads do not show through when mugs are placed on top.
Frequently Asked Questions
Can I use worsted weight yarn instead of DK?
Yes, but your finished tiger coaster will turn out larger (around 5 inches across) and you will need to use a larger hook, such as 4.0 mm or 4.5 mm.
Are safety eyes safe for young children?
Safety eyes are not recommended for items intended for children under three years old. For a baby-safe coaster, embroider the eyes using black embroidery floss instead.
How do I clean my crochet tiger coaster?
Hand wash gently in lukewarm water with mild soap, lay flat to dry on a clean towel, and reshape while damp.
Can I make this project using acrylic yarn?
Cotton yarn is strongly recommended because it absorbs moisture from cold drinks and handles heat from hot mugs much better than acrylic.
📄 Your free PDF pattern