












21. Zebra Coaster
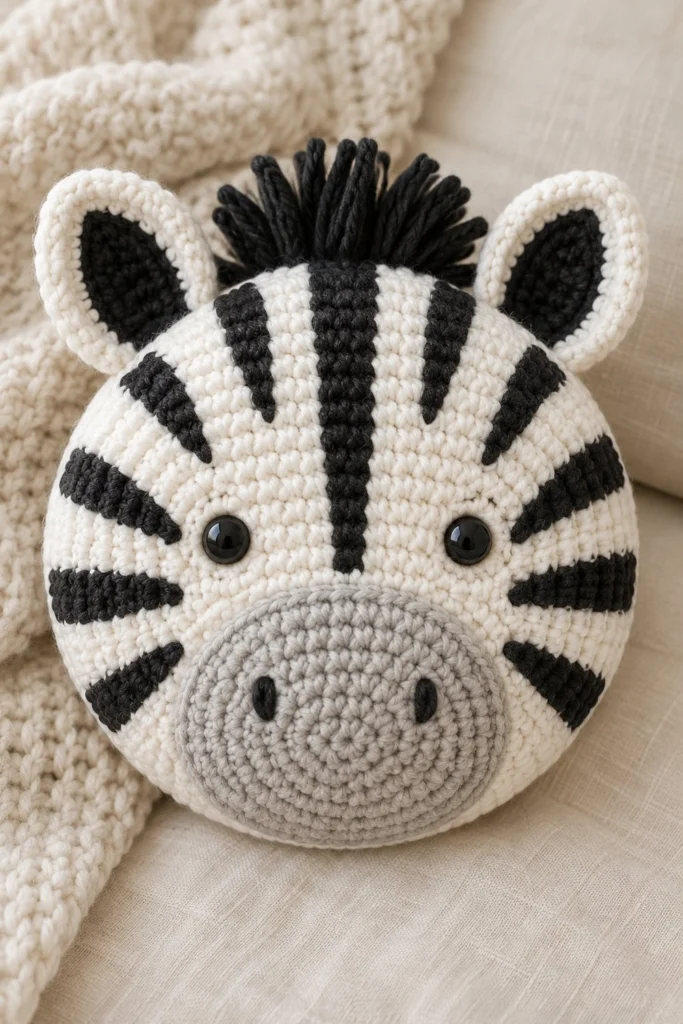
Bring a touch of the wild to your coffee table with this charming zebra coaster, featuring crisp black and white stripes and perky little ears. At 4 inches across, it protects surfaces while keeping your drink cozy, and it stitches up in just under an hour.
Quick Facts
| Skill level | Finished size | Yarn | Hook | Time |
|---|---|---|---|---|
| Easy-Intermediate | 4 in / 10 cm diameter | DK cotton (Cat. 3) | 3.5 mm (US E/4) | 45 minutes |
Materials You Will Need
- DK weight cotton yarn in White (approx. 12 grams, 25 metres)
- DK weight cotton yarn in Black (approx. 8 grams, 15 metres)
- 3.5 mm (US E/4) crochet hook
- Two 6 mm black safety eyes with washers
- Black embroidery floss for facial details
- Tapestry needle
- Scissors
- Stitch marker
Gauge
The first 3 rounds of the coaster base measure approximately 3.5 cm across. Working with a consistent, snug tension is more important than achieving an exact gauge, ensuring your coaster stays flat and sturdy.
Abbreviations (US Terms)
- ch = chain
- sc = single crochet
- hdc = half double crochet
- inc = increase (work 2 single crochets in the same stitch)
- dec = decrease (work 2 single crochets together through front loops)
- sl st = slip stitch
- st(s) = stitch(es)
- Rnd(s) = round(s)
- BLO = back loop only
UK terms: sc = dc, hdc = htr, dc = tr.
Pattern Notes
- The coaster base and muzzle are worked in continuous spiral rounds without joining, unless otherwise stated. Use a stitch marker to keep track of the first stitch of each round.
- Stitch counts are shown in brackets at the end of every round or row.
- When changing colours for the stripes on the coaster base, carry the unused yarn loosely across the back or weave it in as you go to avoid puckering.
Instructions
Coaster Base – White and Black, make 1
Rnd 1: With White, 6 sc in a magic ring (6)
Rnd 2: inc x 6 in White (12)
Rnd 3: (sc in next st, inc in next st) x 6, switching to Black in the final yarn-over of the last inc (18)
Rnd 4: With Black, sc in next st, inc in next st, (sc in next 2 sts, inc in next st) x 5, sc in last st, switching to White in the final st (24)
Rnd 5: With White, (sc in next 3 sts, inc in next st) x 6, switching to Black in the final st (30)
Rnd 6: With Black, sc in next 2 sts, inc in next st, (sc in next 4 sts, inc in next st) x 5, sc in last 2 sts, switching to White in the final st (36)
Rnd 7: With White, (sc in next 5 sts, inc in next st) x 6, switching to Black in the final st (42)
Rnd 8: With Black, sc in next 3 sts, inc in next st, (sc in next 6 sts, inc in next st) x 5, sc in last 3 sts, switching to White in the final st (48)
Rnd 9: With White, (sc in next 7 sts, inc in next st) x 6 (54)
Rnd 10: Sl st in next st to finish neatly. Fasten off, leave a 30 cm tail for weaving.
Muzzle – White, make 1
Rnd 1: 6 sc in a magic ring (6)
Rnd 2: inc x 6 (12)
Rnd 3: (sc in next st, inc in next st) x 6 (18)
Rnd 4: sc in all 18 sts around (18)
Rnd 5: Sl st in next st. Fasten off, leave a 20 cm tail for sewing.
Ears – Black, make 2
Rnd 1: 4 sc in a magic ring (4)
Rnd 2: (sc in next st, inc in next st) x 2 (6)
Rnd 3: (sc in next 2 sts, inc in next st) x 2 (8)
Rnd 4: (sc in next 3 sts, inc in next st) x 2 (10)
Rnd 5: sc in all 10 sts around (10)
Rnd 6: (sc in next 3 sts, dec) x 2 (8)
Fasten off, leave a 15 cm tail for sewing. Do not stuff ears.
Mane – Black, make 1
Row 1: Ch 11, working in the second ch from hook, sc in each ch across (10)
Fasten off, leave a 20 cm tail for sewing.
Assembly
Position the muzzle centrally on the lower half of the coaster base, aligning its top edge roughly at Rnd 6, and sew it securely around the perimeter using the yarn tail. Insert the two safety eyes through the white muzzle or just above it on Rnd 6 of the base, spacing them about 4 stitches apart, and secure the washers on the back. Sew the upright ears to the top edge of the coaster base at approximately Rnd 9, spacing them 5 stitches apart. Attach the mane horizontally along the very top centre edge between the ears. Using black embroidery floss, add two small horizontal slits for nostrils on the muzzle and several vertical stripe lines radiating outward on the face if desired.
Finishing
Weave in all remaining yarn ends securely on the wrong side of the coaster. Trim any loose strands. Lightly steam press the finished coaster with an iron on a low setting through a damp pressing cloth to ensure it lies completely flat.
Tip: When carrying yarn across the back for the stripes, make sure not to pull it too tight, otherwise your circular coaster will start to cup and curl.
Tips and Common Mistakes
- Do not overstuff the muzzle; it should remain relatively flat against the coaster face.
- Remember to switch your yarn colours on the final yarn-over of the previous stitch for clean line transitions.
- Count your stitches at the end of each round to ensure your circular base stays completely flat without rippling.
- Secure safety eye washers firmly before attaching parts to the coaster base.
Frequently Asked Questions
Can I use worsted weight yarn instead of DK?
Yes, you can substitute worsted weight yarn, but your finished coaster will turn out slightly larger and you may need to use a larger hook size, such as 4.0 mm.
How do I wash this coaster?
Hand wash gently in lukewarm water with mild soap, reshape while damp, and lay flat to dry completely.
Are safety eyes safe for a baby or toddler?
Safety eyes can present a choking hazard for children under three years old. For a younger child, embroider the eyes using black embroidery floss instead of using plastic safety eyes.
What is the best way to keep the colour changes tidy?
Drop the old colour to the back and pick up the new colour on the final pull-through of the stitch just before the colour block begins.
📄 Your free PDF pattern