











24. Hamster Coaster
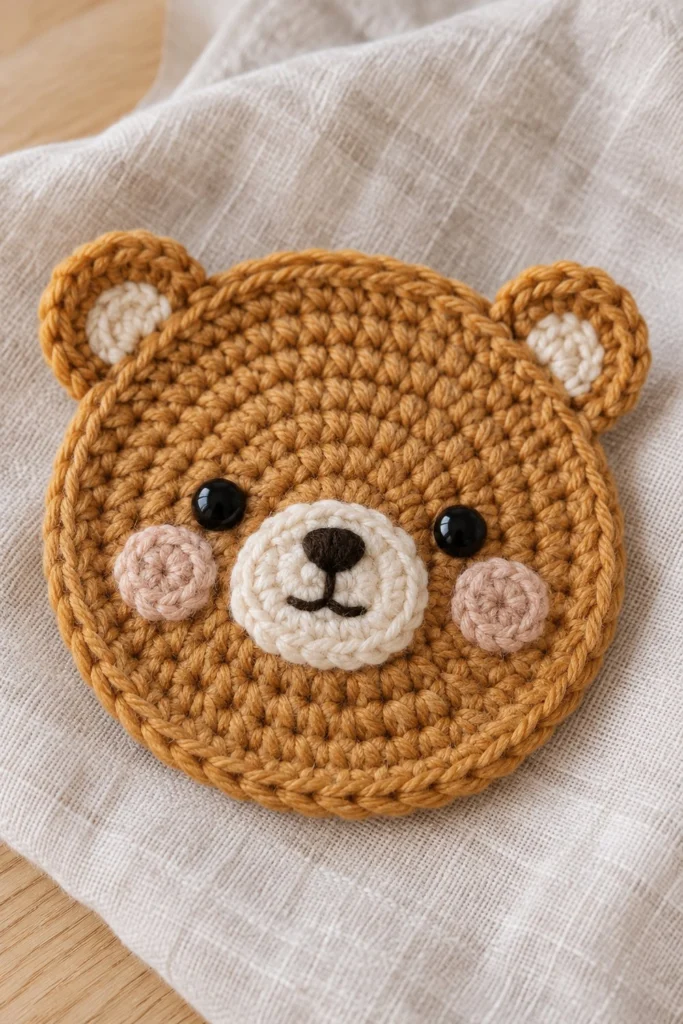
Stitch up the sweetest little companion for your desk or coffee table with this adorable crochet hamster coaster! Featuring chubby golden cheeks, delicate little ears, and a cute embroidered expression, this quick project brings warmth and charm to every cup of tea while keeping your surfaces protected.
Quick Facts
| Skill level | Finished size | Yarn | Hook | Time |
|---|---|---|---|---|
| Beginner | 4 in / 10 cm diameter | DK cotton (Cat. 3) | 3.5 mm (US E/4) | 35 minutes |
Materials You Will Need
- DK weight cotton yarn in Honey Gold (Color A, 15g / 35m)
- DK weight cotton yarn in Cream (Color B, 8g / 20m)
- DK weight cotton yarn scraps in Dark Brown or Black for embroidery
- 3.5 mm (US E/4) crochet hook
- Pair of 6 mm black safety eyes
- Yarn needle
- Stitch marker
Gauge
The first two rounds of the Coaster Base should measure about 2.5 cm across. Exact gauge is not critical for this project, but working with even, firm tension ensures your coaster lies flat and protects surfaces effectively against warm mugs.
Abbreviations (US Terms)
- ch: chain
- sc: single crochet
- hdc: half double crochet
- dc: double crochet
- sl st: slip stitch
- inc: single crochet increase (work 2 sc in the same stitch)
- st(s): stitch(es)
- Rnd(s): round(s)
- BLO: back loop only
UK terms: sc = dc, hdc = htr, dc = tr.
Pattern Notes
- Worked in continuous spiral rounds unless stated otherwise; do not join at the end of each round.
- Use a stitch marker to keep track of the first stitch of every round.
- The stitch count at the end of each round is shown in brackets like (12).
Instructions
Coaster Base – Honey Gold, make 1
Rnd 1: 6 sc in a magic ring (6)
Rnd 2: inc x 6 (12)
Rnd 3: (sc in next st, inc) x 6 (18)
Rnd 4: (sc in next 2 sts, inc) x 6 (24)
Rnd 5: (sc in next 3 sts, inc) x 6 (30)
Rnd 6: (sc in next 4 sts, inc) x 6 (36)
Rnd 7: (sc in next 5 sts, inc) x 6 (42)
Rnd 8: (sc in next 6 sts, inc) x 6 (48)
Fasten off, weave in ends neatly.
Cheek Patches – Cream, make 2
Rnd 1: 6 sc in a magic ring, sl st to first st to join (6)
Fasten off, leave a 20 cm tail for sewing.
Ears – Honey Gold, make 2
Rnd 1: 5 sc in a magic ring (5)
Rnd 2: inc x 5 (10)
Fasten off, leave a 20 cm tail for sewing.
Assembly
Position the two Cream cheek patches on the lower half of the Coaster Base, side by side just below the horizontal center line, and sew them securely in place. Insert the 6 mm safety eyes centered right above the top edge of each cream cheek patch, spaced about 4 stitches apart. Attach the ears to the top rim of the Coaster Base, approximately 5 stitches apart from each other, angled slightly outward. Using dark brown yarn and a yarn needle, embroider a small upside-down triangle nose between the eyes and a tiny smiling mouth underneath.
Finishing
Check all yarn tails on the back of the coaster and weave them in securely. Trim any excess yarn. If the coaster curves slightly after sewing and embroidering, lightly steam press it under a damp pressing cloth to flatten.
Tip: Pressing the finished coaster lightly with a warm iron over a damp cloth gives it a crisp, professional finish that lies completely flat under mugs.
Tips and Common Mistakes
- Count your stitches at the end of every round to avoid accidental increases or decreases that cause the base to cup or ruffle.
- Do not over-pull your embroidery stitches, as this can pull the cotton fabric of the coaster out of shape.
- Make sure safety washers are pressed on firmly if this is for an adult setting, or switch to embroidered eyes if gifting to a small child.
- Use mercerized cotton for a smoother finish that resists staining and wipes clean easily.
Frequently Asked Questions
Can I use acrylic yarn instead of cotton?
Yes, you can use acrylic yarn, but cotton is recommended because it is more absorbent, resists heat better, and provides a sturdier flat surface for cups.
How do I wash my crochet coaster?
Spot clean with mild soap and warm water, or hand wash gently and lay flat to dry in its original shape.
Can I make this coaster larger?
Yes, simply continue the circular increase pattern by adding 6 stitches per round until you reach your desired mug rug size.
What can I use instead of safety eyes for a baby-safe item?
Embroider the eyes using black embroidery floss with French knots or small straight stitches to ensure the item is entirely safe for young children.
📄 Your free PDF pattern