












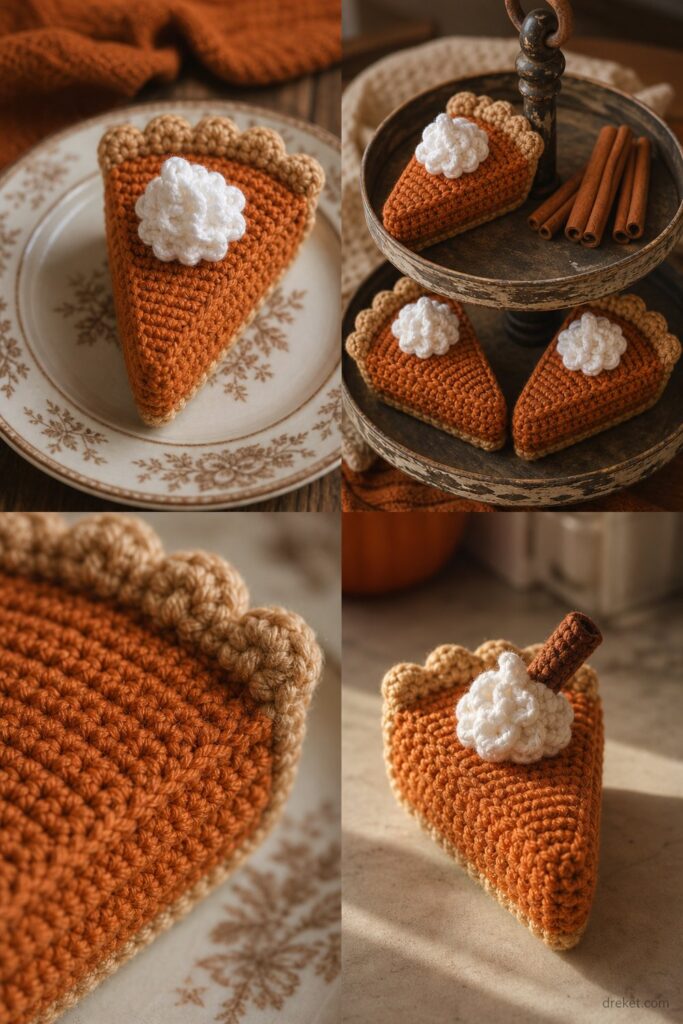
Bring the cozy, nostalgic charm of autumn straight to your home decor with a handcrafted amigurumi treat that looks good enough to eat. This delightful crocheted pie slice features a rich cinnamon-orange filling, a textured tan scalloped crust, and a plush white loop-stitch dollop of whipped cream on top.
The Sweet Cinnamon Pumpkin Pie Slice is an intermediate-level amigurumi project that combines shaping, simple texture work, and a playful loop-stitch technique. Stitches used include single crochet, half double crochet, picot stitches for the crust ridges, and loop stitches for the cream dollop. Designed as a single wedge amigurumi, it takes about 3 to 4 hours to complete from start to finish. It makes a wonderful autumn centerpiece, Thanksgiving table favor, or a heartfelt handmade gift for bakeries, coffee lovers, and autumn enthusiasts.
Sizing customization tips are included later in the pattern for those who wish to scale the wedge up or down.
What Makes This Sweet Cinnamon Pumpkin Pie Slice Special
This amigurumi pie slice achieves its remarkably realistic three-dimensional texture through a clever combination of shaping and stitch choices. The filling is worked in dense single crochet to hold its wedge geometry without collapsing, while the back edge features distinct picot-stitch ridges that mimic a hand-crimped pastry crust. Perched atop the wedge is a cloud of snowy white loop stitches that form a tactile, dimensional whipped cream dollop with a tiny peek-a-boo cinnamon stick accent. Working in the back loops only (BLO) on select rows creates crisp structural folding lines that give the slice its clean triangular side panels.
Skill Level
Intermediate
- Working in the round and in rows
- Basic amigurumi shaping and assembly (seaming wedges)
- Picot stitch technique for crust texture
- Loop stitch (or alternative textured loop method) for whipped cream
- Managing multiple yarn colors across small components
💡 Designer Tip: If you are new to the loop stitch, practice a small swatch of loops on a scrap piece of yarn before starting the whipped cream dollop to ensure an even, plush texture.
Finished Measurements
| Measurement | Inches | Centimeters |
|---|---|---|
| Slice Length (Front to Tip) | 6.5 in | 16.5 cm |
| Slice Width (Back Crust) | 4.5 in | 11.4 cm |
| Slice Height (Max at Crust) | 3.5 in | 8.9 cm |
Materials You Will Need
| Item | Details |
|---|---|
| Yarn Weight | Worsted Weight / Aran (4-ply) |
| Hook Size | US G/6 (4.0 mm) crochet hook |
| Color A (Cinnamon-Orange) | Approx. 65 yards (Filling) |
| Color B (Tan / Crust) | Approx. 35 yards (Crust and Base) |
| Color C (White / Cream) | Approx. 15 yards (Whipped Cream Dollop) |
| Color D (Dark Brown / Cinnamon Stick) | Approx. 5 yards (Mini Cinnamon Stick) |
| Notions | Polyfill stuffing, tapestry needle, stitch markers, scissors |
Yarn Suggestions
| Yarn Brand & Line | Weight | Yardage per Skein | Notes |
|---|---|---|---|
| Lion Brand Vanna’s Choice | Worsted (4) | 145 yards / 133 m | Excellent stitch definition, holds firm amigurumi angles well. |
| Red Heart Super Saver | Worsted (4) | 236 yards / 215 m | Budget-friendly with a huge color range for exact matching. |
| Caron Simply Soft | Worsted (4) | 315 yards / 288 m | Softer hand feel; note that it creates a slightly drapier fabric. |
⚠️ Note: Avoid novelty fuzzy or eyelash yarns for the filling and crust, as they obscure the stitch definition needed for the pie’s geometric shape.
Gauge
| Gauge Type | Measurement |
|---|---|
| Single Crochet Gauge | 16 sts x 18 rows = 4 inches (10 cm) using a 4.0 mm hook |
⚠️ Note: Gauge is not strictly critical for amigurumi, but matching the tight gauge ensures your stuffing does not peek through the stitches. Take time to check your tension.
Abbreviations
| Abbreviation | Full Term |
|---|---|
| ch | Chain |
| sc | Single crochet |
| hdc | Half double crochet |
| sl st | Slip stitch |
| blo | Back loop only |
| flo | Front loop only |
| inc | Increase (work 2 sc in the same stitch) |
| dec | Decrease (sc 2 stitches together) |
| picot | Ch 3, sl st in the 3rd ch from hook |
| loop-st | Loop stitch (detailed in Special Stitches) |
| st(s) | Stitch(es) |
| FO | Fasten off |
Special Stitches Explained
- Picot Stitch: Ch 3, insert hook into the 3rd chain from the hook, yarn over, pull through both the chain and the loop on your hook. This creates a crisp little point used along the crust edge.
- Loop Stitch (loop-st): Insert hook into next st, wrap working yarn around your index finger (at the back of your work) to form a loop of desired height, insert hook under both strands of that loop, yarn over, pull up a loop, yarn over, and pull through both loops on the hook.
- Invisible Decrease (inv-dec): Insert hook into the front loop only of the next stitch, then immediately insert hook into the front loop only of the following stitch. Yarn over and pull through both front loops, yarn over and pull through remaining two loops on hook.
Pattern Instructions
Section 1: Pie Filling (Wedge Body)
Using Color A (Cinnamon-Orange) and a 4.0 mm hook. You will work the wedge from the curved back crust edge tapering down to the front tip, or construct two triangular side panels and a top/bottom panel. For this seamless construction, we work in flat rows forming the wedge profile.
Row 1: Ch 2, working into the 2nd ch from hook, work 2 sc. Ch 1, turn. (2 sc)
Row 2: Inc in each st across. Ch 1, turn. (4 sc)
Row 3: Inc, sc 2, inc. Ch 1, turn. (6 sc)
Row 4: Inc, sc 4, inc. Ch 1, turn. (8 sc)
Row 5: Inc, sc 6, inc. Ch 1, turn. (10 sc)
Rows 6–20: Continue in this pattern, adding 2 sts per row (one inc at each end) until you reach (40 sc) at the end of Row 20. FO Color A. Make two identical triangular filling panels (top and bottom), plus rectangular side gussets.
✅ Checkpoint: You should have two matching triangular flat pieces measuring approximately 6.5 inches along the long sides.
Section 2: Crust Edge and Assembly
Using Color B (Tan), attach yarn to the curved back edge of the top wedge panel.
Row 1: Work sc evenly along the entire curved back edge of the pie slice, incorporating a picot stitch every 4th stitch to create the crimped pastry crust effect. FO.
Repeat the crust edging on the second panel.
Align the top and bottom filling panels with a thin side gusset piece between them. Join with Color A or Color B by single crocheting through both layers around the outer perimeter, stuffing firmly with polyfill before closing the final opening completely. FO and weave in all ends.
Section 3: Whipped Cream Dollop
Using Color C (White) and a 4.0 mm hook.
Round 1: Magic ring, work 6 sc into ring, join with sl st to first sc. (6 sc)
Round 2: Work loop-st in each st around. (6 loop-st)
Round 3: (Loop-st, inc in loop-st) repeat around. (9 loop-st)
Rounds 4–5: Work loop-st in each st around. (9 loop-st)
Round 6: (Loop-st, dec) repeat around. (6 loop-st)
Stuff lightly with polyfill. FO, leaving a long tail for sewing. Sew the whipped cream dollop securely to the top-center back of the pie slice.
Section 4: Mini Cinnamon Stick
Using Color D (Dark Brown) and a 4.0 mm hook.
Row 1: Ch 8, sc in 2nd ch from hook and across. Ch 1, turn. (7 sc)
Row 2: Working in blo, sc across. FO, leaving a long tail. (7 sc)
Roll the strip tightly into a cylinder shape to resemble a rolled cinnamon stick, whip stitch the seam closed, and stitch it securely into the side of the white whipped cream dollop.
Size Customization Tips
- Scaling Up: To make a larger statement pie pillow, use bulky weight yarn (Weight 5 or 6) with a corresponding 6.0 mm or 8.0 mm hook, and continue the wedge increase rows for 10 additional rows. This will increase the slice length by approximately 3 inches.
- Scaling Down: To create miniature pie slice stitch markers or keychain charms, use fingering weight yarn (Weight 1) with a 2.0 mm hook, stopping the wedge increase rows at Row 10.
Care Instructions
Hand wash gently in cool water with mild wool detergent. Do not wring or twist. Reshape the pie wedge carefully while damp and allow it to dry flat on a clean towel away from direct sunlight. Do not machine dry.
Thank you so much for joining me in making this cozy autumn treat! I hope your crochet hook brought a little extra warmth and sweetness to your crafting space today.
If you make your own Sweet Cinnamon Pumpkin Pie Slice, please share your creation with me! Tag me on social media using #SweetCinnamonPieCrochet so I can admire your beautiful stitches. Be sure to save this pattern to your favorite Pinterest crochet boards for easy reference, and leave a comment below to let me know how your baking—er, crocheting—went!
📄 Your free PDF pattern