











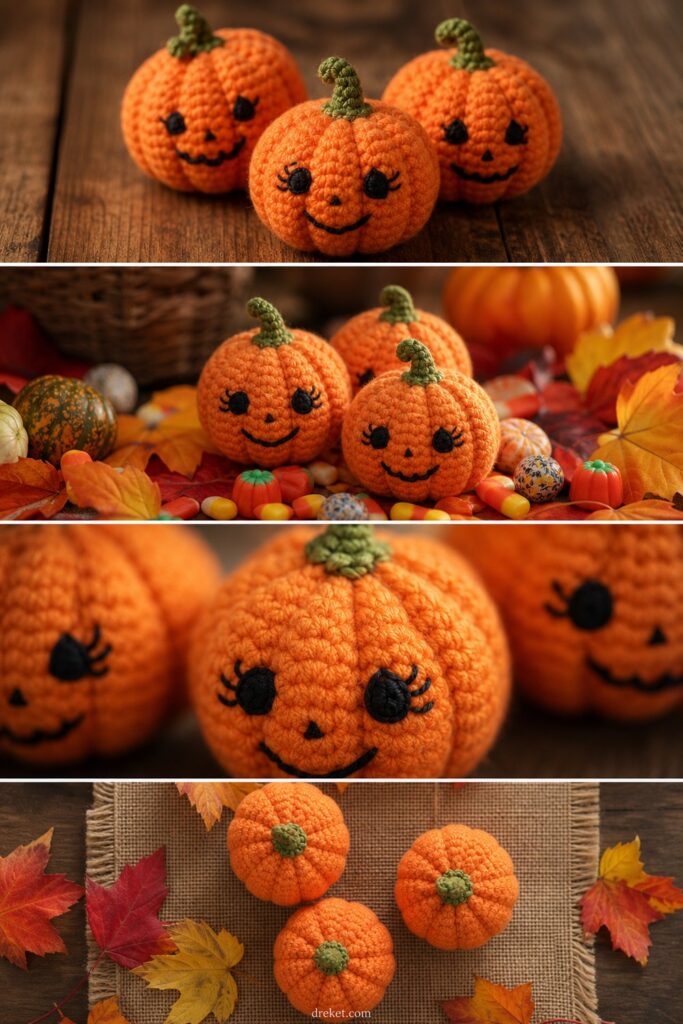
Bring the cozy charm of an autumn afternoon right to your craft table with a cluster of handmade autumn decor. These adorable little plushies capture the magic of the harvest season, resting comfortably among faux candy and crisp foliage while catching the warm afternoon light.
The Spooky Cute Pumpkin Amigurumi is worked primarily in the round using basic single crochet stitches, finished with a cinched-rib effect and surface embroidery for facial features. Sized as a small handheld decorative piece, this project takes about 2 to 3 hours to complete from start to finish. It makes an incredible hostess gift, autumn party favor, or sweet seasonal display piece for your mantel.
💡 Designer Tip: Sizing customization tips are included later in the pattern to help you create an entire patch of varying gourds.
What Makes This Spooky Cute Pumpkin Amigurumi Special
This design relies on clever shaping and surface manipulation to achieve its signature look. Instead of simple vertical seaming, we use post-stitches and long cinching pulls worked from top to bottom through the core of the amigurumi. This creates deep, authentic pumpkin ridges that showcase the tactile texture of plush cotton yarn. Combined with minimalist, hand-stitched jack-o-lantern expressions, the result is an heirloom-quality piece that avoids a plastic or overly smooth look, leaning entirely into handcrafted rustic charm.
Skill Level
- Skill Level: Easy / Advanced Beginner
- Required Skills:
- Working in the round (magic ring)
- Basic single crochet (sc) and increasing/decreasing (inc, dec)
- Front post double crochet (fpdc) for textural ribbing
- Surface slip stitching and basic embroidery (French knots and straight stitches)
⚠️ Note: If you are comfortable working continuous rounds and basic shaping, you will breeze through this project!
Finished Measurements
| Size Option | Circumference (Inches) | Height (Inches) | Circumference (CM) | Height (CM) |
|---|---|---|---|---|
| Standard Small | 9.0 in | 3.5 in | 22.8 cm | 8.9 cm |
Materials You Will Need
- Yarn Weight: Sport / Light DK (or plush cotton equivalent)
- Hook Size: US C/2 (2.75 mm) or D/3 (3.25 mm) depending on tension
- Notions: Polyfill stuffing, yarn needle, stitch markers, black embroidery floss, sharp embroidery needle
| Color Name / Description | Yarn Weight | Yardage Needed |
|---|---|---|
| Bright Orange | Sport / Plush Cotton | 45 yds (41 m) |
| Olive Green | Sport / Plush Cotton | 10 yds (9 m) |
| Charcoal Black (for face) | Embroidery Floss / Fingering | 3 yds (3 m) |
Yarn Suggestions
| Brand & Line Name | Yarn Weight | Skein Yardage | Notes |
|---|---|---|---|
| Hobbii Rainbow Cotton 8/8 | DK (3) | 82 yds / 50g | Exceptional stitch definition; highly recommended. |
| Schachenmayr Catania | Sport (2) | 137 yds / 50g | Smooth mercerized cotton for a crisp, clean finish. |
| Drops Muskat | DK (3) | 109 yds / 50g | Gorgeous subtle sheen and wonderful plush density. |
⚠️ Note: Avoid overly fuzzy novelty acrylic yarns for this project, as they obscure the structural post-stitch ridges and make facial embroidery difficult.
Gauge
| Measurement Type | Stitch / Row Count | Over Area |
|---|---|---|
| Single Crochet Gauge | 22 sts x 24 rows | 4 inches x 4 inches (10 cm x 10 cm) |
💡 Designer Tip: Be sure to swatch first and work your stitches tightly so that the polyfill stuffing does not peek through the gaps.
Abbreviations
| Abbreviation | Full Meaning |
|---|---|
| ch | chain |
| sc | single crochet |
| inc | increase (work 2 sc in the same stitch) |
| dec | invisible decrease (sc 2 stitches together) |
| fpdc | front post double crochet |
| sl st | slip stitch |
| st(s) | stitch(es) |
| Rnd(s) | Round(s) |
| FO | fasten off |
Special Stitches Explained
- Invisible Decrease (inv-dec): Insert hook into the front loop only of the next stitch, then insert hook into the front loop only of the following stitch (3 loops on hook). Yarn over and draw through the first two loops on hook, yarn over and draw through remaining two loops.
- Front Post Double Crochet (fpdc): Yarn over, insert the hook from the front to the back to the front around the post of the indicated stitch from the previous row, yarn over, pull up a loop, (yarn over and draw through 2 loops) twice.
- Deep Pull Cinch: Using a long length of matching yarn and a darning needle, enter through the bottom center of the stuffed pumpkin, pull up through the top center, and draw tightly down the outside groove back to the bottom. Repeat around the circumference to form the distinct pumpkin lobes.
Pattern Instructions
### Section 1: Pumpkin Body (Bright Orange)
Worked in continuous spirals from the bottom up. Do not join rounds unless specified.
- Rnd 1: Magic ring, work 6 sc into the ring. (6 sts)
- Rnd 2: inc in each st around. (12 sts)
- Rnd 3: (sc 1, inc) 6 times. (18 sts)
- Rnd 4: (sc 2, inc) 6 times. (24 sts)
- Rnd 5: (sc 3, inc) 6 times. (30 sts)
- Rnd 6: (sc 4, inc) 6 times. (36 sts)
- Rnd 7: (sc 5, inc) 6 times. (42 sts)
- Rnd 8: (sc 6, inc) 6 times. (48 sts)
- Rnds 9–18: sc in each st around. (48 sts)
- Rnd 19: (sc 6, dec) 6 times. (42 sts)
- Rnd 20: (sc 5, dec) 6 times. (36 sts)
- Rnd 21: (sc 4, dec) 6 times. (30 sts)
✅ Checkpoint: At this stage, pause to embroider your spooky-cute facial features (eyes and mouth) using black embroidery floss across Rnds 12–15 before the opening becomes too narrow. Stuff the pumpkin firmly with polyfill.
- Rnd 22: (sc 3, dec) 6 times. (24 sts)
- Rnd 23: (sc 2, dec) 6 times. (18 sts)
- Rnd 24: (sc 1, dec) 6 times. (12 sts)
- Rnd 25: dec 6 times. (6 sts)
- FO, leaving a long tail of roughly 24 inches for cinching and shaping. Weave tail through remaining front loops and pull tight to close.
### Section 2: Stem (Olive Green)
- Rnd 1: Magic ring, work 5 sc into the ring. (5 sts)
- Rnd 2: inc, sc 4. (6 sts)
- Rnds 3–5: sc in each st around. (6 sts)
- FO, leaving a long tail for sewing. Stuff lightly if desired.
### Section 3: Assembly & Shaping
- Take your long orange yarn tail from the body and thread it onto your tapestry needle.
- Insert the needle from the bottom center hole straight through to the top center hole, pulling firmly to indent the top and bottom of the pumpkin slightly.
- Wrap the yarn vertically down the outside of the pumpkin to the bottom, inserting the needle back through the core to create your first ridge indentation. Repeat this step 5 to 6 evenly spaced times around the circumference to form the classic pumpkin lobes. Securely knot and weave in all ends.
- Sew the Olive Green stem securely to the top center depression of the pumpkin.
Size Customization Tips
- Sizing Up: To make a larger statement pumpkin, continue your increase rounds up to Rnd 11 (sc 9, inc = 72 sts), work straight rounds for 14 rows, and then mirror your decrease sequence. This will increase the final circumference by approximately 4 inches (10 cm).
- Sizing Down: Stop increase rounds at Rnd 5 (sc 3, inc = 30 sts), work straight rounds for 6 rows, and decrease down. This yields a miniature, acorn-sized gourd perfect for dollhouses or autumn table scatter.
Care Instructions
Spot clean gently with a damp cloth and mild soap. Do not submerge completely in water if stuffed with standard polyfill, and do not machine wash or tumble dry to preserve the tight tension of your stitches and the integrity of the embroidered facial features.
Thank you so much for crafting along with me! I hope your autumn decor is looking wonderfully spooky and cozy.
Be sure to snap a photo of your finished pumpkin patch, tag me on social media, save this project to your favorite autumn boards on Pinterest, and leave a comment below to let me know how your creation turned out! Happy crocheting!
📄 Your free PDF pattern