












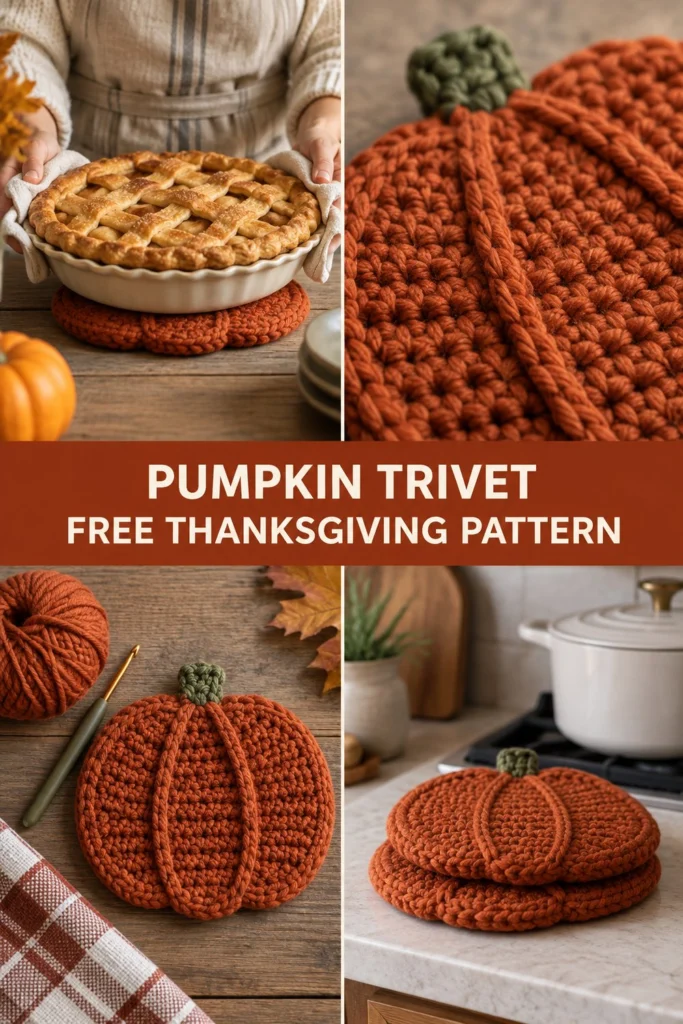
Bring warm autumn style to your kitchen table while protecting your surfaces with this gorgeous double-thick crochet pumpkin trivet. Worked in durable 100% cotton yarn with raised front post accent lines and a sweet hanging stem, it makes a wonderful seasonal decor piece or a thoughtful hostess gift when paired with a freshly baked pie.
Quick Facts
- Skill level: Intermediate
- Finished size: Approximately 10 inches (25.5 cm) wide by 9 inches (23 cm) tall (including the stem)
- Yarn: 100% Combed Cotton Aran / Worsted Weight (approx. 150 yards / 137 meters total)
- Hook: US H/8 (5.0 mm) crochet hook
- Stitches used: ch, sl st, sc, hdc, dc, fpdc, inc, dec
- Time to make: 2 to 3 hours
💡 Designer Tip: Size tips and gauge adjustments are included further down to help you customize your trivet for larger serving dishes.
What Makes This Crochet Pumpkin Trivet Special
This functional fall decor project uses a double-thick construction method to ensure maximum heat protection for your dining table and countertops. The iconic pumpkin ridges are created using front post double crochet stitches worked over previous rounds, giving the piece a rich, tactile texture that closely resembles a real heirloom pumpkin. The integrated stem doubles as a convenient hanging loop so you can display your seasonal kitchen makes when not in use.
Skill Level
- Working in the round and flat
- Basic increasing and decreasing
- Working around front posts (FPdc)
- Seaming and weaving in ends
💡 Reassurance: If you know how to make a basic flat circle and work a front post stitch, you have all the skills needed to complete this project successfully!
Finished Measurements
| Dimension | Inches | Centimeters |
|---|---|---|
| Width (Widest Point) | 10.0 in | 25.5 cm |
| Height (Base to Stem Tip) | 9.0 in | 23.0 cm |
| Thickness | 0.5 in | 1.3 cm |
Materials You Will Need
| Material / Color | Fiber & Weight | Quantity | Yardage / Meters |
|---|---|---|---|
| Pumpkin Orange | 100% Cotton, Aran / Worsted | 1 Ball / Skein | 130 yds / 119 m |
| Olive Green | 100% Cotton, Aran / Worsted | 1 Small Scrap | 20 yds / 18 m |
- Hook: US H/8 (5.0 mm) crochet hook
- Notions: Tapestry needle for weaving ends, locking stitch markers, scissors
Yarn Suggestions
| Yarn Line | Weight | Skein Yardage | Notes |
|---|---|---|---|
| Lily Sugar’n Cream | Worsted / Aran (4) | 120 yds / 109 m per 71g | Excellent stitch definition, wide color range |
| Knit Picks Dishie | Worsted / Aran (4) | 190 yds / 174 m per 100g | Smooth tightly-spun plies, great durability |
| Lion Brand 24/7 Cotton | Worsted / Aran (4) | 186 yds / 170 m per 100g | Mercerized sheen, wonderful structure |
⚠️ Note: Always use 100% cotton yarn for hot pads, trivets, and kitchen accessories. Acrylic, polyester, and wool yarns can melt, scorch, or transfer heat to surfaces when exposed to hot casserole dishes and pie pans.
Gauge
- 14 sc and 16 rows = 4 inches (10 cm) using a 5.0 mm hook.
- Circle Check: Rnds 1 to 5 of the flat pumpkin body should measure approximately 4 inches (10 cm) across.
Abbreviations
- approx: approximately
- beg: beginning
- ch: chain
- dec: decrease (single crochet two together)
- fpdc: front post double crochet
- hdc: half double crochet
- inc: increase (work two single crochet in the same stitch)
- rep: repeat
- rnd(s): round(s)
- sc: single crochet
- sl st: slip stitch
- st(s): stitch(es)
- […]: work instructions within brackets as directed
Note for UK / Commonwealth crafters: US single crochet (sc) = UK double crochet (dc); US half double crochet (hdc) = UK half treble crochet (htr); US double crochet (dc) = UK treble crochet (treble).
Special Stitches Explained
- Magic Ring: Wrap yarn around your index finger twice to form a loose loop. Insert hook into the center of the loop, pull up a loop, ch 1, and work the first round of stitches directly into the ring. Pull the tail end firmly to close the center hole.
- Front Post Double Crochet (FPdc): Yarn over, insert hook from front to back to front around the post of the specified stitch from the row below, yarn over, pull up a loop, [yarn over, pull through 2 loops] twice.
- Invisible Decrease (inv-dec): Insert hook into the front loop only of the next two stitches, yarn over, pull through both front loops, yarn over, and pull through remaining two loops on hook.
Pattern Instructions
Pattern Notes
- Work in continuous spirals for the main body unless otherwise indicated; do not join rounds with a slip stitch unless specified. Use a stitch marker to track the first stitch of each round.
- The trivet is worked as two identical front and back panels, which are then seamed together around the outer edge to provide double-thick heat insulation.
Section 1: Pumpkin Body Panels (Orange, Make 2)
Rnd 1: Start 6 sc in a magic ring (6 sc).
Rnd 2: [Inc] x 6 (12 sc).
Rnd 3: [1 sc, inc] x 6 (18 sc).
Rnd 4: [2 sc, inc] x 6 (24 sc).
Rnd 5: [3 sc, inc] x 6 (30 sc).
Rnd 6: [4 sc, inc] x 6 (36 sc).
Rnd 7: [5 sc, inc] x 6 (42 sc).
Rnd 8: [6 sc, inc] x 6 (48 sc).
Rnd 9: [7 sc, inc] x 6 (54 sc).
Rnd 10: [8 sc, inc] x 6 (60 sc).
Rnd 11: [9 sc, inc] x 6 (66 sc).
Rnd 12: [10 sc, inc] x 6 (72 sc).
Sl st to the first st to join. Fasten off on the first panel, leaving a 24-inch (60 cm) tail for assembly. Do not fasten off the second panel; you will use its working yarn to join both panels together.
Section 2: Raised Segment Lines (Front Panel Only)
Using the remaining tail on the front panel (or a separate strand of orange), surface-sl-st or embroider vertical segment lines running from Rnd 12 down to Rnd 2, dividing the circle evenly into 6 equal sections to match the reference photos. Alternatively, you can work raised FPdc ridges directly onto the front panel by working a round of surface posts aligned with Rnds 2 through 12.
Section 3: Stem (Green)
Row 1: Leaving a 6-inch starting tail, ch 6, sc in 2nd ch from hook and in each ch across, turn (5 sc).
Row 2: Ch 1, sc in each st across, turn (5 sc).
Row 3: Ch 1, [sc, dec, 2 sc], turn (4 sc).
Row 4: Ch 1, sc in each st across (4 sc).
Fasten off, leaving a 12-inch tail for sewing. Fold the stem rectangular piece in half lengthwise and whipstitch the side edges together to form a small green cylinder.
Section 4: Assembly & Joining
- Place the front and back panels wrong sides together, sandwiching them so the textured front faces outward.
- Insert your hook through both corresponding stitches of the front and back panels. Using the working yarn left attached to the second panel, work sc all the way around the outer perimeter edge to join both layers together (72 sc).
- At the top center of the pumpkin, insert the base of the green stem between the two panels, and crochet right through the base of the stem to anchor it securely during the final edge-joining stitches.
- Sl st to the first sc, fasten off, and weave in all loose ends inside the trivet sandwich.
✅ Checkpoint: Your finished trivet should measure 10 inches across, lie completely flat without curling, and feature a sturdy double-layer thickness with the green stem securely attached at the top center.
Size Customization Tips
- To make a larger trivet: Continue working circular increase rounds (adding 6 stitches per round: e.g., [11 sc, inc] x 6 for Rnd 13, [12 sc, inc] x 6 for Rnd 14) until your desired width is reached. Remember to increase the matching back panel and border stitch count accordingly.
- To make a smaller mug rug: Stop increase rounds at Rnd 7 (42 sc) for a cute 6-inch coaster version.
Care Instructions
- Machine wash gentle in cold water with mild detergent.
- Reshape while damp and lay flat to dry completely on a towel.
- Do not bleach or iron directly to preserve stitch texture.
FAQ
Can I use acrylic yarn instead of cotton for this trivet?
No, acrylic and polyester yarns melt under high heat and will not protect your tables from hot casserole dishes or baking pans. Always use 100% natural cotton for kitchen items that contact hot cookware.
How do I prevent my circular crochet panel from curling into a bowl shape?
Curling usually happens when stitches are worked too tightly or when increase spacing is missed. Make sure your tension remains even, and verify that you are adding exactly 6 evenly spaced increases per round.
Can I sell items made from this free crochet pattern?
Yes! You are welcome to sell finished items made from this pattern, provided you give design credit to Luna Crochet. Mass production and copying of this written text or photos are prohibited.
Happy Crocheting!
I hope you love making your new harvest pumpkin trivet as much as I did designing it for your Thanksgiving table. Be sure to save this pin on Pinterest to your Fall Crochet boards, and leave a comment below to share what color pumpkin you decided to make!
📄 Your free PDF pattern