











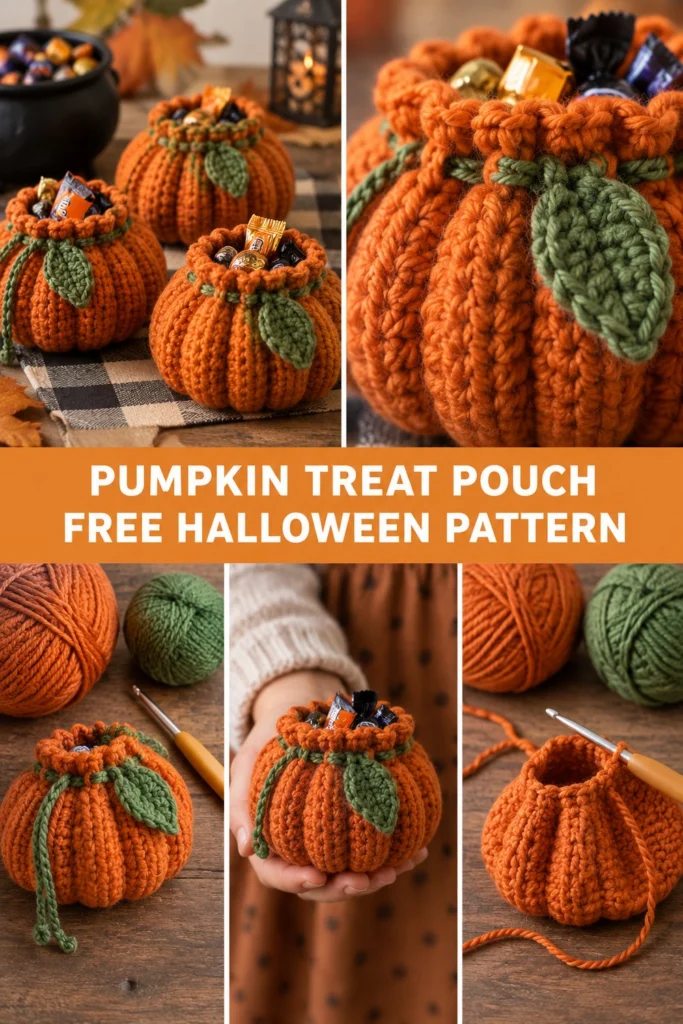
These sweet little pumpkin pouches make the most charming autumn decorations, party favors, or trick-or-treat carriers! Today, I am excited to share how you can crochet your very own batch using simple ribbed panels and a clever drawstring stem.
Quick Facts
- Skill level: Easy
- Finished size: Approximately 4.5 inches (11.5 cm) wide by 4 inches (10 cm) tall (excluding stem)
- Yarn: Worsted weight (Category 4) yarn in pumpkin orange and leaf green
- Hook: 4.0 mm (US G/6) crochet hook
- Stitches used: ch, sc, hdc, sl st, BLO (back loop only)
- Time to make: 2 to 3 hours per pouch
Size customization tips are included further down the page to help you scale your pouches up or down.
What Makes This Pumpkin Treat Pouch Special
This crochet pumpkin pouch uses a textured ribbed panel worked in back loop only (BLO) rows to create vertical pumpkin ridges. Once the rectangular panel is seamed into a tube and gathered at the bottom, it immediately takes on a plump 3柏 shape. A clever green drawstring threaded through the top round closes the pouch securely while forming a cute little stem and leaf accent.
Skill Level
- Basic crochet stitches (chain, single crochet, slip stitch)
- Working in rows and continuous rounds
- Working in the back loop only (BLO) to create ribbed texture
- Basic assembly and weaving in ends
Don’t worry if you are new to shaping amigurumi-style items; I will guide you step by step through every stage of the process!
Finished Measurements
| Measurement | Inches | Centimeters |
|---|---|---|
| Width (at widest point) | 4.5 in | 11.5 cm |
| Height (excluding stem) | 4.0 in | 10 cm |
| Opening Diameter | 2.5 in | 6.5 cm |
Materials You Will Need
| Material | Details | Quantity |
|---|---|---|
| Orange Yarn | Worsted weight (Category 4) | 65 yards / 60 meters |
| Green Yarn | Worsted weight (Category 4) | 15 yards / 14 meters |
| Crochet Hook | 4.0 mm (US G/6) | 1 hook |
| Notions | Yarn needle, scissors, stitch markers | As needed |
| Filling (Optional) | Small candies or polyfill | A handful |
Yarn Suggestions
| Yarn Name | Weight | Skein Yardage | Notes |
|---|---|---|---|
| Lion Brand Vanna’s Choice | Worsted (4) | 170 yds / 156 m | Great stitch definition for ribbed pumpkins |
| Red Heart Super Saver | Worsted (4) | 364 yds / 333 m | Durable and holds its shape wonderfully |
| Caron Simply Soft | Worsted (4) | 315 yds / 288 m | Beautiful sheen and soft texture |
⚠️ Note: Avoid extremely fuzzy or novelty eyelash yarns for the main pumpkin body, as they will obscure the ribbed stitch texture and make it difficult to see your stitches.
Gauge
- 16 sts x 16 rows = 4 inches (10 cm) in single crochet BLO.
- Note: Exact gauge is not critical for this project, but maintaining a firm, even tension ensures your pouch holds its shape and keeps candy secure inside.
Abbreviations
- ch: chain
- sc: single crochet
- hdc: half double crochet
- sl st: slip stitch
- BLO: back loop only
- st(s): stitch(es)
- rep: repeat
- rnd(s): round(s)
- row(s): row(s)
- sk: skip
- inc: increase (work 2 sc in same st)
- dec: decrease (work 2 sc together)
UK terminology note: UK sc = US dc, UK hdc = US tr, UK dc = US dtr. This pattern uses standard US terminology.
Special Stitches Explained
- Single Crochet in Back Loop Only (sc BLO): Insert your hook under the back loop only of the specified stitch, yarn over, pull up a loop, yarn over, and pull through both loops on the hook. This creates a prominent horizontal ridge when worked in rows.
- Magic Ring: A circular starting method that allows you to pull the center completely closed. Wrap yarn around your index finger twice, insert hook under loops, pull up a loop, ch 1, and work your first round of stitches into the ring.
Pattern Instructions
💡 Designer Tip: Use a stitch marker at the start of every round when working in continuous rounds to keep your place easily.
Section 1: Pumpkin Body Panel (Orange, make 1)
The pumpkin body is worked flat in rows using back loop only single crochets to create the vertical ribbed texture, then seamed into a tube.
- Row 1: Ch 21, working in 2nd ch from hook, sc in each ch across, turn (20 sc)
- Row 2: Ch 1, working in BLO, sc in each st across, turn (20 sc)
- Rows 3 to 36: Rep Row 2 (20 sc per row)
Fasten off orange yarn, leaving a long 12-inch (30 cm) tail for seaming. Bring the short ends of your rectangular panel together (Row 1 to Row 36) and seam them using your yarn needle with a mattress stitch to form a seamless tube.
Section 2: Gathering the Base (Orange)
- Rnd 1: Thread your long orange tail onto your yarn needle and weave it in and out along the bottom edge of the tube. Pull the yarn tight to gather the base closed completely, secure with a knot, and weave in the end inside the pouch.
Turn your pouch right side out so the clean seam is on the inside.
Section 3: Top Casing and Drawstring Opening (Orange)
- Rnd 1: Join orange yarn with a sl st to the top raw edge of the pouch, ch 1, work 36 sc evenly spaced around the top opening, sl st to first sc to join (36 sc)
- Rnd 2: Ch 1, sc in each st around, sl st to join (36 sc)
- Rnd 3: Ch 1, sc in next 4 sts, ch 2, sk 2 sts rep around 6 times, sl st to join (24 sc, 6 ch-2 spaces)
- Rnd 4: Ch 1, sc in each sc and 2 sc in each ch-2 space around, sl st to join (36 sc)
Fasten off orange yarn and weave in ends.
Section 4: Drawstring Stem and Leaf (Green, make 1)
- Drawstring Stem: Using green yarn, ch 65. Fasten off, leaving a 6-inch (15 cm) tail on each end. Weave this chain in and out through the ch-2 spaces on Rnd 3 of the pumpkin top casing. Tie a small knot at each end of the chain to prevent fraying. Pull the drawstring tight to gather the top closed like a pumpkin stem.
- Leaf: Ch 6, working in 2nd ch from hook, sl st in next ch, sc in next ch, hdc in next ch, work 3 sc in last ch. Working down the opposite side of the foundation chain, hdc in next ch, sc in next ch, sl st in last ch, join with sl st to first sl st. Fasten off, leaving a long tail to sew the leaf to the base of the stem.
Assembly
- Position the green leaf flat against the top edge of the pumpkin right next to the gathered stem drawstring.
- Securely sew the leaf in place using the green yarn tail.
- Fill your finished pouch with a handful of wrapped candies or small treats.
✅ Checkpoint: Your finished pouch should measure about 4.5 inches wide, with a sturdy ribbed texture and a functional drawstring that pulls the top closed neatly into a pumpkin shape.
Size Customization Tips
- Making it smaller: Work fewer rows for the body panel (e.g., 28 rows instead of 36) and reduce the top casing stitches accordingly by maintaining a multiple of 6 for the drawstring round.
- Making it larger: Add more rows to the body panel (e.g., 42 rows) for a wider pumpkin. Each set of 6 extra rows adds approximately 1.2 inches (3 cm) to the total circumference.
Care Instructions
- Hand wash gently in cool water with mild soap.
- Press out excess water in a clean towel.
- Reshape while damp and lay flat to dry away from direct sunlight.
- Do not bleach, iron, or tumble dry.
FAQ
Can I use cotton yarn instead of acrylic?
Yes! Cotton yarn works wonderfully for these pouches, offering crisp stitch definition and a sturdy structure that holds wrapped candies securely.
How do I wash the pouch after it gets dirty with candy residue?
Because these pouches are small and often filled with sweets, hand washing them gently in lukewarm soapy water is best. Lay them flat to air dry completely before refilling.
Are these pouches safe for young children?
These treat pouches make fantastic party favors for school-aged children. If making them for toddlers under 3 years old, omit small attached parts or sew embellishments extremely securely.
Happy Crocheting!
I hope you love making these adorable pumpkin pouches as much as I do! Save this pin on Pinterest to easily find it later, and be sure to leave a comment below sharing what colors you used for your Halloween batch.
📄 Your free PDF pattern