










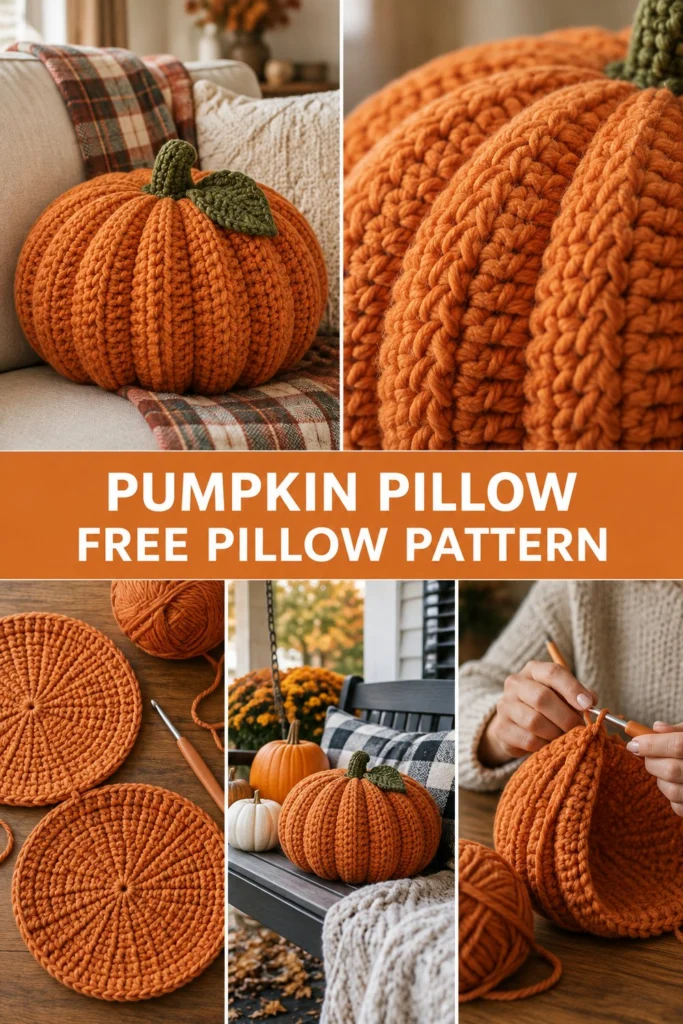
Your sofa is ready for spooky season with a chubby pumpkin pillow. Ribbed segments come from back loop single crochet, the round shape is stuffed and pulled in at the centre, and a green stem and curly leaf finish the top. It stays cute well past Halloween into Thanksgiving.
Quick Facts
- Skill level: Intermediate
- Finished size: 14 inches (35.5 cm) wide, 8 inches (20 cm) tall
- Yarn: Bulky weight (Category 5) chenille or velvet yarn in Pumpkin Orange and Olive Green
- Hook: 6.0 mm (US J/10) crochet hook
- Stitches used: ch, sl st, sc, hdc, dc, BLO
- Time to make: 4 to 6 hours
💡 Designer Tip: Size customization tips are included further down if you want to make a larger floor cushion!
What Makes This Crochet Pumpkin Pillow Special
This crochet pumpkin pillow uses sideways short rows in back loop single crochet to form ribbed wedges. Once sewed together and stuffed firmly, a long piece of yarn pulls the center closed, creating the classic rounded pumpkin shape. A sturdy green stem and textured leaf complete the fall home decor crochet look.
Skill Level
- Working flat in rows using back loops only
- Working in the round for amigurumi-style shaping
- Basic seaming and mattress stitch
- Pulling yarn tightly for deep shaping depressions
- Confident beginner ready for shaping techniques
Finished Measurements
| Dimension | Inches | Centimeters |
|---|---|---|
| Pillow Width | 14.0 in | 35.5 cm |
| Pillow Height | 8.0 in | 20 cm |
| Stem Height | 2.5 in | 6.5 cm |
Materials You Will Need
| Material / Color | Yarn Weight / Type | Yardage | Meters |
|---|---|---|---|
| Pumpkin Orange | Bulky (5) Chenille / Velvet | 350 yds | 320 m |
| Olive Green | Bulky (5) Chenille / Velvet | 60 yds | 55 m |
- Hook: 6.0 mm (US J/10)
- Notions: Tapestry needle, locking stitch markers, polyester fiberfill stuffing (approx. 12 oz), strong upholstery thread or matching yarn for pulling the center indentation.
Yarn Suggestions
| Brand & Line | Weight | Yards per Skein | Notes |
|---|---|---|---|
| Bernat Velvet | Bulky (5) | 315 yds (288 m) | Incredibly soft with a gorgeous sheen |
| Lion Brand Vel-Luxe | Bulky (5) | 246 yds (225 m) | Great stitch definition and rich colors |
| Premier Yarns Basix Chenille | Bulky (5) | 131 yds (120 m) | Very plush and easy to work with |
⚠️ Note: Avoid highly textured novelty yarns like eyelash yarn for this project, as the back loop ribs will be obscured and it makes counting rows very difficult.
Gauge
- 10 sts x 12 rows = 4 in / 10 cm in back loop single crochet using a 6.0 mm hook.
Abbreviations
- ch – chain
- sl st – slip stitch
- sc – single crochet
- hdc – half double crochet
- dc – double crochet
- BLO – back loop only
- st(s) – stitch(es)
- rnd(s) – round(s)
- rep – repeat
- inc – increase (2 sc in same st)
- dec – decrease (sc 2 sts together)
UK translations: sc = dc, hdc = htr, dc = tr.
Special Stitches Explained
- Magic Ring: Wrap yarn around your index finger twice, insert hook under loops, pull up a loop, ch 1, and work initial stitches into the ring.
- BLO (Back Loop Only): Insert hook only under the back loop of the designated stitch, leaving the front loop unworked to create horizontal ridges.
- Invisible Decrease: Insert hook into front loop only of next 2 stitches, yarn over, pull through both loops, yarn over and pull through remaining two loops.
Pattern Instructions
Pattern Notes
- Turning chains do not count as stitches unless explicitly stated.
- Work all pumpkin body segments in rows, turning at the end of each row.
- Work stem and leaf in continuous rounds unless noted.
Section 1: Pumpkin Wedges (Orange, make 8 identical panels)
- Row 1: Ch 26, working in 2nd ch from hook, sc in each ch across, turn (25 sc)
- Row 2: Ch 1, sc in BLO of first 24 sts, leave last st unworked, turn (24 sc)
- Row 3: Ch 1, sc in BLO of 24 sts across, turn (24 sc)
- Row 4: Ch 1, sc in BLO of first 23 sts, leave last st unworked, turn (23 sc)
- Row 5: Ch 1, sc in BLO of 23 sts across, turn (23 sc)
- Rows 6 to 31: Continue this wedge shaping pattern (alternating short rows that leave sts unworked at the top edge and return across), ending with a full row across all 25 sts.
- Fasten off, leaving a 12-inch tail for sewing. Sew all 8 wedges together edge-to-edge along the vertical side to form a closed sphere shape, leaving the top and bottom open before final stuffing.
✅ Checkpoint: You should now have a hollow, segmented orange sphere with top and bottom openings.
Section 2: Stem (Green, make 1)
- Rnd 1: Magic ring, work 6 sc in ring, pull tight (6 sc)
- Rnds 2 to 7: Sc in each st around (6 sc)
- Rnd 8: (Inc, sc in next st) x 3 (9 sc)
- Rnds 9 to 10: Sc in each st around (9 sc)
- Rnd 11: (Inc, sc in next 2 sts) x 3 (12 sc)
- Fasten off, leaving a long tail for sewing to the top of the pumpkin. Stuff lightly.
Section 3: Curly Leaf (Green, make 1)
- Row 1: Ch 21, working in 2nd ch from hook, 3 sc in each ch back to the base. The piece will naturally twist into a corkscrew curl.
- Fasten off, leaving a tail to attach at the base of the stem.
Assembly
- Stuff the pumpkin body firmly with polyester fiberfill through the top and bottom openings.
- Using a tapestry needle and doubled-up yarn or upholstery thread, weave a running stitch around the top and bottom center openings, pull tightly to cinch them closed, and secure knots.
- Thread a long strand of matching yarn from the bottom center, straight up through the middle of the pillow, out the top center, and back down through the outside to the bottom. Pull extremely tight to create the sunken indentation characteristic of pumpkins. Secure firmly.
- Sew the stem securely over the top center cinched hole.
- Attach the curly leaf right at the base of the stem.
Finishing
Weave in all remaining yarn ends securely inside the pillow body. Fluff the segments with your hands to distribute the stuffing evenly.
Size Customization Tips
- Each extra wedge panel you add increases the pillow circumference by about 1.75 inches (4.5 cm). Ensure you make an even number of total panels so the pumpkin balances symmetrically.
Care Instructions
- Spot clean gently with a damp cloth and mild detergent. Do not submerge in water or machine wash to protect the polyester stuffing and chenille texture. Air dry flat.
FAQ
Can I use cotton yarn instead of chenille?
Yes, but the pillow will feel much firmer, less squishy, and the ribbed texture will appear sharper. You will also need significantly more yardage since cotton yarn lacks the plush volume of bulky chenille.
How do I make the center indentation deeper?
Use a heavy-duty upholstery needle and nylon or waxed thread to pull the top and bottom centers together. Wrap the thread around the outside of the pumpkin through the vertical grooves if you want even deeper segmented definition.
Are safety eyes or small parts suitable for children?
This pillow contains no small plastic parts, making it safe for children. However, ensure all yarn ends are securely woven in so little fingers cannot pull them loose.
Happy Crocheting!
I hope you enjoyed making this chubby pumpkin pillow to brighten your seasonal home decor! Save this pin on your Pinterest crochet board for later, and leave a comment below letting me know what colors you used for your cozy harvest display.
📄 Your free PDF pattern