












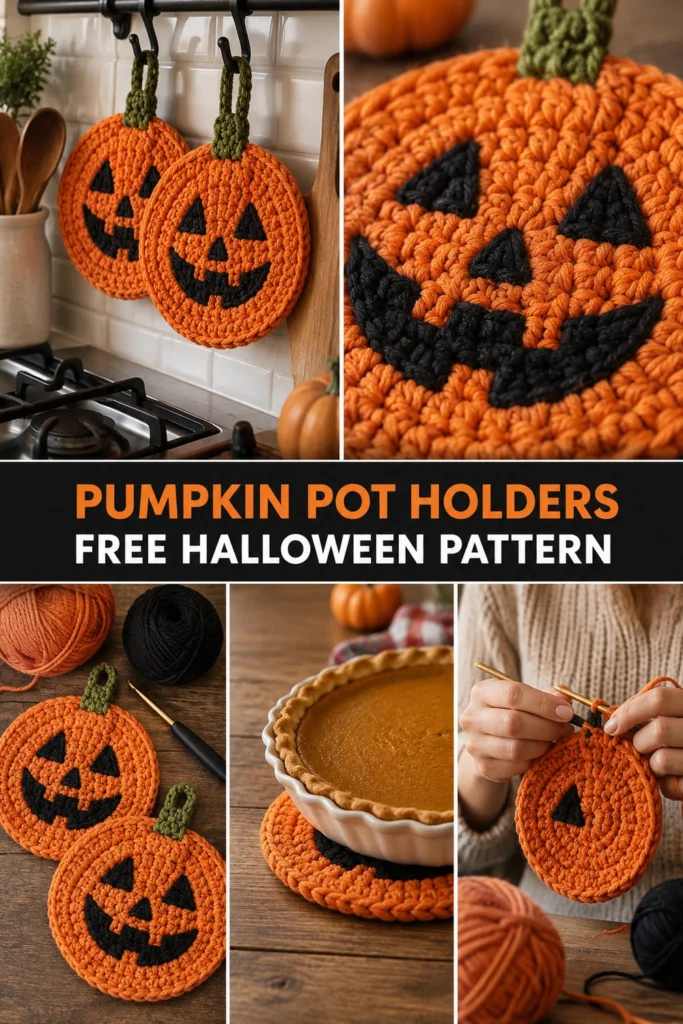
Spooky meets useful in the kitchen with these charming pumpkin face pot holders! Worked double-thick in cotton yarn, they provide real heat protection for your hands and tables while bringing a festive Halloween touch to your home.
Quick Facts
- Skill level: Easy / Beginner-Friendly
- Finished size: Approx. 8 inches (20.3 cm) in diameter (excluding stem)
- Yarn: Worsted weight (Category 4) 100% cotton yarn in Orange, Black, and Green
- Hook: US G/6 (4.0 mm) crochet hook
- Stitches used: Chain (ch), single crochet (sc), slip stitch (sl st), increase (inc), decrease (dec)
- Time to make: About 2 to 3 hours per pot holder
Size tips and customization options are included further down the page!
What Makes This Pumpkin Pot Holder Special
- Double-Thick Protection: Each pot holder consists of two identical round panels joined together around the outer edge, creating a sturdy, thick pad that reliably blocks kitchen heat.
- Surface Crochet Details: The jack-o’-lantern face features bold black features securely worked or surface-stitched onto the front panel for a clean, professional finish.
- Functional Hanging Stem: A textured green stem tab is worked directly into the top edge, making it easy to hang your pot holders on kitchen hooks when not in use.
- 100% Cotton Safety: Using purely cotton yarn ensures the pot holder withstands high temperatures without melting or scorching like acrylic fibers would.
Skill Level
- Basic crochet knowledge (working in the round, single crochet, increases)
- Changing colors cleanly
- Basic assembly by joining two panels
- Reassurance line: If you can make a flat circle, you can easily complete this project!
Finished Measurements
| Measurement | Inches | Centimeters |
|---|---|---|
| Diameter (excluding stem) | 8.0 in | 20.3 cm |
| Total Height (including stem) | 9.5 in | 24.1 cm |
| Thickness | 0.5 in | 1.3 cm |
Materials You Will Need
| Material / Color | Yarn Weight / Type | Yards | Meters |
|---|---|---|---|
| Orange (Pumpkin) | Worsted (4) / 100% Cotton | 85 yds | 78 m |
| Black (Face Features) | Worsted (4) / 100% Cotton | 25 yds | 23 m |
| Green (Stem) | Worsted (4) / 100% Cotton | 15 yds | 14 m |
- Crochet Hook: US G/6 (4.0 mm)
- Notions: Yarn needle for weaving ends, stitch markers, scissors
Yarn Suggestions
| Yarn Line | Skein Yardage | Notes |
|---|---|---|
| Lily Sugar’n Cream | 120 yds (109 m) per 2.5 oz ball | Classic kitchen cotton, excellent stitch definition |
| Dishie by WeCrochet | 190 yds (174 m) per 3.5 oz ball | Tightly spun, highly durable and absorbent |
| Peaches & Crème | 120 yds (109 m) per 2.5 oz ball | Readily available at most craft stores |
⚠️ Note: Avoid wool, acrylic, or polyester yarns for kitchen hot pads. Natural 100% cotton is essential because it is heat-resistant and will not melt when touching hot pans.
Gauge
- Flat Circle Gauge: Rnds 1 to 6 = 4.0 inches (10.0 cm) across using a 4.0 mm hook.
Abbreviations
| Abbreviation | US Term |
|---|---|
| ch | Chain |
| sc | Single crochet |
| sl st | Slip stitch |
| inc | Increase (2 sc in the same st) |
| dec | Decrease (sc 2 stitches together) |
| st(s) | Stitch(es) |
| rnd(s) | Round(s) |
| rem | Remaining |
| rep | Repeat |
| FO | Fasten off |
UK Terms Translation: UK sc = US dc, UK hdc = US htr, UK dc = US tr.
Special Stitches Explained
- Magic Ring: Wrap yarn around your index finger twice to form a loop. Insert hook into center of loop, pull up a loop, ch 1, and work the required number of sc stitches into the ring. Pull the tail tight to close the center hole.
- Invisible Decrease (inv-dec): Insert hook into the front loop only of the next two stitches. Yarn over and pull through both front loops (2 loops on hook), yarn over and pull through both loops on hook.
Pattern Instructions
Pattern Notes:
* Both panels are worked in continuous rounds (spiral) unless otherwise noted. Do not join with a slip stitch at the end of rounds; use a stitch marker to track the first stitch of each round.
* Make two identical pumpkin body panels for each pot holder.
Section 1: Pumpkin Body Panels (Orange, make 2 per pot holder)
- Rnd 1: Start 6 sc in a magic ring (6 sc)
- Rnd 2: Inc in each st around (12 sc)
- Rnd 3: (1 sc, inc) x 6 (18 sc)
- Rnd 4: (2 sc, inc) x 6 (24 sc)
- Rnd 5: (3 sc, inc) x 6 (30 sc)
- Rnd 6: (4 sc, inc) x 6 (36 sc)
- Rnd 7: (5 sc, inc) x 6 (42 sc)
- Rnd 8: (6 sc, inc) x 6 (48 sc)
- Rnd 9: (7 sc, inc) x 6 (54 sc)
- Rnd 10: (8 sc, inc) x 6 (60 sc)
- Rnd 11: (9 sc, inc) x 6 (66 sc)
- Rnd 12: (10 sc, inc) x 6 (72 sc)
- Rnd 13: (11 sc, inc) x 6 (78 sc)
- Rnd 14: (12 sc, inc) x 6 (84 sc)
For the first panel (back), FO orange and weave in ends.
For the second panel (front), do not fasten off yet; set aside for facial embroidery.
✅ Checkpoint: You should have two 8-inch flat orange circles, each with exactly 84 stitches.
Section 2: Jack-O’-Lantern Face (Black)
Using black yarn and a yarn needle, embroider the face features onto the front orange panel using surface slip stitches or satin embroidery stitches referring to the final image:
* Eyes: Two small triangles positioned between Rnds 8 and 11, spaced about 6 stitches apart.
* Nose: A small triangle centered between the eyes on Rnd 9.
* Mouth: A jagged grinning mouth spanning across Rnds 5 to 7, approximately 16 stitches wide.
Secure all yarn tails neatly on the wrong side of the front panel.
Section 3: Stem and Hanging Loop (Green)
- Row 1: With green yarn, ch 8, sc in 2nd ch from hook and in each rem ch across, turn (7 sc)
- Row 2: Ch 1, working in back loops only (BLO), sc in each st across, turn (7 sc)
- Rows 3 to 4: Rep Row 2. FO leaving a long tail for sewing.
Fold the stem strip in half to form a loop, and sew the bottom base securely to the top edge of the front orange panel (centered above the face between Rnds 13 and 14).
Section 4: Joining Panels
- Place the front panel (with face and stem attached) directly on top of the plain back panel, wrong sides facing together.
- Attach orange yarn through both thicknesses at the base of the stem.
- Working through both panels simultaneously, work 1 sc in each st all the way around the outer circle (84 sc total).
- Work 3 sc into the top corner stitches around the stem base to keep edges smooth.
- Join with a sl st to the first sc, FO and weave in all remaining ends securely between the two layers.
Size Customization Tips
- Making it Larger: Continue the flat circle increase pattern for additional rounds (e.g., Rnd 15: [13 sc, inc] x 6 = 90 sts). Each extra round adds about 0.6 inches to the overall diameter. Remember to adjust your joining round to match your final stitch count.
- Making it Smaller: Stop the increase sequence earlier (e.g., stopping at Rnd 11 = 66 sts) for a smaller mug rug or mini hot pad size.
Care Instructions
- Machine wash cold on a gentle cycle with like colors.
- Do not bleach.
- Reshape while damp and lay flat to dry completely before using.
- Do not iron directly over synthetic embellishments (if any added).
Frequently Asked Questions
Can I use acrylic yarn instead of cotton?
No, acrylic yarn is not recommended for kitchen pot holders or hot pads. Acrylic melts and scours when exposed to hot pots and baking dishes straight out of the oven. Always use 100% natural cotton.
How do I make the face features neat?
Using surface crochet slip stitches or simple satin stitch embroidery gives the crispest lines. Take your time outlining the triangles and jagged mouth before filling them in.
Are these pot holders thick enough for hot pans?
Yes! Because you are joining two heavy cotton panels together back-to-back, the double-layer construction provides excellent insulation for everyday kitchen tasks.
Happy Crocheting!
I hope you love making these spooky pumpkin pot holders for your autumn kitchen! Be sure to save this free crochet pattern pin on Pinterest and leave a comment below telling me what colors you plan to use for your jack-o’-lanterns. Happy Halloween crafting!
📄 Your free PDF pattern