












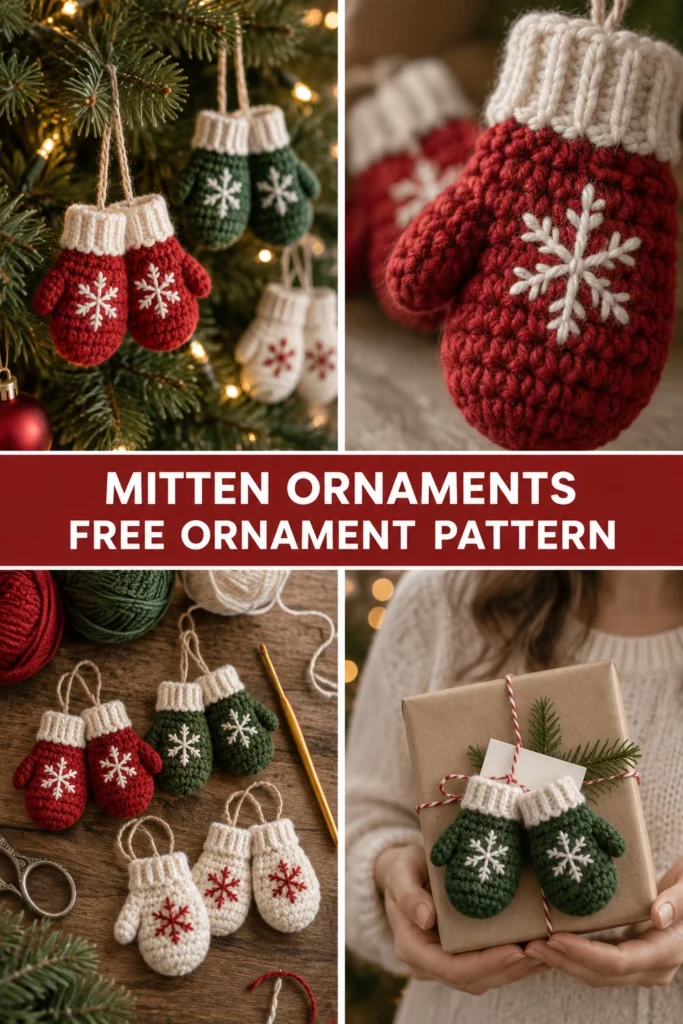
These little crochet mittens on a string capture the warmth and nostalgia of classic holiday decor, just like the ones pinned to a child’s winter coat. Each pair features two small textured mittens joined by a length of rustic twine, making them perfect for hanging on your Christmas tree, tying onto gift packages, or tucking away a surprise gift card. Grab your leftover yarn and let’s make a batch of these charming little keepsakes.
Quick Facts
- Skill level: Easy
- Finished size: Each mitten is 2.5 inches (6.4 cm) long and 1.5 inches (3.8 cm) wide
- Yarn: Sport weight or DK yarn in Red, Green, and Cream (approx. 20 yards total per pair)
- Hook: 3.5 mm (US E/4) crochet hook
- Stitches used: ch, sl st, sc, inc, dec, BLO
- Time to make: 45 minutes per pair
💡 Designer Tip: Size tips and instructions for using different yarn weights are included further down.
What Makes This Mitten Ornament Special
Working in continuous rounds from the ribbed cuff down creates a seamless, polished shape that holds its form without needing heavy stuffing. The back of each hand features a delicately embroidered French-knot snowflake, adding a handmade heirloom touch that mirrors the stitched details in the photo.
Skill Level
- Basic crochet stitches (chain, slip stitch, single crochet)
- Working in continuous spiral rounds
- Working into the back loop only (BLO)
- Basic surface embroidery (straight stitches)
Even if you are relatively new to amigurumi or small holiday projects, these mittens work up quickly with clear, step-by-step instructions.
Finished Measurements
- Length: 2.5 inches (6.4 cm) from top of cuff to bottom tip
- Width: 1.5 inches (3.8 cm) across the palm
- String length: 12 inches (30.5 cm) of twine connecting each pair
Materials You Will Need
| Material | Description | Amount |
|---|---|---|
| Yarn A (Cuff) | Cream DK weight yarn | 5 yards (4.6 meters) |
| Yarn B (Body) | Red or Green DK weight yarn | 15 yards (13.7 meters) |
| Embroidery Floss | White cotton embroidery floss | 1 skein |
| Crochet Hook | 3.5 mm (US E/4) | 1 hook |
| Notions | Tapestry needle, scissors, stitch marker, rustic twine | As needed |
| Stuffing | Polyfill fiber stuffing | A small pinch per mitten |
Yarn Suggestions
| Yarn Line | Weight | Skein Yardage | Notes |
|---|---|---|---|
| Drops Safran | Sport (Fine) | 175 yards (160 meters) | 100% cotton, excellent stitch definition for tiny details |
| Lion Brand Mandala Special Edition | DK (Light) | 150 yards (137 meters) | Acrylic blend, easy care and vibrant holiday colors |
| Paintbox Yarns Cotton DK | DK (Light) | 137 yards (125 meters) | Huge color range, true rich reds and forest greens |
⚠️ Note: Avoid fuzzy mohair or heavy novelty yarns for the main mitten body, as they will obscure the stitch texture and make embroidery difficult.
Gauge
- 6 sc x 6 rounds = 1 inch (2.5 cm) square using a 3.5 mm hook. Gauge is not overly critical for this project, but maintaining a firm, even tension ensures the stuffing won’t peek through.
Abbreviations
- ch = chain
- sl st = slip stitch
- sc = single crochet
- inc = single crochet increase (2 sc in same stitch)
- dec = single crochet invisible decrease (sc 2 together through front loops)
- BLO = back loop only
- st(s) = stitch(es)
- Rnd(s) = round(s)
UK/US Conversion Note: UK terms use double crochet (dc) for US single crochet (sc). This pattern is written in standard US terminology.
Special Stitches Explained
- Invisible Decrease (dec): Insert hook into the front loop of the first stitch, then immediately insert hook into the front loop of the next stitch (3 loops on hook). Yarn over and pull through the first 2 loops, yarn over and pull through remaining 2 loops.
- Back Loop Only (BLO): Work the indicated stitch inserting your hook under only the back horizontal loop of the stitch from the previous round, leaving the front loop free.
Pattern Instructions
Pattern Notes
- Mittens are worked in continuous spiral rounds from the cuff down. Do not join with a slip stitch at the end of rounds unless instructed. Use a stitch marker to keep track of the first stitch of each round.
- Make 2 mittens for each complete ornament pair.
Section 1: Cuff (Cream, Make 2)
Rnd 1: Leaving a 6-inch tail for weaving, ch 12, join with sl st to form a ring, being careful not to twist the chain. Ch 1, sc in same ch and in each ch around (12 sc).
Rnds 2 to 3: Working in BLO for all stitches in these rounds, sc in each st around (12 sc).
Fasten off cream yarn, leaving a short tail to weave in later.
Section 2: Hand and Palm (Red or Green, Make 2)
Join Yarn B (Red or Green) to any unworked loop from Rnd 3 of the cuff.
Rnd 4: Sc in each st around (12 sc).
Rnd 5: (1 sc, inc) x 6 (18 sc).
Rnds 6 to 9: Sc in each st around (18 sc).
Rnd 10: (1 sc, dec) x 6 (12 sc).
Stuff the mitten lightly with a small pinch of polyfill fiber stuffing.
Rnd 11: Dec x 6 (6 sc).
Fasten off, leaving an 8-inch tail. Thread the tail through the front loops of the remaining 6 stitches using a tapestry needle, pull tightly to close the tip, and weave in securely.
Section 3: Thumb (Red or Green, Make 2)
Rnd 1: Join Yarn B to the side of the hand at Rnd 6 where the thumb position sits. Work 4 sc evenly around the opening, working in a small circle (4 sc).
Rnd 2: Sc in each st around (4 sc).
Fasten off, leave a short tail, and use your tapestry needle to stitch the tiny opening closed.
✅ Checkpoint: You should now have two completed mittens, each with a neat ribbed cuff, a small thumb bump, and securely fastened ends.
Assembly and Finishing
- Embroidery: Using white embroidery floss and a tapestry needle, stitch a tiny snowflake onto the back of each mitten palm. Make one vertical straight stitch, one horizontal straight stitch, and two diagonal intersecting stitches, adding a tiny French knot at the center if desired.
- Joining: Cut a 12-inch length of rustic twine. Thread the ends through the top inner corner of each mitten cuff, knotting them securely at your desired hanging length.
Size Customization Tips
- To make a slightly larger gift-card holder mitten, start with a foundation chain of 16 for the cuff, increase to 24 sts in Rnd 5, and work 2 extra straight rounds for the hand.
Care Instructions
- Spot clean gently with a damp cloth and mild soap if needed. Do not submerge in hot water or machine wash to preserve the embroidery and polyfill shape.
FAQ
Can I use scrap yarn for this project?
Yes! These mini mittens are the ultimate scrap-buster project. You only need a few yards of each color, making them a fantastic way to use up leftover DK or sport-weight yarn from winter garments.
How do I attach a gift card inside the mitten?
Because these are mini ornaments, they are designed primarily for tree hanging or small package decoration. To hold a standard gift card, scale up the pattern by using worsted weight yarn and a 4.5 mm hook.
Are these safe to give as toys for young children?
While they are soft and charming, these mini mittens contain small parts (polyfill stuffing and tiny stitches) and are intended as holiday tree ornaments or gift toppers rather than infant toys.
Happy Crocheting!
I hope you enjoyed making these little holiday mittens! Be sure to save this pin on Pinterest to keep the pattern handy, and leave a comment below sharing what colors you decided to use for your tree.
📄 Your free PDF pattern