
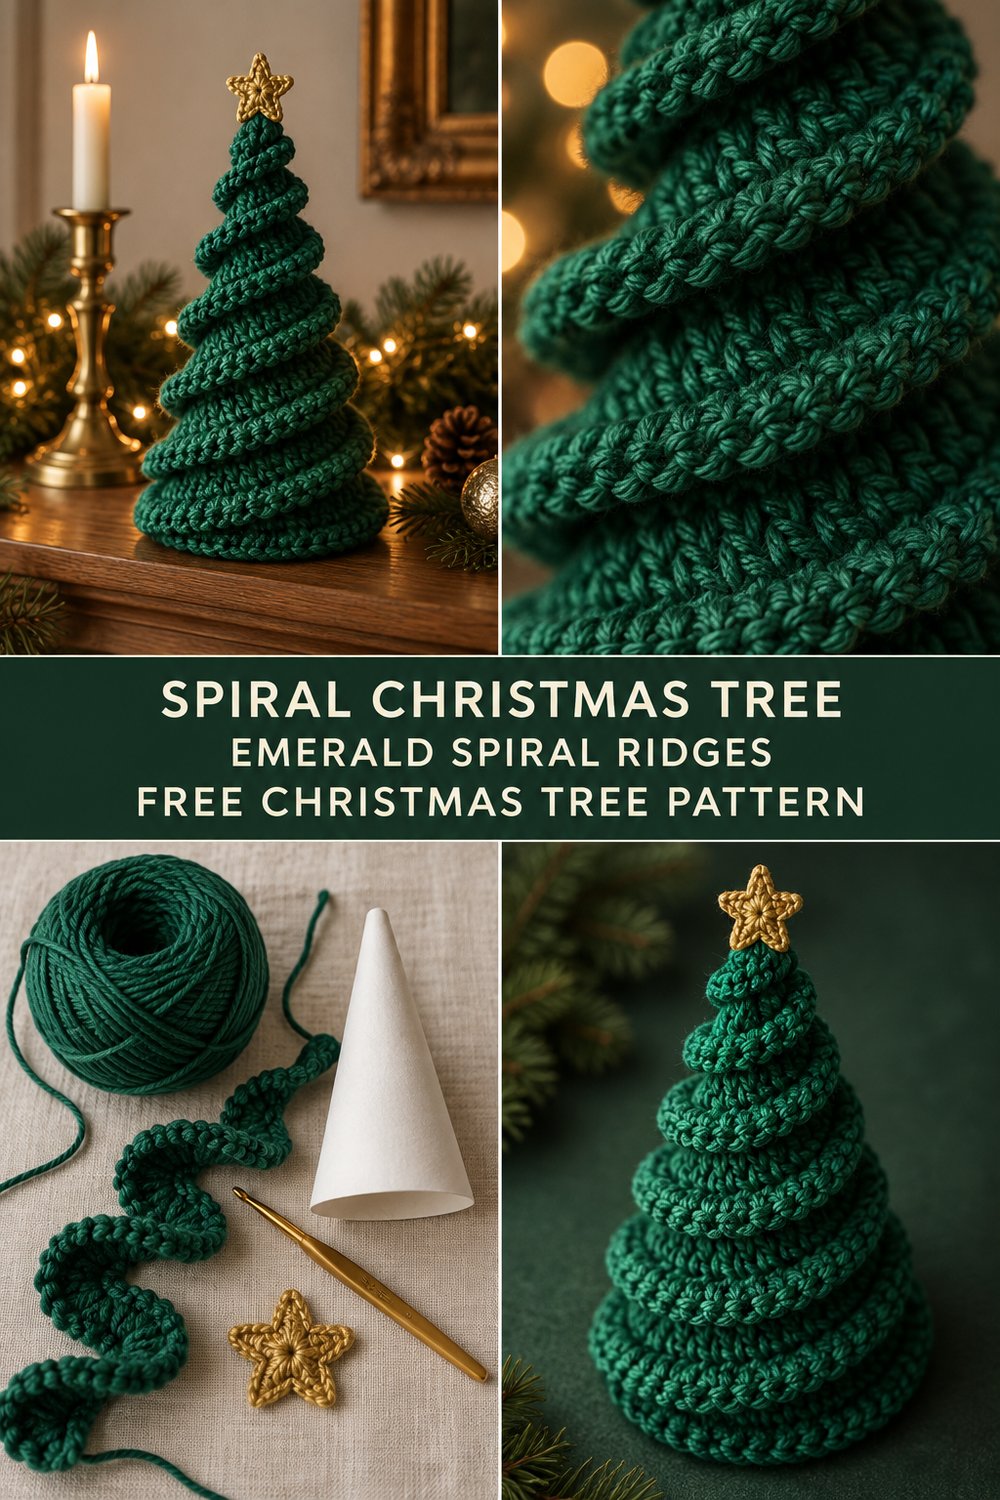
Bring the magic of handmade holiday decor to your mantel with a whimsical piece that captures the cozy spirit of the season. Working in a continuous spiral of ruffled rounds transforms a simple cone into a rich, three-dimensional evergreen that stands proudly beside your favorite candles and fairy lights.
Spiral Crochet Christmas Tree — Free Christmas Pattern
Quick Facts
- Stitches Used: ch, sc, hdc, dc, tr, sl st, working in back loops and front loops
- Size Fit: One size standing holiday home decor piece, approximately 10 inches tall by 5 inches wide at the base
- Estimated Hours to Complete: 3 to 4 hours from start to finish
- Gift-Appeal Framing: A quick-to-stitch handmade holiday present that makes a thoughtful hostess gift, desk decoration, or festive mantel display for friends and family
💡 Designer Tip: This project is wonderfully beginner-friendly while offering a striking visual payoff, making it an ideal weekend stash-buster for your holiday crafting queue.
Sizing customization tips for altering the height and width of your tree are included near the end of this pattern.
What Makes This Spiral Crochet Christmas Tree Special
The magic of this crochet christmas tree pattern lies in its continuous spiral construction. Rather than building tiered branches separately and sewing them together, this tree is worked from the bottom up in an unbroken spiral of expanding and contracting rounds. By working specific stitch combinations into designated loops of the previous round, natural ruffled ridges form automatically as you ascend. This unique shaping technique gives the tree its dense, sculptural texture, perfectly mimicking the lush boughs of a real evergreen without the fuss of complex assembly or excessive weaving in of ends.
Skill Level
- Beginner-Friendly Intermediate: Comfort with basic crochet stitches and working in the round is all you need to get started.
- Required Skills:
- Working into front and back loops only
- Increasing and decreasing stitches evenly across a round
- Working tall stitches (dc, tr) to create ruffled movement
- Basic surface slip stitching
⚠️ Note: Do not be intimidated by the spiral shaping; simply trust the rhythm of the stitch counts in each round and your ridges will curl into place naturally.
Finished Measurements
| Dimension | Inches | Centimeters |
|---|---|---|
| Total Height | 10.0 in | 25.4 cm |
| Base Diameter | 5.0 in | 12.7 cm |
| Top Star Height | 1.5 in | 3.8 cm |
Materials You Will Need
- Yarn: Worsted weight (#4) yarn in rich emerald green and a small amount of metallic gold for the star.
- Crochet Hook: US Size E/4 (3.5 mm).
- Notions: Yarn needle, stitch markers, hot glue gun or craft glue, and one pre-made white cardboard or styrofoam cone (approx. 10 inches tall by 4.5 inches base diameter).
| Colorway | Exact Color Name | Yarn Weight | Yardage Needed |
|---|---|---|---|
| Color A | Rich Emerald Green | Worsted (#4) | 180 yds / 165 m |
| Color B | Metallic Gold | Fingering / Sport (#3) | 15 yds / 14 m |
Yarn Suggestions
| Yarn Brand & Line Name | Yarn Weight | Yardage Per Skein | Notes |
|---|---|---|---|
| Lion Brand Vanna’s Choice | Worsted (#4) | 170 yds / 156 m per skein | Excellent stitch definition for crisp, structured spiral ridges. |
| Caron Simply Soft | Worsted (#4) | 315 yds / 288 m per skein | Provides a lovely subtle sheen that catches holiday fairy lights. |
| Red Heart Super Saver | Worsted (#4) | 364 yds / 333 m per skein | Durable, sturdy option that helps the tree hold its rigid shape. |
⚠️ Note: Avoid ultra-fuzzy or novelty yarns (such as eyelash or brushed mohair) for the main body, as they will obscure the intricate spiral stitch definition and make it difficult to see your working loops.
Gauge
| Measurement Type | Stitch / Row Count | Over Area |
|---|---|---|
| Gauge Swatch | 16 sc × 18 rows | 4 × 4 in (10 × 10 cm) |
💡 Designer Tip: Exact gauge is not critical for this home decor piece, but maintaining a firm, consistent tension will ensure your spiral ridges stay crisp and your cone is covered without gaps. Be sure to swatch first if you are using an unfamiliar yarn fiber!
Abbreviations
| Abbreviation | Full Term |
|---|---|
| ch | chain |
| sc | single crochet |
| hdc | half double crochet |
| dc | double crochet |
| tr | treble crochet |
| sl st | slip stitch |
| BLO | back loop only |
| FLO | front loop only |
| inc | increase (work 2 sc in same stitch) |
| dec | decrease (sc 2 stitches together) |
| st(s) | stitch(es) |
| rep | repeat |
| Rnd(s) | round(s) |
Special Stitches Explained
- Ruffled Spiral Shell (RSS): Work (2 dc, 2 tr, 2 dc) all into the designated single stitch to create a pronounced fan of ruffles that naturally twists along the spiral path.
- Back Loop Only (BLO): Insert hook under the back loop of the designated stitch only, leaving the front loop unworked to anchor future rounds or create ridge textures.
Pattern Instructions
Section 1: The Spiral Tree Body
Using Color A (Emerald Green) and a 3.5mm hook, begin at the bottom base of the tree and work upwards in a continuous spiral without joining rounds. Use a stitch marker to track the first stitch of each round.
- Rnd 1: Magic ring, work 6 sc into ring. (6 sc)
- Rnd 2: [Inc] 6 times. (12 sc)
- Rnd 3: [Sc in next st, inc in next st] 6 times. (18 sc)
- Rnd 4: Working in BLO, [sc in next 2 sts, inc in next st] 6 times. (24 sc)
- Rnd 5: Sc in each st around. (24 sc)
- Rnd 6: [Sc in next 3 sts, inc in next st] 6 times. (30 sc)
- Rnd 7: Working in BLO, [sc in next 4 sts, inc in next st] 6 times. (36 sc)
- Rnd 8: Sc in each st around. (36 sc)
- Rnd 9: [Sc in next 5 sts, inc in next st] 6 times. (42 sc)
✅ Checkpoint: At the end of Round 9, you should have exactly 42 stitches around.
- Rnd 10: Working in BLO, [sc in next 6 sts, inc in next st] 6 times. (48 sc)
- Rnds 11–12: Sc in each st around. (48 sc)
- Rnd 13: [Sc in next 6 sts, dec] 6 times. (42 sc)
- Rnd 14: Working in BLO, [sc in next 5 sts, dec] 6 times. (36 sc)
- Rnds 15–16: Sc in each st around. (36 sc)
- Rnd 17: [Sc in next 4 sts, dec] 6 times. (30 sc)
- Rnd 18: Working in BLO, [sc in next 3 sts, dec] 6 times. (24 sc)
- Rnds 19–20: Sc in each st around. (24 sc)
- Rnd 21: [Sc in next 2 sts, dec] 6 times. (18 sc)
- Rnd 22: Working in BLO, [sc in next st, dec] 6 times. (12 sc)
- Rnds 23–24: Sc in each st around. (12 sc)
- Rnd 25: [Dec] 6 times. (6 sc)
- Rnd 26: Sc in each st around. Fasten off, leaving a 10-inch tail for closing the very top tip. (6 sc)
Section 2: The Ruffled Spiral Over-Rounds
Return to the unworked front loops (FLO) left exposed on Rnds 4, 7, 10, 14, 18, and 22. Starting from the bottommost available FLO round (Rnd 4) with the tree base facing you:
- Rnd 1 (Ruffle Pass): Join Color A with a sl st to any unworked front loop of Rnd 4. Work Ruffled Spiral Shell (RSS) in the same st, *skip next st, sl st in next st, work RSS in next st; rep from * around, ending with a sl st in the final skipped st space. Fasten off and weave in ends. Repeat this exact ruffled shell sequence into the exposed FLO rounds of Rnds 7, 10, 14, 18, and 22 to build the lush multi-tiered spiral ruffles cascading up the tree.
Section 3: The Gold Star Topper
Using Color B (Metallic Gold) and a 3.5mm hook:
- Rnd 1: Magic ring, work [sc, ch 2, dc, ch 2, sc] 5 times into the ring to form a 5-pointed star. Join with a sl st to the first sc. Fasten off, leaving a 6-inch tail for assembly. (5 star points)
Section 4: Assembly and Finishing
- Slide your completed crochet spiral cover over your cardboard or styrofoam cone to check the fit. If necessary, secure the interior wrong sides lightly to the cone using small dots of hot glue at the base and apex.
- Thread your gold star tail onto a yarn needle and stitch or glue the star securely to the absolute top apex of the tree.
- Smooth and arrange the spiral ruffles gently with your fingers so they cascade outward in an even, twisting pattern from bottom to top.
Size Customization Tips
- To Make a Taller Tree: Simply continue working repeating increase/decrease sequences every few rounds, adding extra rounds to the main body and inserting additional unworked FLO rows for more ruffle tiers. Each extra tier adds approximately 1.5 inches of height.
- To Make a Wider Tree: Start your base ring with 8 sc instead of 6, and continue your initial increase rounds by increments of 8 stitches per round rather than 6.
Care Instructions
- Gently dust your finished tree with a soft, dry cloth or a handheld vacuum on low suction.
- Do not submerge in water if using a cardboard inner cone base. Spot clean only with a damp cloth and mild detergent if accidental staining occurs.
- Store in a breathable cotton dust bag during the off-season to keep your holiday decor looking pristine year after year.
Closing
I hope you adore making this Spiral Crochet Christmas Tree — Free Christmas Pattern as much as I loved designing it for your holiday home! There is nothing quite like cozying up with your yarn and hook while winter weather settles in outside.
If you make your own emerald spiral tree, please share photos and tag me on social media so I can admire your festive creations! Don’t forget to save this project to your holiday Pinterest boards and leave a comment below letting me know how your styling turned out. Happy crocheting and happy holidays!