












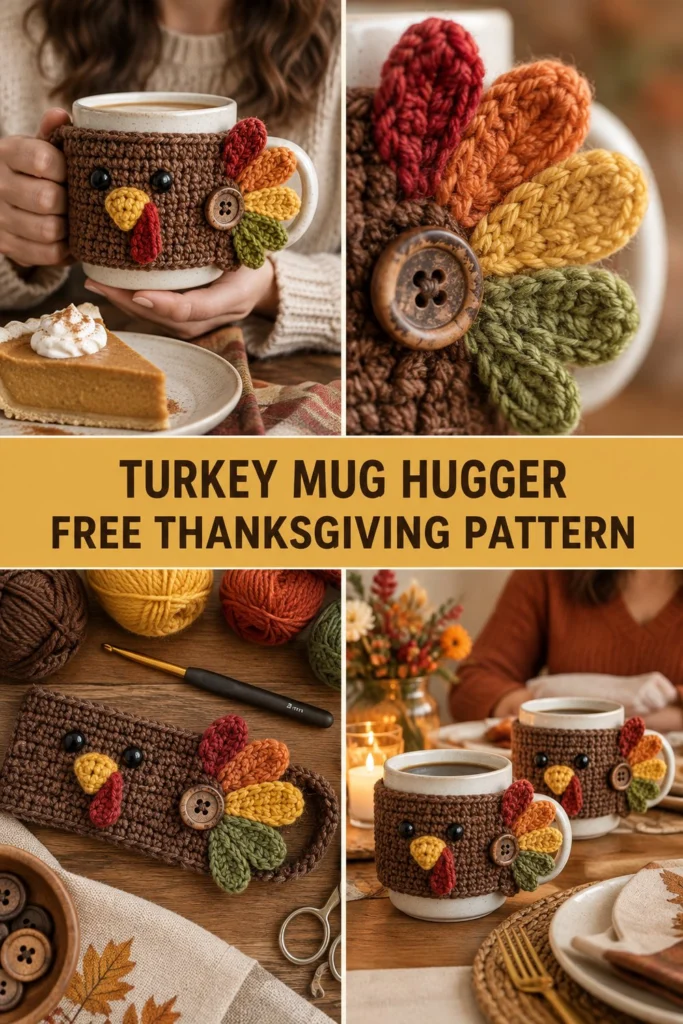
Make every autumn coffee break a little more festive with a handmade turkey mug hugger! This charming, quick-to-stitch project features a textured single crochet band that buttons snugly around your favorite mug, complete with a cheerful turkey face and a colorful fanned tail. It is the absolute best hostess gift when tucked into a mug with gourmet cocoa mix or seasonal tea bags.
Quick Facts
- Skill level: Easy
- Finished size: Fits a standard 12 oz to 15 oz coffee mug (approx. 9.5 inches circumference band, 3.5 inches tall)
- Yarn: Worsted weight (Medium #4) acrylic or cotton yarn in Brown, Red, Orange, Yellow, and Olive Green
- Hook: US E/4 (3.5 mm) crochet hook
- Stitches used: Chain (ch), single crochet (sc), half double crochet (hdc), double crochet (dc), slip stitch (sl st), front loop only (FLO), back loop only (BLO)
- Time to make: 1 to 2 hours
Size customization tips are included further down in this guide.
What Makes This Turkey Mug Hugger Special
This cozy is designed to be both adorable and functional. The main band is worked in sturdy single crochet stitches to provide a secure heat barrier for your hands, complete with a custom-formed button loop on one end so it fastens securely around the mug handle. The turkey’s face uses smooth plastic safety eyes for a polished look, while the multi-colored tail feathers are individually crocheted and layered behind a rustic wooden button. Every detail from the bright red wattle to the yellow beak is crafted to stay securely attached, even with daily washing and use.
Skill Level
- Working in rows and flat rounds
- Basic shaping and changing colors
- Sewing flat appliqués securely to a foundation piece
- Buttonhole creation via chaining and skipping stitches
Don’t worry if you are new to appliqués—each piece is small, easy to manage, and explained step-by-step below!
Finished Measurements
| Dimension | Inches | Centimeters |
|---|---|---|
| Band Length (Unbuttoned) | 9.5 in | 24.0 cm |
| Band Height | 3.5 in | 9.0 cm |
| Tail Feather Span | 4.0 in | 10.0 cm |
Materials You Will Need
| Item | Description | Quantity / Details |
|---|---|---|
| Yarn (Color A) | Dark Brown (Worsted / #4) | Approx. 35 yards / 32 meters |
| Yarn (Color B) | Red (Worsted / #4) | Approx. 5 yards / 5 meters |
| Yarn (Color C) | Orange (Worsted / #4) | Approx. 5 yards / 5 meters |
| Yarn (Color D) | Yellow (Worsted / #4) | Approx. 5 yards / 5 meters |
| Yarn (Color E) | Olive Green (Worsted / #4) | Approx. 5 yards / 5 meters |
| Crochet Hook | US E/4 (3.5 mm) | 1 hook |
| Safety Eyes | 6 mm black plastic safety eyes | 2 pieces (or black embroidery floss) |
| Button | 20 mm 4-hole wooden button | 1 piece |
| Notions | Tapestry needle, scissors, locking stitch markers | As needed |
Yarn Suggestions
| Yarn Line | Weight | Yardage per Skein | Notes |
|---|---|---|---|
| Lion Brand Vanna’s Choice | Worsted (#4) | 145 yds / 133 m | Great stitch definition, holds shape well |
| Caron Simply Soft | Worsted (#4) | 315 yds / 288 m | Silky finish, brilliant autumn colors |
| Lily Sugar’n Cream | Worsted (#4) | 120 yds / 109 m | 100% cotton, rigid and heat resistant |
⚠️ Note: Avoid novelty yarns with eyelash textures or heavy fuzz for the band, as they obscure stitch counts and make the buttonhole unstable. Smooth acrylic or cotton blends work best.
Gauge
- 18 sc x 20 rows = 4 inches (10 cm) using a 3.5 mm hook in single crochet.
Abbreviations
| Abbreviation | Meaning |
|---|---|
| ch | Chain |
| sc | Single crochet |
| hdc | Half double crochet |
| dc | Double crochet |
| sl st | Slip stitch |
| inc | Increase (work 2 sc in the same st) |
| dec | Decrease (sc2tog) |
| st(s) | Stitch(es) |
| BLO | Back loop only |
| FLO | Front loop only |
| rep | Repeat |
| Rnd / Row | Round / Row |
UK terms translation: sc = dc, hdc = htr, dc = tr.
Special Stitches Explained
- Magic Ring: Wrap yarn around your index finger twice, insert hook under rings, pull up a loop, ch 1, and work the required number of sc into the ring. Pull tail to close tightly.
- Invisible Decrease (inv-dec): Insert hook into the front loop only of the next stitch, then insert hook into the front loop only of the following stitch. Yarn over, draw through both loops on hook, yarn over and pull through remaining two loops.
Pattern Instructions
Note: The main band is worked flat in rows with a turning chain that does not count as a stitch unless specified. Tail feathers and facial pieces are worked separately and sewn on.
Section 1: Mug Band (Brown)
Using Color A (Brown), ch 43.
– Row 1: Sc in 2nd ch from hook and in each ch across, turn (42 sc)
– Row 2: Ch 1, sc in each st across, turn (42 sc)
– Row 3: Ch 1, sc in first 39 sts, ch 4, sk 3 sts, sl st into the last st to form the button loop, turn (39 sc, 4 ch-space)
– Row 4: Ch 1, sc in first 39 sts, work 4 sc tightly around the ch-4 loop space, turn (43 sc)
– Rows 5 to 14: Ch 1, sc in each st across, turn (43 sc)
– Row 15: Ch 1, sc in each st across. Fasten off, leaving a long tail for weaving (43 sc).
✅ Checkpoint: Your band should measure approximately 9.5 inches long by 3.5 inches tall, featuring a small loop on one short end.
Section 2: Turkey Tail Feathers
Make 4 feathers in different colors: one each in Red (Color B), Orange (Color C), Yellow (Color D), and Olive Green (Color E).
– Row 1: Ch 7, sc in 2nd ch from hook, hdc in next ch, dc in next 2 ch, hdc in next ch, 3 sc in last ch. Working along the opposite side of the foundation chain: hdc in next ch, dc in next 2 ch, hdc in next ch, sc in last ch, sl st to first st to join (14 sts)
– Fasten off, leaving an 8-inch tail for assembly.
Section 3: Turkey Head & Beak
Head Base (Brown / Color A):
– Rnd 1: Start 6 sc in a magic ring, sl st to join (6 sc)
– Rnd 2: Ch 1, inc in each st around, sl st to join (12 sc)
– Rnd 3: Ch 1, (1 sc, inc) x 6, sl st to join. Fasten off (18 sc)
Beak (Yellow / Color D):
– Row 1: Ch 4, sc in 2nd ch from hook, hdc in next ch, dc in last ch. Fasten off, leaving a tail to sew (3 sts)
Waddle (Red / Color B):
– Row 1: Ch 5, sl st in 2nd ch from hook, sc in next 2 ch, hdc in last ch. Fasten off, leaving a tail to sew (4 sts)
Assembly & Finishing
- Face Placement: Position the brown circular head piece onto the right side of the Mug Band, centered horizontally about 2 inches from the non-loop end. Sew securely around the edge.
- Eyes: Attach 6 mm safety eyes onto the upper half of the turkey head, spaced 3 stitches apart. Secure backs firmly on the reverse side of the band. (Alternatively, embroider small French knots with black yarn).
- Beak & Waddle: Stitch the yellow beak horizontally just below the eyes. Attach the red waddle so it dangles slightly to one side of the beak.
- Tail Feathers: Arrange the four colored feather motifs in a fan shape behind the right side of the band (overlapping the band edge opposite the head). Secure them together with neat back-stitches through the band.
- Button: Sew the 20 mm wooden button onto the front of the fan base where the feathers overlap, ensuring it aligns with the button loop on the opposite end of the band.
- Finishing: Weave in all loose yarn ends securely on the wrong side. Wrap around your favorite mug and fasten.
Size Customization Tips
- Larger Mugs: If your mug has a 11-inch circumference, increase your starting chain by multiples of 6 stitches (each 6 stitches adds approximately 1.3 inches of length).
- Smaller Mugs: Subtract 6 stitches from the starting chain for espresso or small diner mugs.
Care Instructions
- Remove the mug hugger before washing your mug.
- Hand wash gently in cool water with mild wool detergent.
- Lay flat on a clean towel to dry completely. Do not tumble dry.
FAQ
Can I use cotton yarn instead of acrylic?
Yes! Cotton yarn like Lily Sugar’n Cream works wonderfully because it is rigid, heat-resistant, and holds the turkey’s shape and stitches very sharply.
How do I adjust the pattern for a mug with a wide handle?
Simply adjust Row 3 of the band by making your ch-space larger (e.g., ch 6 and skip 5 stitches instead of ch 4 and skip 3 stitches) to accommodate thicker mug handles.
Are safety eyes safe for children’s gifts?
If you are giving this mug hugger to a young child or using it as a toy accessory, embroider the eyes using black embroidery floss instead of using plastic safety eyes to eliminate choking hazards.
Happy Crocheting!
I hope you love making this festive turkey mug hugger as much as I loved designing it for you. Pin this pattern to your Thanksgiving crochet board on Pinterest so it is ready whenever you need a quick holiday gift, and leave a comment below to let me know which colors you chose for your turkey’s tail feathers!
📄 Your free PDF pattern