











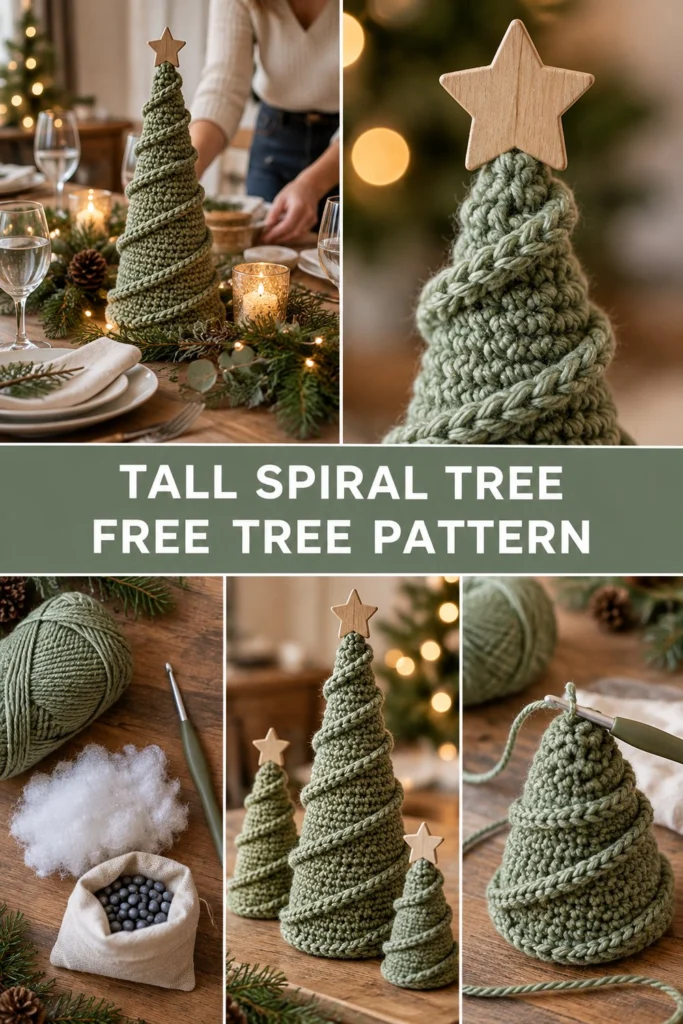
Make a showstopping centrepiece for the holiday table with a tall spiral tree. This bigger version adds more rounds to the cone, worked in back loops so the raised ridge spirals all the way up, and a weighted base keeps it standing tall. A wooden star finishes the top.
Quick Facts
- Skill level: Intermediate
- Finished size: Approximately 14 inches tall and 5 inches wide at the base
- Yarn: Worsted weight (Medium #4) cotton or wool blend yarn, approx. 250 yards
- Hook: US G/6 (4.0 mm) crochet hook
- Stitches used: Ch, sc, hdc, inc, dec, BLO
- Time to make: 5 to 7 hours
Size tips and adjustments are included further down in this guide.
What Makes This Tall Spiral Crochet Christmas Tree Special
This design relies on a clever mathematical twist. By working every single round of the main cone in the Back Loop Only (BLO), you leave a continuous spiral of exposed Front Loops running from the bottom to the tip. Afterward, you return to those leftover loops and work half double crochet stitches into them upward. This creates a deeply textured, raised spiral ridge without needing complicated cables. A small bag of weighting pellets dropped into the base during construction ensures your tree sits proudly on the holiday table without tipping over.
Skill Level
- Required skills: Working in the round, back loop only crochet, basic increases and decreases, picking up stitches in front loops, sewing pieces together.
- Don’t worry if you haven’t worked a spiral ridge before; the step-by-step instructions below make it easy to follow along!
Finished Measurements
| Measurement | Inches | Centimeters |
|---|---|---|
| Height | 14.0 in | 35.5 cm |
| Base Diameter | 5.0 in | 12.7 cm |
Materials You Will Need
| Material / Notion | Description / Specification |
|---|---|
| Yarn (Color A: Forest Green) | Worsted Weight (4), 100% Cotton, 250 yards (230 meters) |
| Crochet Hook | US G/6 (4.0 mm) |
| Weighted Pellets | Poly pellets or clean aquarium gravel (approx. 1 cup) |
| Small Fabric Pouch | Cotton canvas drawstring bag (approx. 3×4 inches) to hold pellets |
| Toy Stuffing | Polyester fiberfill |
| Wooden Star Topper | Laser-cut wooden star with a peg or flat base (approx. 2 inches) |
| Tapestry Needle | Large-eye needle for weaving ends |
| Stitch Markers | Locking stitch markers (at least 2) |
Yarn Suggestions
| Yarn Line | Weight | Skein Yardage | Notes |
|---|---|---|---|
| Lion Brand 24/7 Cotton | Worsted (4) | 186 yds / 170 m | Excellent stitch definition, firm drape |
| Lily Sugar’n Cream | Worsted (4) | 120 yds / 109 m | Budget-friendly, great matte finish |
| Drops Paris | Worsted (4) | 82 yds / 75 m | Soft cotton, beautiful deep greens |
⚠️ Note: Avoid novelty yarns with long fuzz or eyelash texture, as they will obscure the spiral ridge technique and make it difficult to locate your front loops.
Gauge
- Stitch Gauge: 16 sc x 18 rounds = 4 inches in standard single crochet.
- Circle Gauge: Rnds 1 to 6 of the flat circle base = 3.25 inches across.
Abbreviations
- ch: chain
- sc: single crochet
- hdc: half double crochet
- inc: single crochet increase (2 sc in same st)
- dec: single crochet decrease (sc2tog)
- BLO: back loop only
- FLO: front loop only
- sl st: slip stitch
- st(s): stitch(es)
- rnd(s): round(s)
- sk: skip
- FO: fasten off
UK translation terms: sc = dc, hdc = htr, sl st = ss.
Special Stitches Explained
- Magic Ring: A movable starting loop. Wrap yarn around your index finger, insert hook under the loop, pull up a working loop, and chain 1. Work your first round of stitches directly into the ring, then pull the tail tight to close the center hole.
- Invisible Decrease: Insert hook into the front loop only of the next stitch, then insert hook into the front loop only of the following stitch (3 loops on hook). Yarn over and pull through first 2 loops, yarn over and pull through remaining 2 loops.
- BLO (Back Loop Only): Insert your hook under the back loop (the loop furthest from you) of the specified stitch, leaving the front loop free.
- FLO Spiral Pickup: Working from bottom to tip, insert hook into the lowest exposed front loop left behind by your BLO rounds, join yarn with a slip stitch, and work the specified stitches directly into those loops.
Pattern Instructions
💡 Designer Tip: This tree is worked from the bottom flat base upward to the pointed tip in continuous spiral rounds without joining. Always use a stitch marker to track the first stitch of each round.
Section 1: Base Circle
Using Color A and a 4.0 mm hook, make a magic ring.
– Rnd 1: 6 sc in magic ring (6 sc)
– Rnd 2: Inc in each st around (12 sc)
– Rnd 3: (1 sc, inc) x 6 (18 sc)
– Rnd 4: (2 sc, inc) x 6 (24 sc)
– Rnd 5: (3 sc, inc) x 6 (30 sc)
– Rnd 6: (4 sc, inc) x 6 (36 sc)
– Rnd 7: (5 sc, inc) x 6 (42 sc)
– Rnd 8: (6 sc, inc) x 6 (48 sc)
– Rnd 9: (7 sc, inc) x 6 (54 sc)
– Rnd 10: (8 sc, inc) x 6 (60 sc)
– Rnd 11: (9 sc, inc) x 6 (66 sc)
– Rnd 12: (10 sc, inc) x 6 (72 sc)
Section 2: Tree Cone Body (Worked in BLO)
From this point forward, every single round is worked in the Back Loop Only (BLO). This leaves the Front Loops unworked to form the spiral ridge later.
- Rnd 13 (BLO): Working in BLO, (10 sc, dec) x 6 (66 sc)
- Rnds 14 to 15 (BLO): Working in BLO, sc in each st around (66 sc)
- Rnd 16 (BLO): Working in BLO, (9 sc, dec) x 6 (60 sc)
- Rnds 17 to 18 (BLO): Working in BLO, sc in each st around (60 sc)
- Rnd 19 (BLO): Working in BLO, (8 sc, dec) x 6 (54 sc)
- Rnds 20 to 21 (BLO): Working in BLO, sc in each st around (54 sc)
- Rnd 22 (BLO): Working in BLO, (7 sc, dec) x 6 (48 sc)
- Rnds 23 to 24 (BLO): Working in BLO, sc in each st around (48 sc)
- Rnd 25 (BLO): Working in BLO, (6 sc, dec) x 6 (42 sc)
- Rnds 26 to 27 (BLO): Working in BLO, sc in each st around (42 sc)
- Rnd 28 (BLO): Working in BLO, (5 sc, dec) x 6 (36 sc)
- Rnds 29 to 30 (BLO): Working in BLO, sc in each st around (36 sc)
- Rnd 31 (BLO): Working in BLO, (4 sc, dec) x 6 (30 sc)
✅ Checkpoint: At this stage, place your filled pellet pouch inside the bottom flat circle, then pack polyester fiberfill firmly around and above it to give the tree structural integrity before the cone narrows too much.
- Rnds 32 to 33 (BLO): Working in BLO, sc in each st around (30 sc)
- Rnd 34 (BLO): Working in BLO, (3 sc, dec) x 6 (24 sc)
- Rnds 35 to 36 (BLO): Working in BLO, sc in each st around (24 sc)
- Rnd 37 (BLO): Working in BLO, (2 sc, dec) x 6 (18 sc)
- Rnds 38 to 39 (BLO): Working in BLO, sc in each st around (18 sc)
- Rnd 40 (BLO): Working in BLO, (1 sc, dec) x 6 (12 sc)
- Rnd 41 (BLO): Working in BLO, dec x 6 (6 sc)
- Rnd 42 (BLO): Working in BLO, dec x 3, sl st in next st. FO, leaving a 10-inch tail. Thread tail through remaining front loops, pull tightly to close the tip, and secure.
For more inspiration on pairing this piece with other holiday projects, explore our guides on creating an emerald green spiral christmas tree free pattern, crafting a rustic alpine spiral christmas tree free pattern, or styling a modern forest spiral christmas tree free pattern.
Section 3: The Raised Spiral Ridge
Now you will bring the spiral texture to life by working into the unused front loops left behind during Sections 1 and 2.
- Turn your tree upside down so the base faces you. Find the lowest exposed front loop at the outer edge of Rnd 12.
- Join Color A with a slip stitch into that lowest front loop.
- Working upward along the continuous spiral staircase of exposed front loops, work 1 hdc into each front loop all the way from the base up to the top tip of the cone.
- When you reach the top tip, FO and weave in all remaining yarn ends securely inside the tree.
Section 4: Finishing and Assembly
- Star Attachment: Secure the wooden star topper to the very top tip of your tree cone. You can secure it with a dab of hot glue or by inserting its peg directly into the dense center fiberfill stuffing at the apex.
- Blocking / Shaping: Gently press and roll the tree between your hands to distribute the internal stuffing evenly and ensure the base sits completely flat on your surface.
Size Customization Tips
- To make it taller: Add 2 to 3 extra straight rounds between each decrease section in the cone body, remembering to maintain the BLO instruction for every single round.
- To make it shorter: Omit one of the paired straight rounds (e.g., work only 1 straight round instead of 2 before each decrease round).
Care Instructions
- Spot clean only with a damp cloth and mild detergent.
- Do not submerge in water due to the internal weighted pellet pouch and wooden star topper.
- Store upright in a breathable cotton bag during the off-season.
FAQ
Can I make this tree without the weighted base?
Yes, you can omit the pellets and fabric pouch and stuff the entire interior with polyester fiberfill. However, the weighted base helps the tall 14-inch version stand firmly upright against accidental bumps on a busy holiday table.
Can I use acrylic yarn instead of cotton?
Acrylic yarn works wonderfully and offers great stretch, but cotton provides superior stitch definition and a crisp, matte look that accentuates the raised spiral ridges.
Are safety eyes or small decorations safe for toddlers?
If placing this holiday decor in a home with young children under 3 years of age, ensure any wooden stars or added buttons are securely glued and firmly attached, or embroider details instead of using hard glued embellishments.
Happy Crocheting!
I hope you enjoyed making this tall spiral tree centerpiece! Be sure to save this pin on Pinterest and leave a comment below sharing what color green you chose for your holiday table.
📄 Your free PDF pattern