












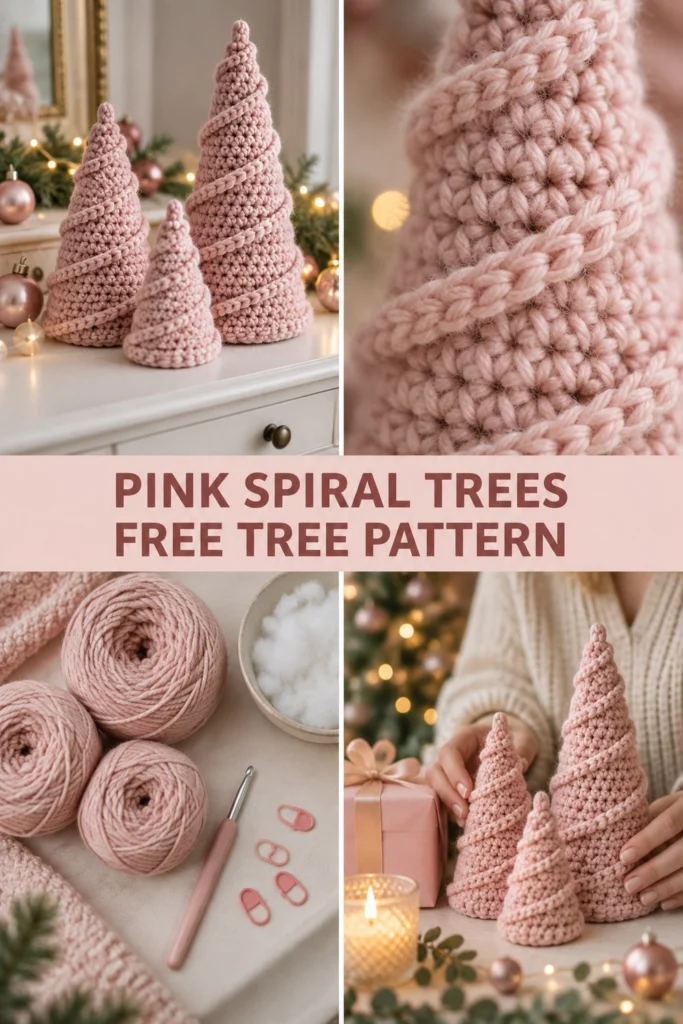
Nothing captures the magic of a winter wonderland quite like a forest of handmade trees. This blush pink spiral crochet Christmas tree trio free pattern is a wonderful way to bring modern pastel decor into your home for the holidays. Worked in rich textured single crochet with raised spiral ridges, these trees make an eye-catching statement on a mantel, shelf, or holiday table.
Quick Facts
- Skill level: Intermediate
- Finished size: Small (3.5 in / 9 cm tall), Medium (5.5 in / 14 cm tall), Large (8 in / 20.3 cm tall)
- Yarn: #4 medium worsted weight yarn (approximately 15 yds for Small, 35 yds for Medium, 70 yds for Large)
- Hook: 4.0 mm (US G/6) crochet hook
- Stitches used: ch, sl st, sc, hdc, BLO
- Time to make: 1 to 3 hours per tree
You will find size customization tips and full gauge details further down in the article.
What Makes This Spiral Tree Trio Special
These trees use a clever construction technique that sets them apart from standard amigurumi cones. You begin with a flat single crochet base circle, then transition immediately into working every round in the back loops only (BLO). Because you leave the front loops unworked round after round, they combine to form one continuous spiral path winding upward from base to tip. In the final step, you work half double crochet stitches directly into those exposed front loops from bottom to tip, creating the signature raised spiral ridges seen in the photos.
Skill Level
- Working in the round and in rows
- Back loop only (BLO) crochet technique
- Working into previously skipped front loops
- Basic sewing and stuffing
Don’t worry if you’ve never tried a spiral surface crochet technique before; the step-by-step instructions below guide you through every phase of the process.
Finished Measurements
| Tree Size | Diameter at Base | Height |
|---|---|---|
| Small | 2.5 in / 6.4 cm | 3.5 in / 9 cm |
| Medium | 3.8 in / 9.7 cm | 5.5 in / 14 cm |
| Large | 5.0 in / 12.7 cm | 8.0 in / 20.3 cm |
Materials You Will Need
| Material | Details | Quantity |
|---|---|---|
| Yarn | #4 Worsted Weight Acrylic/Cotton Blend (Blush Pink) | 120 yds / 110 m total for set |
| Crochet Hook | 4.0 mm (US G/6) | 1 |
| Notions | Polyester fiberfill stuffing | 1 oz |
| Notions | Stitch markers | 3 |
| Notions | Tapestry needle | 1 |
| Notions | Measuring tape | 1 |
Yarn Suggestions
| Yarn Name | Weight | Yardage per Skein | Notes |
|---|---|---|---|
| Caron Simply Soft | #4 Worsted | 315 yds / 288 m | Beautiful subtle sheen and excellent stitch definition |
| Lion Brand Vanna’s Choice | #4 Worsted | 170 yds / 156 m | Holds its conical shape firmly without slouching |
| Paintbox Yarns Simply Aran | #4 Aran | 201 yds / 184 m | Wide range of pastel shades with crisp definition |
⚠️ Note: Avoid novelty fuzzy, eyelash, or heavily textured eyelash yarns for this project. They obscure the intricate spiral front loop ridge details that define this pink crochet christmas tree trio free pattern.
Gauge
- 16 sc x 18 rows = 4 in / 10 cm using a 4.0 mm hook.
- Small Tree Base: Rnds 1 to 4 of the flat circle = 2.5 in / 6.4 cm across.
Abbreviations
- ch: chain
- sl st: slip stitch
- sc: single crochet
- hdc: half double crochet
- BLO: back loop only
- FLO: front loop only
- inc: single crochet 2 in same stitch
- dec: single crochet 2 together (invisible decrease recommended)
- st(s): stitch(es)
- rnd(s): round(s)
- rep: repeat
- sk: skip
- […]: work instructions within brackets as directed
UK Terms Equivalent: sc = dc, hdc = htr, sl st = ss.
Special Stitches Explained
- Magic Ring: Form a loop with working yarn, insert hook through center, pull up a loop, and work the required starting stitches around the ring. Pull tight to close.
- Back Loop Only (BLO): Insert hook under the back horizontal loop only of the designated stitch, leaving the front loop free for later surface work.
- Spiral Front Loop Surface Crochet: Working from the base upward, slip knot yarn onto hook and work hdc stitches sequentially into each exposed front loop left behind from the BLO cone rounds.
Pattern Instructions
Pattern Notes:
* All parts are worked in continuous spiral rounds without joining unless specified. Place a stitch marker in the first stitch of each round and move it up as you go.
* For more inspiration on holiday decor, you can also explore our emerald green spiral tree, rustic alpine tree, and modern forest tree patterns.
Section 1: Small Tree (Make 1)
Base Circle:
* Rnd 1: Start 6 sc in a magic ring (6 sc)
* Rnd 2: inc in each st around (12 sc)
* Rnd 3: (1 sc, inc) x 6 (18 sc)
* Rnd 4: (2 sc, inc) x 6 (24 sc)
Tree Body (Cone):
* Rnd 5: Working in BLO, sc in each st around (24 sc)
* Rnd 6: (2 sc, dec) x 6 (18 sc)
* Rnds 7 to 8: sc in each st around (18 sc)
* Rnd 9: (1 sc, dec) x 6 (12 sc)
* Rnds 10 to 13: sc in each st around (12 sc)
* Rnd 14: dec x 6 (6 sc)
* Rnd 15: sc in each st around (6 sc)
* Rnd 16: dec x 3 (3 sc)
Fasten off, leave a 6 in / 15 cm tail. Stuff the cone firmly with fiberfill before closing the top tip. Weave the tail through the remaining 3 front loops and pull tight to seal.
Spiral Ridge:
Turn the tree upside down so the base faces you. Locate the lowest exposed front loop from Rnd 5. Attach yarn with a sl st, then work hdc into each exposed front loop sequentially all the way up to the top tip of the cone. Fasten off and weave in ends.
Section 2: Medium Tree (Make 1)
Base Circle:
* Rnd 1: Start 6 sc in a magic ring (6 sc)
* Rnd 2: inc in each st around (12 sc)
* Rnd 3: (1 sc, inc) x 6 (18 sc)
* Rnd 4: (2 sc, inc) x 6 (24 sc)
* Rnd 5: (3 sc, inc) x 6 (30 sc)
* Rnd 6: (4 sc, inc) x 6 (36 sc)
Tree Body (Cone):
* Rnd 7: Working in BLO, sc in each st around (36 sc)
* Rnd 8: (4 sc, dec) x 6 (30 sc)
* Rnds 9 to 10: sc in each st around (30 sc)
* Rnd 11: (3 sc, dec) x 6 (24 sc)
* Rnds 12 to 14: sc in each st around (24 sc)
* Rnd 15: (2 sc, dec) x 6 (18 sc)
* Rnds 16 to 19: sc in each st around (18 sc)
* Rnd 20: (1 sc, dec) x 6 (12 sc)
* Rnds 21 to 23: sc in each st around (12 sc)
* Rnd 24: dec x 6 (6 sc)
* Rnds 25 to 26: sc in each st around (6 sc)
* Rnd 27: dec x 3 (3 sc)
Fasten off, leave an 8 in / 20 cm tail. Stuff firmly with fiberfill, close top, and secure.
Spiral Ridge:
Attach yarn to the lowest exposed front loop of Rnd 7. Work hdc in each exposed front loop moving upward in a continuous spiral until you reach the top tip. Fasten off and weave in ends.
Section 3: Large Tree (Make 1)
Base Circle:
* Rnd 1: Start 6 sc in a magic ring (6 sc)
* Rnd 2: inc in each st around (12 sc)
* Rnd 3: (1 sc, inc) x 6 (18 sc)
* Rnd 4: (2 sc, inc) x 6 (24 sc)
* Rnd 5: (3 sc, inc) x 6 (30 sc)
* Rnd 6: (4 sc, inc) x 6 (36 sc)
* Rnd 7: (5 sc, inc) x 6 (42 sc)
* Rnd 8: (6 sc, inc) x 6 (48 sc)
Tree Body (Cone):
* Rnd 9: Working in BLO, sc in each st around (48 sc)
* Rnd 10: (6 sc, dec) x 6 (42 sc)
* Rnds 11 to 12: sc in each st around (42 sc)
* Rnd 13: (5 sc, dec) x 6 (36 sc)
* Rnds 14 to 16: sc in each st around (36 sc)
* Rnd 17: (4 sc, dec) x 6 (30 sc)
* Rnds 18 to 21: sc in each st around (30 sc)
* Rnd 22: (3 sc, dec) x 6 (24 sc)
* Rnds 23 to 26: sc in each st around (24 sc)
* Rnd 27: (2 sc, dec) x 6 (18 sc)
* Rnds 28 to 31: sc in each st around (18 sc)
* Rnd 32: (1 sc, dec) x 6 (12 sc)
* Rnds 33 to 35: sc in each st around (12 sc)
* Rnd 36: dec x 6 (6 sc)
* Rnds 37 to 39: sc in each st around (6 sc)
* Rnd 40: dec x 3 (3 sc)
Fasten off, leave a 10 in / 25 cm tail. Stuff firmly with fiberfill, close tip, and secure.
✅ Checkpoint: Before working the surface spiral on your large tree, make sure the cone is evenly stuffed so the base sits completely flat on a tabletop without wobbling.
Spiral Ridge:
Attach yarn to the lowest exposed front loop of Rnd 9. Work hdc in each exposed front loop moving upward in a continuous spiral until you reach the tip. Fasten off and weave in ends.
Assembly & Finishing
- Inspect all three trees to ensure stuffing is secure and no fiberfill pokes through the stitches.
- Thread your tapestry needle with any remaining yarn tails and weave them securely into the interior bases of the trees.
- Arrange your pastel Christmas decor trio together on a mantel, shelf, or side table.
Size Customization Tips
If you want to make an even larger statement tree, you can continue expanding the base circle by adding rounds of increases (e.g., [7 sc, inc] x 6 for 54 sts), then work your BLO transition round and mirror the decrease frequency accordingly. Each extra increase round adds approximately 0.75 in / 2 cm to the base diameter.
Care Instructions
- Spot clean gently with a damp cloth and mild detergent as needed.
- Do not machine wash or submerge fully in water to protect the inner polyester fiberfill stuffing and preserve shape.
- Store in a breathable cotton bag during the off-season.
FAQ
Can I use cotton yarn instead of acrylic?
Yes, 100% cotton yarn works wonderfully for this pattern and gives the spiral ridges a crisp, defined structure, though it has slightly less stretch than acrylic.
How do I make the trees stand up straight?
Ensure you work your base flat circles evenly and stuff the cones firmly. If needed, you can insert a small cardboard circle cut to fit the inner base diameter before closing up the bottom.
Are these trees safe for children’s rooms?
Yes! Because there are no plastic safety eyes, wires, or hard components used anywhere in this spiral tree trio crochet pattern, they make soft and safe holiday decorations for children’s spaces.
Happy Crocheting!
I hope you love making this blush pink spiral crochet christmas tree trio free pattern as much as I loved designing it for you! Be sure to save this pin to your holiday crochet boards on Pinterest so you can find it easily later. Leave a comment below to let me know what colors you decided to use for your pastel holiday forest.
📄 Your free PDF pattern