











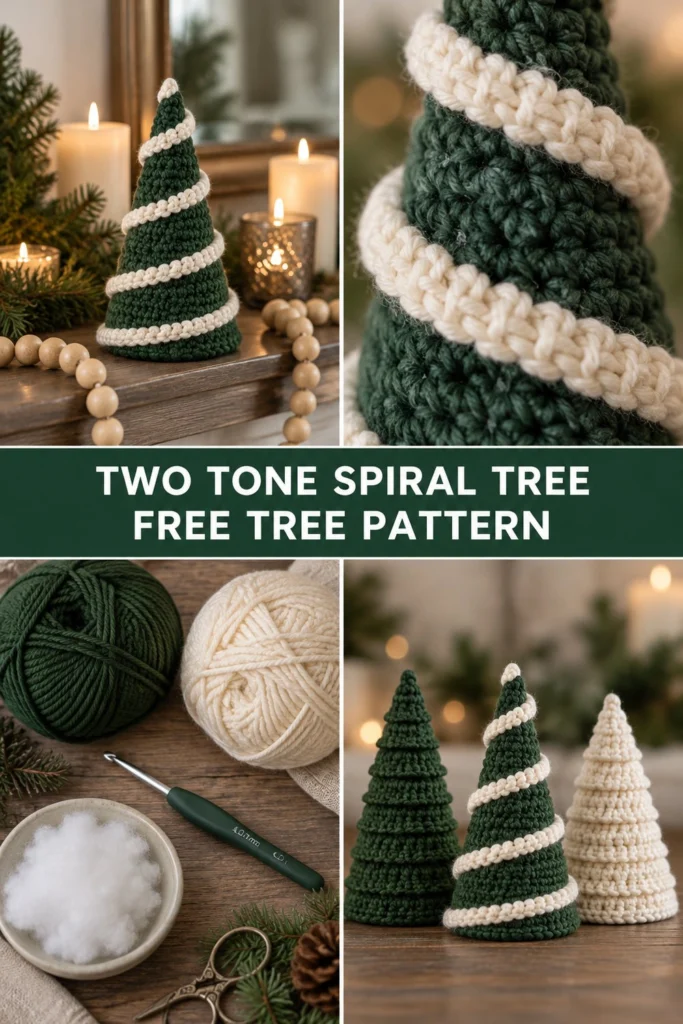
Bring handmade charm to your holiday mantel with this delightful two-tone spiral christmas tree. Featuring a clever single crochet base and a continuous raised ridge that winds up the cone, this project makes stunning crochet holiday decor that you can whip up in an afternoon.
Quick Facts
- Skill level: Intermediate
- Finished size: 3.5 inches (9 cm) wide at the base by 6.5 inches (16.5 cm) tall
- Yarn: Worsted weight (Category 4) acrylic or cotton yarn in Forest Green and Cream (approx. 70 yards total)
- Hook: US G/6 (4.0 mm) crochet hook
- Stitches used: Chain (ch), single crochet (sc), half double crochet (hdc), back loop only (BLO), front loop only (FLO), slip stitch (sl st), increase (inc), invisible decrease (inv-dec)
- Time to make: 2 to 3 hours
Tip: Size customization tips and gauge adjustments are included further down in this guide.
What Makes This Two Tone Spiral Christmas Tree Special
This free crochet pattern uses a specialized construction method to achieve its signature look without any complicated color-working or carrying yarn. As you build the green cone, every single round is worked exclusively in the back loop only (BLO). This leaves behind a continuous, exposed spiral of front loops from the bottom all the way to the tip. Once the cone is complete, you simply return to those leftover front loops and work a rich cream half double crochet ridge right up the spiral. It creates a stunning, dimensional candy-cane effect that instantly elevates your striped crochet tree designs.
Skill Level
- Comfortable working in the round in continuous spirals
- Familiarity with BLO (back loop only) and FLO (front loop only) techniques
- Ability to follow simple cone shaping increases and decreases
- Reassurance: If you can make a basic amigurumi cone, you can easily master this spiral tree crochet pattern!
Finished Measurements
| Measurement | Inches | Centimeters |
|---|---|---|
| Base Diameter | 3.5 in | 9 cm |
| Tree Height | 6.5 in | 16.5 cm |
Materials You Will Need
| Item | Details | Quantity / Yardage |
|---|---|---|
| Color A (Forest Green) | Worsted Weight (Category 4) | Approx. 50 yards (46 meters) |
| Color B (Cream) | Worsted Weight (Category 4) | Approx. 20 yards (18 meters) |
| Crochet Hook | US G/6 (4.0 mm) | 1 hook |
| Stitch Markers | Locking stitch markers | 2 markers |
| Tapestry Needle | For weaving in ends | 1 needle |
| Polyfill Stuffing | Toy stuffing / fiberfill | Approx. 1 ounce |
Yarn Suggestions
| Yarn Line | Skein Yardage | Notes |
|---|---|---|
| Lion Brand Vanna’s Choice | 145 yards / 100g | Excellent stitch definition and holds a firm cone shape |
| Red Heart Super Saver | 236 yards / 141g | Budget-friendly with plenty of yardage for multiple trees |
| Paintbox Yarns Simply Aran | 201 yards / 100g | 100% acrylic with a gorgeous color range for holiday decor |
⚠️ Note: Avoid novelty, fuzzy, or mohair-style yarns for this project. The spiral texture relies on crisp stitch definition, which textured yarns will obscure.
Gauge
- 16 sc x 18 rounds = 4 inches (10 cm) using a 4.0 mm hook in standard single crochet.
- Rnds 1 to 6 of the flat circle base = 2.25 inches (5.7 cm) across.
Abbreviations (US Terms)
- beg: beginning
- BLO: back loop only
- ch: chain
- dec: decrease (work 2 sc together)
- FLO: front loop only
- hdc: half double crochet
- inc: increase (work 2 sc in the same stitch)
- rep: repeat
- rnd(s): round(s)
- sc: single crochet
- sl st: slip stitch
- st(s): stitch(es)
- UK equivalents: sc = dc, hdc = htr, sl st = ss.
Special Stitches Explained
- Magic Ring: Wrap yarn around your index finger twice to form a loop, insert hook through center, pull up a loop, ch 1, and work your starting stitches into the ring. Pull the tail tight to close.
- Back Loop Only (BLO): Insert your hook under the back loop (the loop farthest from you) of the designated stitch, leaving the front loop unworked.
- Front Loop Only (FLO): Insert your hook under the front loop (the loop closest to you) of the designated stitch.
Pattern Instructions
Tree Cone (Color A – Forest Green)
Note: Work in continuous rounds without joining unless otherwise stated. Use a stitch marker to keep track of the first stitch of each round.
Rnd 1: In Color A, make a magic ring, work 6 sc into the ring (6 sc).
Rnd 2: Working in BLO for this and every subsequent cone round: sc in each st around (6 sc).
Rnd 3: Working in BLO: (sc in next st, inc) x 3 (9 sc).
Rnd 4: Working in BLO: sc in each st around (9 sc).
Rnd 5: Working in BLO: (sc in next 2 sts, inc) x 3 (12 sc).
Rnd 6: Working in BLO: sc in each st around (12 sc).
Rnd 7: Working in BLO: (sc in next 3 sts, inc) x 3 (15 sc).
Rnd 8: Working in BLO: sc in each st around (15 sc).
Rnd 9: Working in BLO: (sc in next 4 sts, inc) x 3 (18 sc).
Rnds 10 to 11: Working in BLO: sc in each st around (18 sc).
Rnd 12: Working in BLO: (sc in next 5 sts, inc) x 3 (21 sc).
Rnds 13 to 14: Working in BLO: sc in each st around (21 sc).
Rnd 15: Working in BLO: (sc in next 6 sts, inc) x 3 (24 sc).
Rnds 16 to 17: Working in BLO: sc in each st around (24 sc).
Rnd 18: Working in BLO: (sc in next 7 sts, inc) x 3 (27 sc).
Rnds 19 to 20: Working in BLO: sc in each st around (27 sc).
Rnd 21: Working in BLO: (sc in next 8 sts, inc) x 3 (30 sc).
Rnds 22 to 23: Working in BLO: sc in each st around (30 sc).
Rnd 24: Working in BLO: (sc in next 4 sts, inc) x 6 (36 sc).
Rnds 25 to 26: Working in BLO: sc in each st around (36 sc).
Rnd 27: Working in BLO: (sc in next 5 sts, inc) x 6 (42 sc).
Rnds 28 to 29: Working in BLO: sc in each st around (42 sc).
Rnd 30: Working in BLO: (sc in next 6 sts, inc) x 6 (48 sc).
Rnd 31: Working in BLO: sc in each st around (48 sc).
✅ Checkpoint: At the end of Rnd 31, your flat bottom edge is complete and the cone stands approximately 6.5 inches tall. Stuff the cone firmly with polyfill now before closing the base.
Base Circle
Rnd 32: Working in both loops of the final round stitches, work (sc in next 6 sts, dec) x 6 (42 sc).
Rnd 33: (sc in next 5 sts, dec) x 6 (36 sc).
Rnd 34: (sc in next 4 sts, dec) x 6 (30 sc).
Rnd 35: (sc in next 3 sts, dec) x 6 (24 sc).
Rnd 36: (sc in next 2 sts, dec) x 6 (18 sc).
Rnd 37: (sc in next st, dec) x 6 (12 sc).
Stuff the very bottom fully to ensure a flat, stable base.
Rnd 38: dec x 6 (6 sc).
Fasten off, leaving a 6-inch tail. Thread the tail through the front loops of the remaining 6 stitches, pull tight to close the hole completely, and weave in the end securely inside the tree.
Spiral Ridge (Color B – Cream)
To create the signature striped crochet tree look, hold the tree upside down with the base facing you.
1. Join Color B with a sl st in the exposed front loop of Rnd 2 at the bottom edge.
2. Working upwards along the continuous spiral of leftover front loops, work hdc in each FLO st all the way up to the tip of the tree.
3. Fasten off neatly at the top and weave in all remaining yarn tails inside the cone body. For more inspiration on pairing colors, take a look at the modern forest spiral Christmas tree.
Assembly & Finishing
- Check your tree for any stray stuffing poking through stitches; use your crochet hook to push fibers back inside.
- Pair this classic green design with other festive variations like the rustic alpine spiral Christmas tree or a solid cream version for a stunning forest vignette on your holiday mantel.
Size Customization Tips
- To make a taller tree: Continue working additional straight rounds (sc in each st in BLO) every two increase rounds before moving on to the next expansion.
- To make a wider tree: Add more increase rounds at the base (e.g., working up to
(sc in next 7 sts, inc) x 6for a 54-stitch base circumference). Every extra increase round adds approximately 0.5 inches to the base diameter.
Care Instructions
- Gently spot clean with a damp cloth and mild soap as needed.
- Do not submerge in water if stuffed heavily with polyfill to preserve the cone shape.
- Store in a breathable cotton bag or box during the off-season.
FAQ
Can I use cotton yarn instead of acrylic?
Yes! Cotton yarn produces fantastic stitch definition and a crisp, clean spiral ridge. Just ensure your tension remains consistent so the polyfill doesn’t peek through the stitches.
How do I prevent the tree from leaning?
Stuff the cone evenly, pressing small amounts of fiberfill into all sides as you work upward. Adding a small flat plastic disc or heavy washer inside the base circle can also give it extra stability.
Are these trees safe around small children?
These crocheted trees make wonderful, soft holiday decor. Because they contain no wire frames or small plastic parts, they are wonderfully child-friendly when made with securely woven ends.
Happy Crocheting!
I hope you love creating your very own two tone spiral christmas tree for the holidays! Save this pin on Pinterest to easily find it later, and leave a comment below sharing what color combination you decided to use.
📄 Your free PDF pattern