
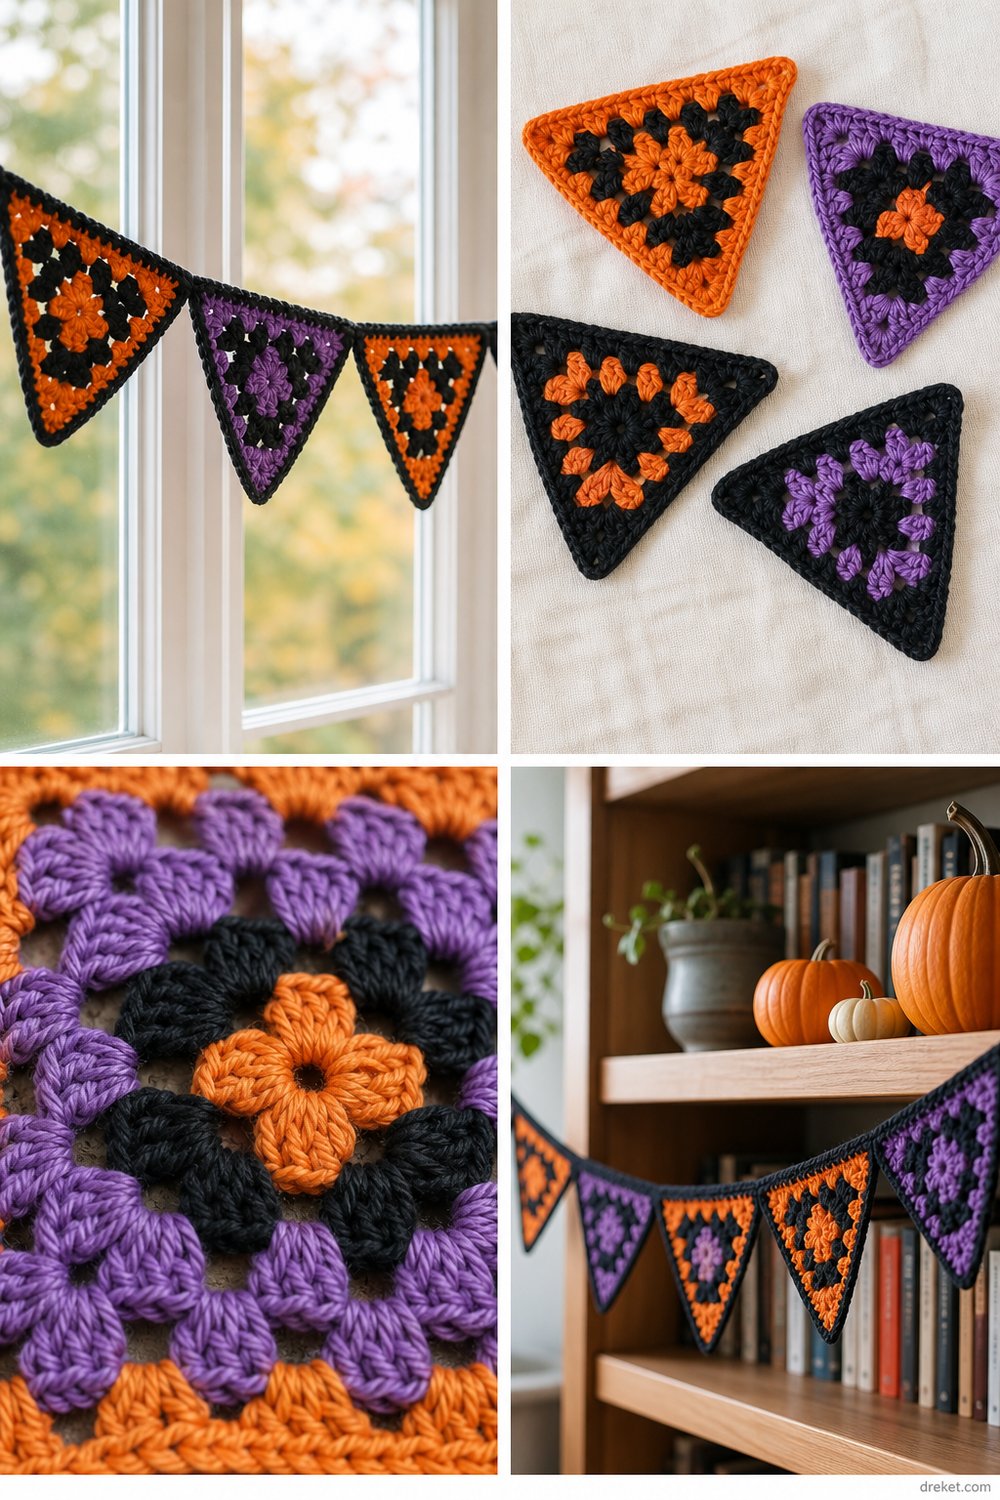
Bring a touch of handmade magic to your autumn decor as crisp daylight streams through the window and highlights the crisp cotton texture of your latest creation. There is nothing quite like stringing up handmade garlands across a bookshelf filled with tiny pumpkins to signal that spooky season has officially arrived.
Spooky Granny Square Halloween Bunting Free Crochet Pattern
This festive home decor project uses classic crochet stitches, measures a generous length, takes about 6 to 8 hours to complete, and makes a wonderful handmade gift for fellow autumn enthusiasts.
Sizing customization tips are included later in this article to help you fit any window or mantel space.
What Makes This Spooky Granny Square Halloween Bunting Special
This design takes the timeless traditional granny square and cleverly transforms it into a cheerful triangle motif by working in specific triangular rounds rather than a full square. The secret lies in creating sharp, defined corners using chain spaces, which allows each square to fold and hang gracefully as a banner pennant. By carefully sequencing our color palette of pumpkin orange, black, and violet, we create a rhythmic, high-contrast visual display that looks just as stunning draped across a sunny window as it does nestled among books and gourds on a living room shelf.
Skill Level
- Advanced Beginner
- Required skills:
- Working in the round and turning
- Basic stitches (ch, sc, dc)
- Changing colors cleanly at round beginnings
- Joining motifs as you go or via whip stitch
💡 Designer Tip: If you are comfortable reading a basic granny square pattern, you will breeze right through these triangle motifs!
Finished Measurements
| Size / Component | Inches (Imperial) | Centimeters (Metric) |
|---|---|---|
| Individual Triangle Motif | 6.5″ wide x 5.5″ high | 16.5 cm wide x 14 cm high |
| Total Bunting Length (10 Pennants) | 60″ string length | 152.4 cm string length |
| Hanging String Length | 72″ total | 182.8 cm total |
Materials You Will Need
- Yarn Weight: Sport / #2 Fine weight 100% cotton yarn (recommended for crisp stitch definition)
- Crochet Hook: US E/4 (3.5 mm)
- Notions: Tapestry needle for weaving in ends, sharp scissors
| Color Name | Color Hex / Description | Yardage Needed |
|---|---|---|
| Pumpkin Orange | Vibrant Halloween Orange | 65 yds / 60 m |
| Black | Midnight Black | 65 yds / 60 m |
| Violet | Deep Mystic Violet | 65 yds / 60 m |
| Cream | Natural Linen Cream (Joining/Border) | 80 yds / 73 m |
Yarn Suggestions
| Brand & Line Name | Yarn Weight | Skein Yardage | Notes |
|---|---|---|---|
| Schachenmayr Catania | Sport (#2) | 137 yds / 125 m per 50g | 100% mercerized cotton; exceptional stitch definition. |
| Hobbii Rainbow Cotton 8/6 | Sport (#2) | 115 yds / 105 m per 50g | Matte finish, massive color range, great value. |
| Knit Picks CotLin | DK (#3) | 123 yds / 112 m per 50g | Linen-cotton blend; gorgeous rustic drape (adjust hook if needed). |
⚠️ Note: Avoid using fuzzy acrylic or novelty yarns for this project. They obscure the crisp geometry of the granny triangles and hide the lovely cotton texture shown in the product photography.
Gauge
| Measurement Type | Stitch / Row Count Over 4 inches (10 cm) |
|---|---|
| Standard Granny Cluster Gauge | 3 3-dc clusters and 3 spaces across 4 rows using a 3.5 mm hook |
| Motif Gauge | One completed triangle motif measures 6.5 inches across the top edge. |
💡 Designer Tip: Always make a gauge swatch if you want to ensure your pennants match the exact dimensions listed. Cotton yarn has zero stretch, so your tension will remain consistent throughout.
Abbreviations
| Abbreviation | Full Term |
|---|---|
| ch | Chain |
| sc | Single crochet |
| dc | Double crochet |
| sl st | Slip stitch |
| st(s) | Stitch(es) |
| sp(s) | Space(s) |
| Rnd / Row | Round or Row |
| yo | Yarn over |
| rep | Repeat |
| RS | Right Side |
Special Stitches Explained
- V-Stitch in Corner (V-Stst): (1 dc, ch 2, 1 dc) worked into the designated ch-2 corner space.
- Granny Cluster (Cl): Work 3 dc in the same specified space or stitch.
- Standing Double Crochet (Standing DC): With slip knot on hook, yo, insert hook into st, yo, pull up a loop, [yo, pull through 2 loops] twice.
Pattern Instructions
Section 1: Triangular Granny Motifs (Make 10 total: 3 Orange, 3 Black, 3 Violet, plus 1 accent motif of your choice)
Rnd 1: With Color A, ch 4, join with sl st to form a ring. Ch 3 (counts as first dc here and throughout), work 2 dc into the ring, ch 2, work 3 dc into the ring, ch 2, work 3 dc into the ring. Turn. Do not join in the round; this is worked back and forth in rows/wedge rounds to form a triangle. Stitch count: 3 3-dc clusters, 2 ch-2 corner spaces.
Rnd 2: Ch 3, turn. Work 2 dc in the very first st at the base of the ch-3. Skip next 3 sts, work [3 dc, ch 2, 3 dc] in the next ch-2 corner sp. Rep from * to * across to the final ch-2 space. In the final ch-2 corner space, work [3 dc, ch 1, 1 dc] to keep the edge flat. Stitch count: 5 3-dc clusters, 2 ch spaces.
Rnd 3: Ch 3, turn. Work 2 dc in first st. Skip to next space, work 3 dc in space between clusters. In next ch-2 corner sp, work [3 dc, ch 2, 3 dc]; work 3 dc in next space between clusters, working [3 dc, ch 1, 1 dc] in the final turning space. Stitch count: 7 3-dc clusters.
Rnd 4: Ch 3, turn. Work 2 dc in first st, work 3 dc in each space across to the corner sp. In corner sp, work [3 dc, ch 2, 3 dc]. Work 3 dc in each space to the end, finishing with [3 dc, ch 1, 1 dc] in the top of turning chain. Fasten off Color A. Stitch count: 10 3-dc clusters.
✅ Checkpoint: Verify that your triangle has a flat top edge, two clean sloping sides, and sharp lower corner points before moving on to the border round.
Section 2: Cream Border and Edging
Rnd 5: Join Cream yarn with a standing sc in the top right corner st. Working evenly across the top horizontal edge of the triangle, work 1 sc in each dc and ch sp across to the top left corner. Along the two slanted sides, work 2 sc evenly down each side dc post, and 3 sc in the bottom point corner. Join with a sl st to the first sc. Fasten off and weave in all ends.
Section 3: Assembly and Hanging Cord
Step 1: Lay your 10 finished triangles out in a pleasing alternating color sequence: Pumpkin Orange, Black, Violet, repeating across the line.
Step 2: Using Cream yarn, create a starting tail of 18 inches for hanging.
Step 3: Chain 2. Align the top edge of the first triangle along your working chain, and work a row of sc through both the top loops of the triangle and the chain stitches simultaneously to secure it to the cord.
Step 4: Chain 10 between each consecutive triangle to space them evenly apart. Repeat the sc attachment method across all 10 triangles.
Step 5: Once all triangles are attached, ch 18 for the final ending tail, fasten off, and secure your ends.
✅ Checkpoint: Check that all triangles hang uniformly right-side out and that the spacing chains between pennants are identical in length.
Size Customization Tips
- Sizing Up: To make a longer bunting for a wide fireplace mantel or larger window, simply crochet 2 to 4 additional triangle motifs following the exact pattern instructions, maintaining your color sequence rotation, and add 10 additional chains of spacing between each extra pennant. Every added triangle increases the total span by approximately 7.5 inches (19 cm).
- Sizing Down: To fit a smaller space like a reading nook or narrow doorway, reduce the total count to 6 or 8 triangles. This decreases the overall banner length proportionally by roughly 15 to 22 inches (38 to 56 cm).
Care Instructions
Hand wash your finished bunting gently in cool water using a mild wool-safe detergent. Do not wring or twist the cotton fabric. Lay flat to dry on a clean towel, blocking the individual triangle motifs into crisp geometric shapes while damp. Store folded loosely in a breathable cotton bag during the off-season.
Closing
Thank you for crafting along with this Spooky Granny Square Halloween Bunting Free Crochet Pattern! I hope your home feels delightfully festive and cozy all season long.
If you make this project, please share your photos, tag me on social media, save this pin to your favorite holiday boards on Pinterest, and leave a comment below to let me know which color combination was your favorite! Happy crocheting!