











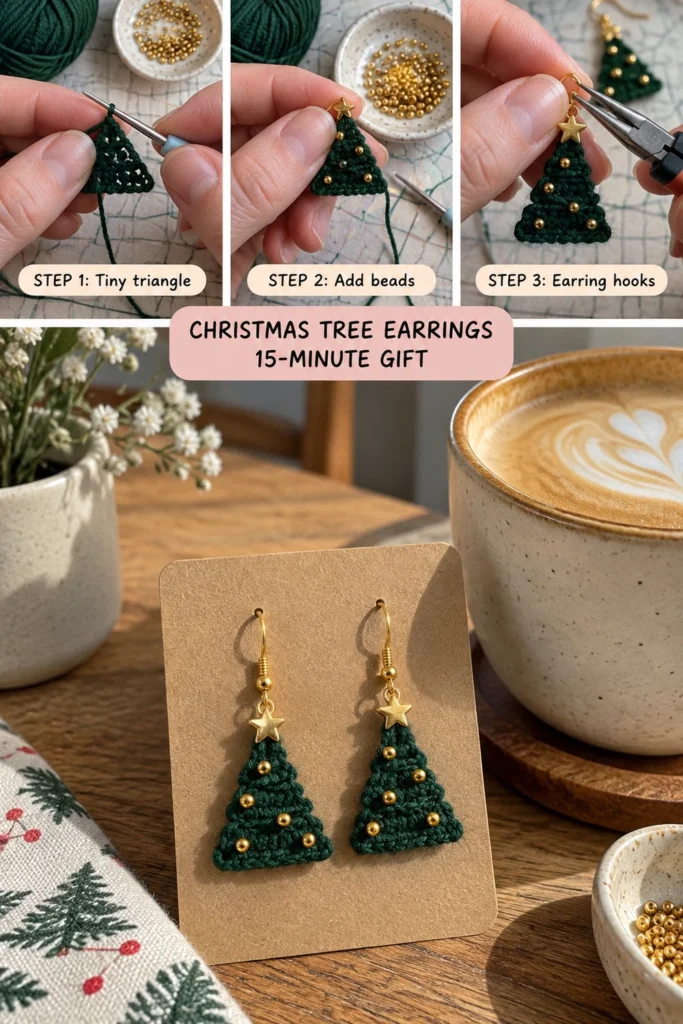
These festive Christmas tree earrings are quick, charming, and make wonderful holiday gifts or stocking stuffers. Each tiny tree is worked as a flat triangle in fine green cotton, with gold seed beads crocheted right into the fabric as baubles, topped with a star charm, and lightly stiffened so it holds its shape all season long.
15-Minute Crochet Christmas Tree Earrings – Free Pattern
Quick Facts
- Skill level: Easy / Beginner-friendly
- Finished size: Approximately 1.5 inches (3.8 cm) tall and 1.2 inches (3 cm) wide (excluding the earring hook)
- Yarn: Fingering weight (#1) cotton yarn in Dark Green
- Hook: 2.0 mm (US steel hook size 14 or US b/1 equivalent)
- Stitches used: Chain (ch), single crochet (sc), single crochet two together (sc2tog)
- Time to make: 15 minutes per pair
For adjustments and size customizations, check the section further down.
What Makes These Christmas Tree Earrings Special
- Pre-strung baubles: Gold seed beads are threaded onto the yarn before you begin, then pulled up into specific stitches as you crochet so they sit securely on the front of the tree.
- Instant structure: Working from the tip down in flat rows creates a clean, symmetrical triangle without needing complex shaping or sewing.
- Lightweight wear: Fine cotton yarn and tiny seed beads mean these earrings are comfortable for all-day holiday wear without pulling on your lobes.
Skill Level
- Basic understanding of crochet terminology (ch, sc)
- Ability to work simple decreasing rows
- Familiarity with threading small beads onto yarn before starting
- Reassurance line: If you can work basic single crochet rows and decrease, you can easily finish this project in one sitting!
Finished Measurements
| Dimension | Inches | Centimeters |
|---|---|---|
| Height (Tree only) | 1.5 in | 3.8 cm |
| Width (Tree base) | 1.2 in | 3 cm |
| Total Drop (with hook) | 2.2 in | 5.6 cm |
Materials You Will Need
| Material / Notion | Description | Quantity / Details |
|---|---|---|
| Yarn | Fingering weight (#1) 100% cotton yarn in Dark Green | Small scrap (~5 yards / 4.5 meters) |
| Beads | Metallic gold seed beads (size 6/0 or 8/0) | 6 beads per tree (12 beads per pair) |
| Charms | Small gold star charms or flat star beads | 1 per tree (2 per pair) |
| Findings | Gold-toned earring hooks and jump rings | 1 pair of hooks, 2 jump rings |
| Tools | Crochet hook 2.0 mm | 1 |
| Tools | Jewelry pliers (flat nose and round nose) | 1 pair |
| Tools | Tapestry needle and sharp sewing needle (to thread beads if needed) | 1 |
| Finishing | Fabric stiffener or diluted white craft glue | A few drops |
Yarn Suggestions
| Yarn Line | Weight | Skein Yardage | Notes |
| :— | :— | :— |
| Schachenmayr Catania | Fingering (#1) | 137 yds (125 m) per 50g | Wonderful stitch definition and rich green shades. |
| DMC Petra Crochet Cotton (Size 3) | Fingering / Thread | 305 yds (278 m) per 100g | Gives a crisp, clean triangle shape. |
⚠️ Note: Avoid fuzzy or acrylic yarns like mohair or heavy wool for this project. You want a smooth, mercerized cotton or tight crochet thread so the tiny seed beads pop against the stitches and the triangle keeps its sharp geometric shape.
Gauge
- Gauge: 10 sc and 10 rows = 1 inch (2.5 cm) using a 2.0 mm hook with fingering weight cotton. Exact gauge is not critical for earrings, but tighter stitches will hold the beads and stiffener better.
Abbreviations
- ch: chain
- sc: single crochet
- sc2tog: single crochet two together (decrease)
- st(s): stitch(es)
- sk: skip
- rnd(s): round(s)
- row(s): row(s)
- [ ] / ( ): work instructions within parentheses as directed
UK terms equivalent: sc = dc, hdc = htr, dc = tr.
Special Stitches Explained
- Pre-strung beads technique: Before starting your foundation chain, thread all 6 gold seed beads onto your yarn tail using a fine needle. Push them down along the yarn so they stay out of your way until called for in the pattern.
- sc2tog (Decrease): Insert hook in next st, yarn over, pull up a loop (2 loops on hook), insert hook in following st, yarn over, pull up a loop (3 loops on hook), yarn over, draw through all 3 loops on hook.
Pattern Instructions
Pattern Notes
- Work in turned rows.
- The turning chain-1 at the start of a row does not count as a stitch.
- Slide your pre-strung beads up the working yarn as you reach the designated rows, popping them to the front of your work as you make the stitch.
Section 1: Christmas Tree (Dark Green, make 2)
Before beginning, thread 6 gold seed beads onto your Dark Green yarn.
Row 1: Ch 11, working in the 2nd ch from hook, sc in each ch across (10 sc). Turn.
Row 2: Ch 1, sc2tog, sc in next 6 sts, sc2tog (8 sc). Turn.
Row 3: Ch 1, sc in first st, slide 1 bead up and work sc in next st capturing the bead on the front, sc in next 4 sts, slide 1 bead up and work sc in next st capturing the bead, sc in last st (8 sc). Turn.
Row 4: Ch 1, sc2tog, sc in next 4 sts, sc2tog (6 sc). Turn.
Row 5: Ch 1, sc in first st, slide 1 bead up and work sc in next st capturing the bead, sc in next 2 sts, slide 1 bead up and work sc in next st capturing the bead, sc in last st (6 sc). Turn.
Row 6: Ch 1, sc2tog, sc in next 2 sts, sc2tog (4 sc). Turn.
Row 7: Ch 1, sc in first st, slide 1 bead up and work sc in next st capturing the bead, slide 1 bead up and work sc in next st capturing the bead, sc in last st (4 sc). Turn.
Row 8: Ch 1, sc2tog, sc2tog (2 sc). Turn.
Row 9: Ch 1, slide the final remaining bead up and work sc2tog capturing the bead (1 sc). Fasten off, leaving a 6-inch (15 cm) tail. Weave in your starting tail.
✅ Checkpoint: You should have a flat, symmetrical green triangle with 6 gold seed beads arranged in a pyramid layout across the rows, ending with 1 single crochet at the very top peak.
Assembly
- Attach the star: Using the top yarn tail (or a separate small piece of matching thread), securely attach the gold star charm to the top peak of the tree (Row 9). Securely knot and weave in any remaining ends.
- Attach the hardware: Open a jump ring using your jewelry pliers, slip it through the top loop behind or around the star charm, slide on the loop of the earring hook, and twist the jump ring closed securely. Repeat for the second earring.
Finishing
- Stiffening: Lay both completed trees flat on a piece of parchment paper. Lightly dab the back of each tree with fabric stiffener or a 1:1 mixture of white craft glue and water using a cotton swab. Let dry completely (about 2–4 hours) so the earrings maintain a crisp, flat triangle shape when worn.
Size Customization Tips
- Making them larger: Start with an initial foundation of ch 15 and adjust your decrease rows accordingly, adding a few extra gold seed beads to match the wider base.
- Making them smaller: Start with ch 7 for a miniature tree, using 3 total beads instead of 6.
Care Instructions
- Store your earrings flat in a jewelry box or pouch to prevent bending.
- Avoid getting the stiffened earrings wet; remove them before showering, swimming, or applying hairspray.
- Spot clean gently with a dry or barely damp cloth if needed.
FAQ
Can I use embroidery floss instead of cotton yarn?
Yes! Embroidery floss split into fewer strands or used whole with a tiny 1.25 mm or 1.5 mm hook makes wonderfully crisp, delicate mini trees.
What size seed beads should I buy?
Size 6/0 or 8/0 seed beads work best because their inner holes are large enough to easily pass fingering weight cotton yarn or be threaded with a standard tapestry needle.
How do I stop the edges from curling?
Applying fabric stiffener to the back of the finished trees while pinning them flat on parchment paper completely eliminates curling and keeps them rigid and neat.
Happy Crocheting!
I hope you love making these festive Christmas tree earrings! Save this pattern on Pinterest for later, and leave a comment below sharing what color trees you decided to make this holiday season.
📄 Your free PDF pattern