











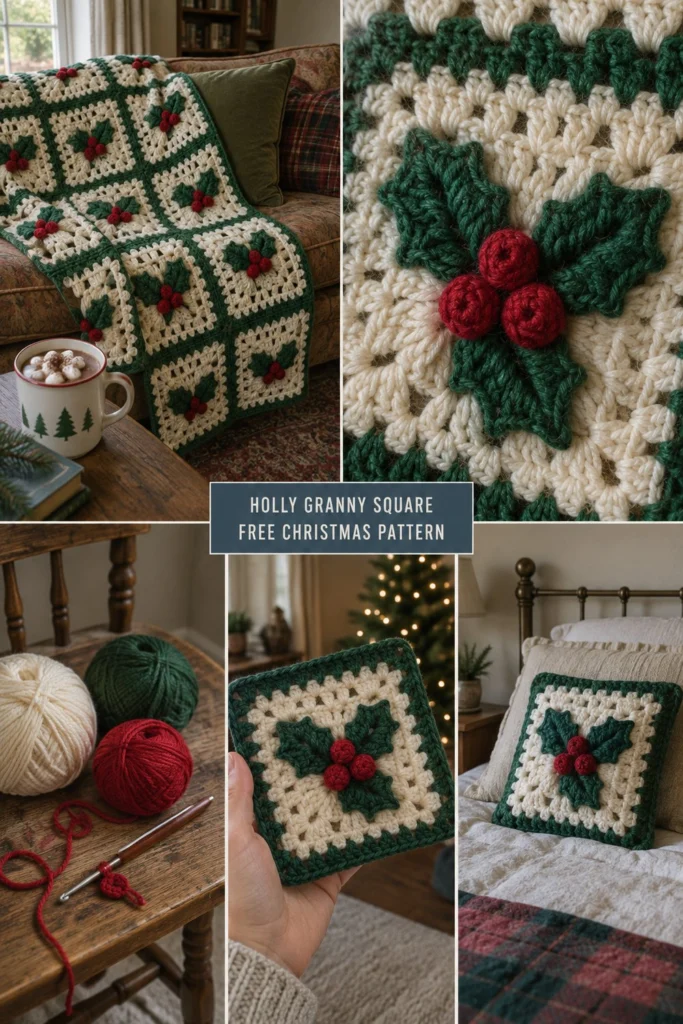
Add a handmade, festive touch to your home this holiday season with this classic Christmas motif! Worked in rich forest green, cream, and deep red, this granny square features textured bobble berries and dimensional puff stitch leaves that pop right off the surface.
Free Crochet Holly Granny Square Pattern: Christmas Blanket Motif
Quick Facts
- Skill level: Intermediate
- Finished size: Approximately 6 inches (15 cm) square
- Yarn: Worsted weight (Aran) yarn in Cream, Forest Green, and Red
- Hook size: 5.0 mm (H-8) crochet hook
- Stitches used: Ch, sl st, sc, hdc, dc, puff stitch, bobble stitch
- Time to make: About 1 to 1.5 hours per square
💡 Designer Tip: Size customization and joining instructions for pillows and blankets are included further down.
What Makes This Motif Special
This design transforms a traditional granny square into a festive holiday decoration by combining classic granny stitch clusters with textured specialty stitches. The center features three raised red bobble berries nestled among two lush, textured puff stitch leaves, all framed within clean rounds of cream and forest green.
Skill Level
- Comfortable working in the round and joining new yarn colors
- Familiarity with basic granny square construction
- Ability to work puff stitches and bobble stitches
- Reassurance line: If you can make a standard granny square, you can easily master the center embellishments with these step-by-step instructions.
Finished Measurements
| Dimension | Inches | Centimeters |
|---|---|---|
| Width | 6.0 in | 15.0 cm |
| Height | 6.0 in | 15.0 cm |
Materials You Will Need
| Color | Yarn Type / Weight | Yards | Meters |
|---|---|---|---|
| Cream | Worsted Weight (4) | 25 yds | 23 m |
| Forest Green | Worsted Weight (4) | 30 yds | 27 m |
| Red | Worsted Weight (4) | 10 yds | 9 m |
- Hook: 5.0 mm (US H-8) crochet hook
- Notions: Yarn needle for weaving in ends, sharp scissors
Yarn Suggestions
| Yarn Line | Weight | Skein Yardage | Notes |
|---|---|---|---|
| Lion Brand Vanna’s Choice | Worsted (4) | 170 yds (156 m) | Excellent stitch definition for texture |
| Red Heart Super Saver | Worsted (4) | 236 yds (215 m) | Durable and holds its shape well |
| Caron One Pound | Worsted (4) | 812 yds (742 m) | Great economical choice for blankets |
⚠️ Note: Avoid novelty fuzzy yarns or extremely thin sport-weight yarns, as they will obscure the definition of the puff and bobble stitches.
Gauge
- Rnds 1 to 3 measure approximately 2.5 inches (6.5 cm) across.
- 1 standard granny square measures 6 x 6 inches (15 x 15 cm) using a 5.0 mm hook.
Abbreviations
- ch: chain
- sl st: slip stitch
- sc: single crochet
- hdc: half double crochet
- dc: double crochet
- puff: puff stitch
- bobble: bobble stitch
- st(s): stitch(es)
- sp(s): space(s)
- sk: skip
- rep: repeat
- rnd(s): round(s)
- RS: right side
UK terms equivalent: sc = dc, hdc = htr, dc = tr, sl st = sl st.
Special Stitches Explained
- Puff Stitch (puff): [Yo, insert hook into designated st/sp, pull up a loop] 4 times in the same st/sp (9 loops on hook), yo, draw through all 9 loops, ch 1 to lock the stitch.
- Bobble Stitch (bobble): [Yo, insert hook into st, yo, pull up a loop, yo, draw through 2 loops] 4 times in the same st (5 loops on hook), yo, draw through all 5 loops on hook.
- Magic Ring: Wrap yarn around your fingers to create an adjustable loop, work the required number of stitches into the ring, and pull the tail tight to close.
Pattern Instructions
Section 1: Holly Center and Berry Cluster (Red, Forest Green, Cream)
Rnd 1 (Red): Make a magic ring. Working into the ring, ch 1, work 3 bobble stitches (ch 1 between each bobble), sl st to the top of the first bobble to join. Fasten off red. (3 bobbles, 2 ch-1 sps)
Rnd 2 (Forest Green): Join Forest Green yarn in any ch-1 space between the red bobbles.
– Ch 2 (counts as hdc), work 1 puff stitch in the same space, ch 2, work 1 puff stitch in the same space (first leaf made).
– Work 1 hdc in the top of the next bobble.
– In the next ch-1 space, work (1 puff, ch 2, 1 puff) (second leaf made).
– Work 1 hdc in the top of the final bobble.
– Sl st to the top of the starting ch-2 to join. Fasten off forest green. (4 puff stitches, 2 ch-2 spaces, 2 hdc)
✅ Checkpoint: You should now have a compact red berry cluster in the center, flanked by two distinct green puff-stitch holly leaves.
Rnd 3 (Cream): Join Cream yarn in any ch-2 corner space of the leaves.
– Ch 3 (counts as 1 dc), work (2 dc, ch 2, 3 dc) in the same corner sp.
– *Sk next 2 sts, work 3 dc in the space between leaves/hdc, sk next 2 sts*, work (3 dc, ch 2, 3 dc) in the next corner sp. Rep from * to * once more.
– Sl st to top of starting ch-3 to join. Do not fasten off cream. (28 dc, 4 ch-2 corner sps)
Rnd 4 (Cream): Sl st across to the next ch-2 corner space.
– Ch 3 (counts as 1 dc), work (2 dc, ch 2, 3 dc) in the same corner sp.
– *Ch 1, work 3 dc in the next ch-space between 3-dc groups, ch 1*, work (3 dc, ch 2, 3 dc) in the next corner sp. Rep from * to * once.
– Ch 1, work 3 dc in the final side space, ch 1, sl st to top of starting ch-3 to join. Fasten off cream. (36 dc, 8 ch-1 sps, 4 ch-2 corner sps)
Rnd 5 (Forest Green): Join Forest Green yarn in any ch-2 corner space.
– Ch 3 (counts as 1 dc), work (2 dc, ch 2, 3 dc) in the same corner sp.
– *[Work 3 dc in the next ch-1 sp, ch 1] across to the next corner sp*, work (3 dc, ch 2, 3 dc) in the corner. Rep from * to * around.
– Sl st to top of starting ch-3 to join. Fasten off and weave in all ends securely. (48 dc, 12 ch-1 sps, 4 ch-2 corner sps)
Assembly
- For a Pillow: Crochet 1 front panel square. For the back, you can either crochet 4 matching squares and join them into a larger 2×2 square panel, or work a solid granny square to match the dimensions. Sew the front and back panels together along three sides, insert a 12-inch square pillow form, and whipstitch the final side closed.
- For a Blanket: Crochet as many squares as desired (e.g., a 4×5 grid for a throw blanket). Arrange them with alternating color balance or uniform orientation. Join them using the flat braid join or simple whipstitch through the back loops only on the RS.
Finishing
- Weave in all loose yarn tails on the wrong side using your yarn needle.
- Block your finished squares by pinning them out to exact 6×6 inch dimensions on a blocking mat and misting lightly with water. Allow to dry completely before joining.
Size Customization Tips
- Each complete square measures 6 inches square. To make a larger blanket, simply calculate your desired dimensions and multiply by 6 inches to determine how many squares you need to crochet.
- To make a larger standalone cushion, add one more granny round in Cream following the pattern of Rnd 4, increasing the side 3-dc groups accordingly.
Care Instructions
- Hand wash gently in cool water with mild wool detergent, or machine wash on a delicate cycle in a mesh laundry bag.
- Lay flat to dry in the correct shape. Do not tumble dry, bleach, or iron directly.
FAQ
Can I use acrylic yarn instead of wool?
Yes! Acrylic yarn is affordable, washable, and holds up wonderfully for blankets and decorative pillows. Just ensure all your yarns are the same weight for a uniform square size.
How do I join the squares seamlessly?
You can use a whipstitch through the back loops only for a clean, flat seam, or use a continuous join-as-you-go method as you complete Rnd 5 on subsequent squares.
Are these squares safe for baby items?
Yes, this motif makes a lovely baby blanket when worked in soft, certified baby-safe acrylic or cotton yarns. Because there are no safety eyes or buttons, it is completely baby-safe.
Happy Crocheting!
I hope you enjoy creating these festive holly granny squares for your holiday home. Be sure to save this pin on Pinterest and leave a comment below sharing what you are making with your squares!
📄 Your free PDF pattern