
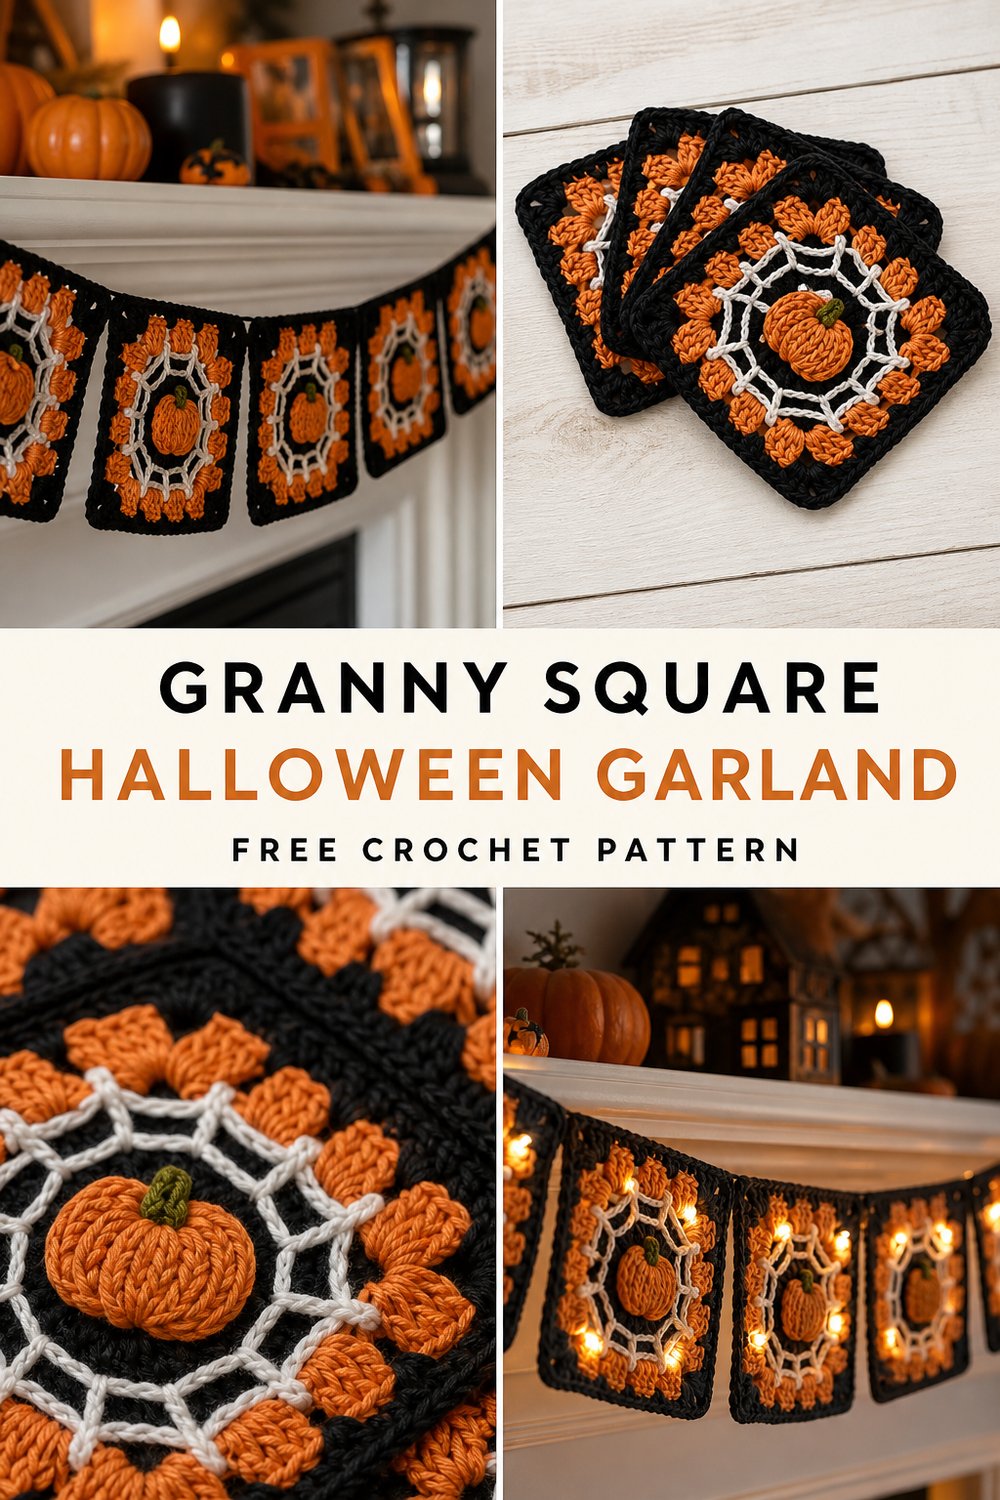
Drape your mantel in crisp cotton texture and warm light this season with a project that brings instant, handmade charm to your autumn hearth. This cheerful yet spooky decor piece blends classic motifs with festive spirit, creating an inviting focal point whether styled alone or woven with glowing string lights.
Orange and Black Granny Square Garland Free Crochet Pattern
Quick Facts
- Stitches Used: Chain (ch), single crochet (sc), half double crochet (hdc), double crochet (dc), slip stitch (sl st), popcorn stitch (pc).
- Size Fit: One standard size garland, easily adjustable to span any mantel, shelf, or doorway.
- Estimated Hours to Complete: 4–6 hours from first motif to final hanging.
- Gift-Appeal Framing: Perfect for housewarming autumn gifts, Halloween enthusiasts, or as a quick weekend project to elevate your seasonal hosting.
Easily customize your garland’s total length and motif spacing using the straightforward sizing tips included near the end of this pattern.
What Makes This Orange and Black Granny Square Garland Special
This design relies on a clever fusion of traditional granny square construction and modern thematic motifs. Working in crisp cotton yarn ensures sharp stitch definition, keeping the tiny web and pumpkin center details clean and structured without looking floppy or overly soft. The seamless continuous-join method means fewer ends to weave in while maintaining a flexible drape that hangs naturally across uneven surfaces or pairs effortlessly with warm string lights.
Skill Level
- Skill Level: Intermediate
- Required Skills:
- Working in the round and turning chains.
- Basic amigurumi-style center shaping for motifs.
- Standard granny square cluster placement (3-dc shells).
- Joining squares on-the-fly or via seamless whipstitch.
💡 Designer Tip: Don’t let the intermediate tag intimidate you; if you can tackle a basic granny square and a popcorn stitch, you have all the tools needed to complete this garland with flying colors.
Finished Measurements
| Dimension | Inches | Centimeters |
|---|---|---|
| Single Square Width/Height | 3.5 inches | 9 cm |
| Standard Garland Length (8 Squares) | 48 inches | 122 cm |
| Hanging Tie Length (Each End) | 10 inches | 25.5 cm |
| Total Finished Span | 68 inches | 173 cm |
Materials You Will Need
- Yarn Weight: Sport (#2) or Light Worsted (#3) 100% cotton yarn for crisp stitch definition.
- Hook: US Size E/4 (3.5 mm) or size needed to obtain gauge.
- Notions: Tapestry needle for weaving ends, locking stitch markers, scissors.
| Color Name | Exact Color Order | Yarn Weight | Yardage Needed |
|---|---|---|---|
| Pumpkin Orange | Color A | Sport / Light Worsted | 50 yds / 46 m |
| Jet Black | Color B | Sport / Light Worsted | 50 yds / 46 m |
| Natural Cream | Color C | Sport / Light Worsted | 40 yds / 37 m |
| Charcoal | Color D | Sport / Light Worsted | 30 yds / 28 m |
Yarn Suggestions
| Brand & Line Name | Yarn Weight | Yardage Per Skein | Notes |
|---|---|---|---|
| Knit Picks CotLin | Sport (#2) | 123 yds / 112 m per 50g | Linen-cotton blend offers fantastic stitch definition and subtle rustic drape. |
| Schachenmayr Catania | Sport (#2) | 137 yds / 125 m per 50g | 100% mercerized cotton with vibrant, non-fading color saturation. |
| Lion Brand Coboo | Light Worsted (#3) | 232 yds / 212 m per 100g | Cotton-bamboo blend with a lovely soft sheen and excellent weight. |
⚠️ Note: Avoid loosely spun acrylic or heavy roving yarns for this project. They obscure the intricate center details of the web and pumpkin motifs and lack the crisp structure needed for a clean garland drape.
Gauge
Gauge is helpful but not strictly critical for a decorative garland. However, matching gauge ensures your squares remain uniform in size.
| Measurement Type | Stitches / Rows | Dimensions |
|---|---|---|
| Square Gauge | 1 Granny Square round 1-3 | 3.5 inches (9 cm) square |
| Stitch Gauge | 6 dc and 3 rows | 2 inches (5 cm) square |
⚠️ Note: Be sure to check your gauge by completing one test square before producing all motifs to ensure consistency.
Abbreviations
| Abbreviation | Full Meaning |
|---|---|
| ch | Chain |
| sl st | Slip stitch |
| sc | Single crochet |
| hdc | Half double crochet |
| dc | Double crochet |
| pc | Popcorn stitch |
| sp(s) | Space(s) |
| st(s) | Stitch(es) |
| rnd | Round |
| rep | Repeat |
| RS | Right side |
Special Stitches Explained
- Popcorn Stitch (pc): Work 5 dc in the designated st/sp, drop loop from hook, insert hook from front to back through the top of the first dc made, pick up the dropped loop and pull it through the st. Ch 1 to close.
- Spiderweb Center (sw-c): Work a small ring of alternating sc and ch-3 spaces, designed to mimic delicate radial threads before building out into traditional granny cluster corners.
- Continuous Join (c-join): A method of working the final round of adjacent squares while simultaneously joining them along their outer edges to eliminate separate sewing steps.
Pattern Instructions
Section 1: The Motifs (Make 4 Orange-Center Squares and 4 Black-Center Squares)
Round 1 (Center Motif)
Using Color A (or Color B for alternate squares), magic ring. Ch 3 (counts as first dc), work 15 dc into the ring. Join with sl st to top of beg ch-3. Fasten off. (16 dc)
Round 2 (Web/Detail Layer)
Join Color C in any st. Ch 1, sc in same st, *ch 3, skip 1 st, sc in next st; rep from * around, ending with ch 3, sl st to first sc. (8 sc, 8 ch-3 sps)
Round 3 (Granny Square Transition)
Sl st into first ch-3 sp. Ch 3 (counts as first dc), (2 dc, ch 2, 3 dc) in same ch-3 sp (first corner made). *(3 dc in next ch-3 sp) twice, work (3 dc, ch 2, 3 dc) in next ch-3 sp; rep from * twice more, (3 dc in next ch-3 sp) twice, join with sl st to top of beg ch-3. Fasten off Color C. (4 corners, 12 3-dc clusters total)
Round 4 (Border & Outer Edge)
Join Color D in any corner ch-2 sp. Ch 3, (2 dc, ch 2, 3 dc) in same sp. *[3 dc in space between next 2 clusters] across to next corner sp, work (3 dc, ch 2, 3 dc) in corner sp; rep from * around, join with sl st to top of beg ch-3. Fasten off, leaving a 6-inch tail for weaving. (16 3-dc clusters, 4 ch-2 corners)
✅ Checkpoint: Measure your completed square diagonally and horizontally. It should measure precisely 3.5 inches (9 cm) across. Block lightly with steam if edges curl.
Section 2: Garland Assembly and Joining
Step 1: Layout Arrangement
Arrange your 8 completed squares in an alternating color sequence along a flat surface:
[Orange Center] – [Black Center] – [Orange Center] – [Black Center] – [Orange Center] – [Black Center] – [Orange Center] – [Black Center]
Step 2: The Continuous Join
Using Color D, attach yarn to the top-left corner ch-2 space of Square 1. Working across the top edge, join adjacent squares side-by-side using a continuous flat braid join or simple whipstitch through the back loops of Round 4.
💡 Designer Tip: If you prefer a more rustic look, leave a 1-inch gap between each square when joining, securing them with small knots at the corners.
Step 3: Hanging Ties
- Join Color D at the far-left corner ch-2 space of the first square.
- Chain 50 loosely to create a 10-inch hanging loop/tie. Fasten off and secure securely.
- Repeat the same process at the far-right corner ch-2 space of the final square to create the second hanging tie.
✅ Checkpoint: Check that all loose yarn tails are securely woven into the back of the motifs using a tapestry needle before hanging.
Size Customization Tips
- To Make a Longer Garland: Simply crochet additional squares (following the alternating color formula) and join them to the chain before adding the final end ties. Each additional square adds approximately 3.5 inches (9 cm) to the total decorated span.
- To Make a Shorter Garland: Reduce the total count to 4 or 6 squares for smaller display areas like window frames or mirrors.
Care Instructions
- Hand wash gently in cool water using mild wool detergent.
- Do not bleach or tumble dry.
- Lay flat on a clean towel, block to original square dimensions, and allow to air dry completely before hanging.
Closing
Thank you so much for creating the Orange and Black Granny Square Garland Free Crochet Pattern alongside me! I hope this cozy project brings warmth, whimsy, and handmade charm to your seasonal decorating.
Be sure to snap a picture of your finished garland draped across your mantel or styled with string lights, and tag me on social media using #OrangeAndBlackGarland and #StitchWith[DesignerName]. Save this pin to your favorite Halloween or Crochet Decor boards on Pinterest so you can find it year after year, and please leave a comment below letting me know how your spooky squares turned out! Happy crocheting!