
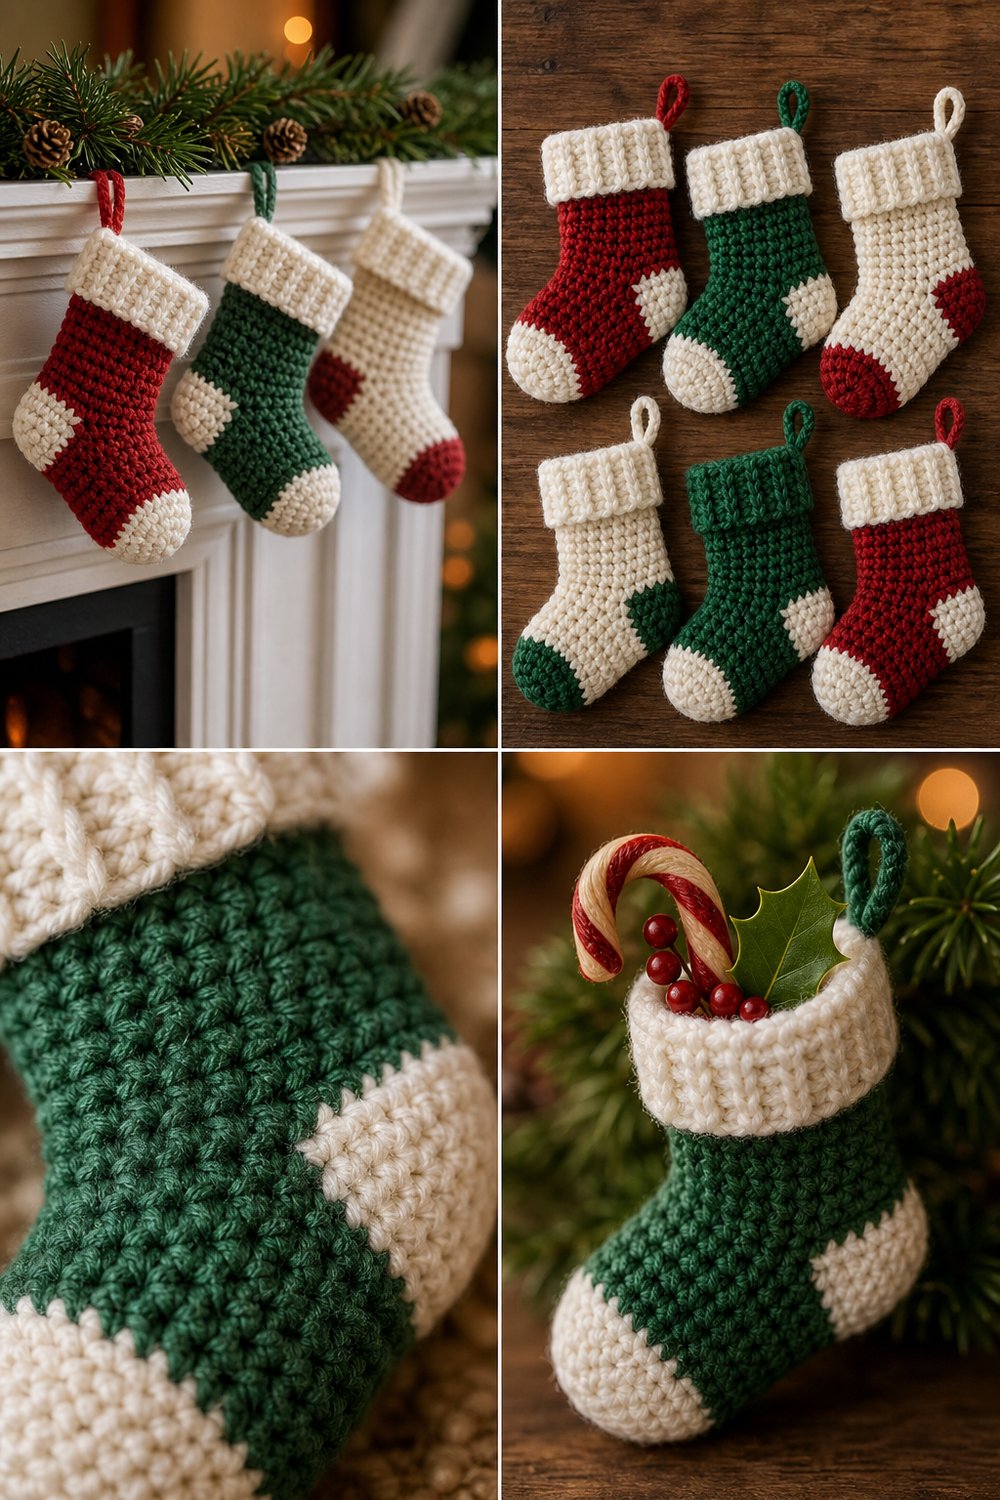
Transform your holiday mantel into a handcrafted wonderland with a string of miniature stockings designed to celebrate the season day by day. Featuring plush turned heels, crisp ribbed cuffs, and a classic color palette, this project brings heirloom warmth straight to your living room.
Festive Mini Stocking Garland Calendar Free Christmas Pattern
Quick Facts
- Stitches Used: Chain, single crochet, half double crochet, front post half double crochet, back post half double crochet, single crochet two together (decrease).
- Size Fit: One size miniature stocking (approx. 5 inches tall).
- Estimated Hours to Complete: 1.5 to 2 hours per stocking (approx. 50 hours total for a 24-day advent calendar garland).
- Gift-Appeal Framing: An exquisite, nostalgic holiday keepsake that doubles as an interactive advent calendar or a timeless fireplace mantel display.
Sizing customization tips are included later in this post to help you adjust your stockings for larger treats or alternative display styles.
What Makes This Festive Mini Stocking Garland Calendar Special
This design achieves its remarkably polished, professional look through traditional shaping techniques scaled down for miniature crochet. Instead of working flat and seaming, each stocking is crocheted in the round from the toe up, incorporating a classic short-row heel turn that creates a crisp, authentic heel pocket without awkward gaps. The toe and heel contrast sharply against the main body, while the ribbed white cuff is worked directly onto the leg using post stitches to create a cozy, stretchy fold-over brim. The resulting texture is plush and substantial, holding its shape perfectly whether dangling from fresh pine boughs or holding a tiny wooden candy cane.
Skill Level
- Intermediate: Familiarity with working in the round, basic shaping, post stitches, and simple color changes.
- Required Skills:
- Working magic rings and continuous spiral rounds
- Basic increases and decreases (
sc2tog) - Front post and back post crochet for ribbing
- Joining new yarn and weaving in ends securely
- Reassurance Line: If you know the basics of single crochet and are eager to try your hand at shaping a heel turn, you will find this pattern straightforward and thoroughly rewarding.
Finished Measurements
| Measurement | Inches | Centimeters |
|---|---|---|
| Height (Cuff to Toe) | 5.0″ | 12.7 cm |
| Foot Length (Heel to Toe) | 4.0″ | 10.2 cm |
| Cuff Width (Flat) | 2.5″ | 6.4 cm |
Materials You Will Need
- Yarn Weight: Sport or light DK weight 100% cotton or wool yarn for crisp stitch definition.
- Hook Size: US C/2 (2.75 mm) crochet hook.
- Notions: Tapestry needle for weaving ends, locking stitch markers, scissors.
| Color Name | Color Order | Yarn Weight | Approximate Yardage |
|---|---|---|---|
| Cream | 1st Color | Sport / DK | 15 yds (per stocking) |
| Emerald Green | 2nd Color | Sport / DK | 25 yds (per stocking) |
| Classic Red | 3rd Color | Sport / DK | 25 yds (per stocking) |
Yarn Suggestions
| Yarn Brand & Line | Weight | Yards per Skein | Notes |
|---|---|---|---|
| Knit Picks CotLin | Sport / DK | 123 yds / 50g | Excellent stitch definition, crisp matte finish. |
| Schachenmayr Catania | Sport (Fine) | 137 yds / 50g | Superior mercerized cotton with vibrant holiday hues. |
| Cascade 220 Sport | Sport | 164 yds / 50g | 100% wool option for ultimate plushness and blocking. |
⚠️ Note: Avoid novelty fuzzy yarns or heavy acrylics for this project, as they obscure the stitch definition of the heel turn and prevent the miniature stockings from holding a crisp shape.
Gauge
| Gauge Type | Stitches & Rows | Measurement |
|---|---|---|
| Single Crochet (Foot) | 22 sts x 26 rows | 4″ x 4″ (10 cm x 10 cm) |
💡 Designer Tip: Always make a gauge swatch using your 2.75 mm hook. If your stitches are too loose, the stocking will sag and won’t hold small candies upright.
Abbreviations
| Abbreviation | Full Meaning |
|---|---|
| ch | chain |
| sc | single crochet |
| hdc | half double crochet |
| sl st | slip stitch |
| sc2tog | single crochet 2 together (decrease) |
| FPhdc | front post half double crochet |
| BPhdc | back post half double crochet |
| st(s) | stitch(es) |
| rnd(s) | round(s) |
| inv-sc2tog | invisible single crochet decrease |
| FO | fasten off |
Special Stitches Explained
- Invisible Single Crochet Decrease (
inv-sc2tog): Insert hook into the front loop only of the next two stitches. Yarn over, draw through both loops on hook (2 loops on hook), yarn over, and draw through both loops to complete the stitch. - Heel Turn Short Rows: Working back and forth across a designated subset of stitches while leaving the remaining stitches unworked, creating a cupped heel pocket.
- Post Stitches (
FPhdc/BPhdc): Work half double crochet by inserting your hook from the front to the back around the post of the specified stitch in the previous round (FPhdc) or from back to front (BPhdc).
Pattern Instructions
Section 1: The Toe
Using Color 3 (Classic Red), leave a 6-inch tail for weaving.
– Rnd 1: Work 6 sc in a magic ring. Pull tight to close. (6 sc)
– Rnd 2: Work 2 sc in each st around. (12 sc)
– Rnd 3: [1 sc in next st, 2 sc in next st] 6 times. (18 sc)
– Rnds 4–7: 1 sc in each st around. (18 sc)
✅ Checkpoint: At the end of Rnd 7, your toe piece should form a neat little dome measuring approximately 1.5 inches across.
Section 2: The Foot
Switch to Color 2 (Emerald Green) (carry or join cleanly).
– Rnds 8–13: 1 sc in each st around. (18 sc)
✅ Checkpoint: Verify you have exactly 18 sts before beginning the heel construction.
Section 3: The Heel Turn
The heel is worked back and forth in rows over the next 9 stitches. Leave the remaining 9 stitches unworked for the top of the foot.
– Row 1 (RS): Working in the next 9 sts, sc 9, turn, leave remaining 9 sts unworked. (9 sc)
– Row 2 (WS): Ch 1, sc2tog, sc 5, sc2tog, turn. (7 sc)
– Row 3 (RS): Ch 1, sc2tog, sc 3, sc2tog, turn. (5 sc)
– Row 4 (WS): Ch 1, sc2tog, sc 1, sc2tog, turn. (3 sc)
Heel turn complete. FO Red.
Section 4: The Leg and Gusset
Reconnect Color 2 (Emerald Green) at the heel corner.
– Rnd 1: Work 3 sc across the heel edge, pick up 4 sc along the side of the heel flap, work 1 sc in each of the 9 unworked instep stitches, pick up 4 sc along the other side of the heel flap. (20 sts)
– Rnd 2: [Sc2tog] twice, 1 sc in each st to last 4 sts, [sc2tog] twice. (16 sts)
– Rnds 3–7: 1 sc in each st around. (16 sts)
✅ Checkpoint: The leg tube should now stand upright above the heel cup.
Section 5: The Cuff and Hanging Loop
Switch to Color 1 (Cream).
– Rnd 1: 1 hdc in each st around. (16 hdc)
– Rnds 2–4: [Working in post stitches for ribbing] 1 FPhdc, 1 BPhdc; repeat from * around. (16 sts)
– Hanging Loop: Without cutting yarn, ch 10, sl st into the base of the first cuff stitch to form a small hanging loop. FO and weave in all ends securely.
Size Customization Tips
- Larger Stockings: To scale up the stocking for larger treats, start your toe with 8 sc in the magic ring, increase up to 24 sts in Rnd 3, and work 12 sts for the heel flap. This increases the overall height and foot length by approximately 25%.
- Smaller Stockings: Work with a fine thread or lace-weight yarn and a 2.0 mm hook while following the exact stitch counts above to create delicate micro-stockings.
Care Instructions
Hand wash gently in lukewarm water with mild wool wash. Do not wring or twist. Lay flat on a clean towel, reshape carefully to dimensions, and allow to air dry completely before hanging on your garland string.
Festive Mini Stocking Garland Calendar Free Christmas Pattern
I hope you adore stitching up this festive garland as much as I loved designing it for your holiday home! Be sure to snap photos of your finished advent calendar, tag me on social media @YourBlogHandle, and use the hashtag #FestiveMiniStockingGarland so I can admire your gorgeous color combinations. Pin this pattern to your favorite Christmas crochet boards on Pinterest so you can easily find it year after year, and leave a comment below to let me know which day’s treat is going inside your first stocking!