

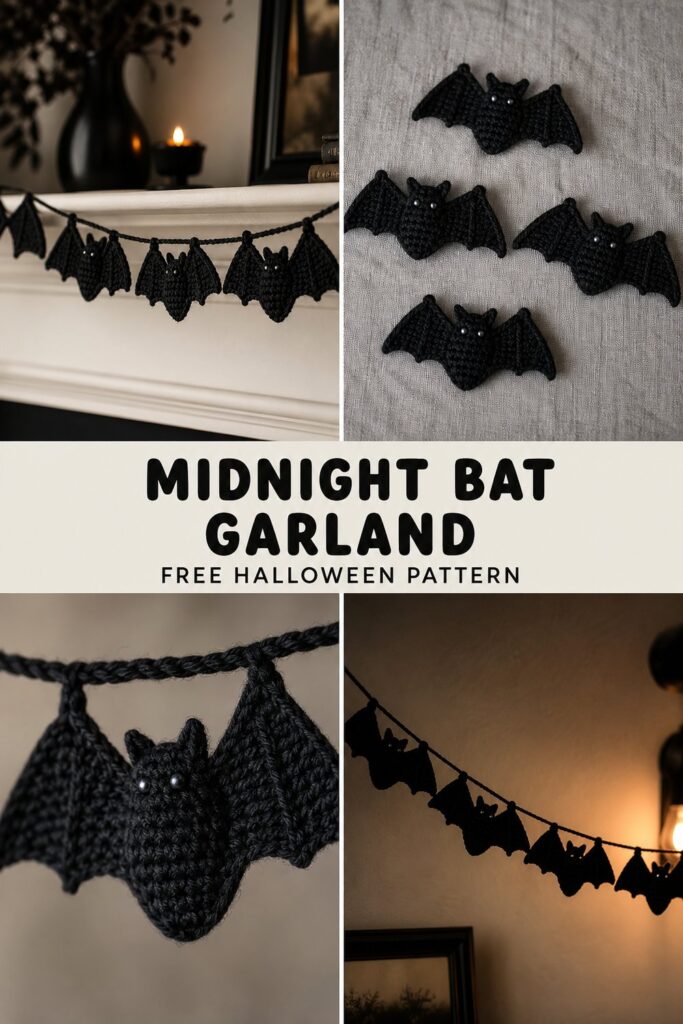
Transform your mantelpiece into a moody, sophisticated gothic display with a string of matte-black crochet bats featuring crisp pointed wings and tiny stitched eyes. As twilight falls, these striking silhouettes catch the warm ambient light of your living room, casting sharp shadows and setting an elegantly spooky tone for the autumn season.
This decorative home accessory relies on basic stitches like ch, sc, hdc, and dc, styled for an intermediate-accessible home decor project that takes roughly 3 to 4 hours to complete from start to finish. It makes a stunning, handmade Halloween gift for gothic decor enthusiasts or a treasured addition to your own annual spooky-season traditions.
💡 Designer Tip: Full customization tips are included later in the pattern so you can easily adjust your garland length and bat spacing to fit any mantel, entryway, or staircase.
What Makes This Midnight Bat Garland Special
The striking visual impact of this garland comes from a clever construction method that works each bat from the center body outward, finishing with sharp, sculpted wingtips rather than floppy or rounded edges. By using a tight gauge and a matte, non-mercerized yarn, the bats hold their rigid shape naturally without requiring heavy stiffeners, keeping the texture crisp and professional. The subtle surface texturing on the wings gives the matte-black yarn deep definition, ensuring the bats remain visually distinct and defined even when viewed from a distance or silhouetted against a dim wall.
Skill Level
- Required Skills: Working in rows, working in the round, basic shaping, surface embroidery (for the eyes), and simple assembly/stringing.
- Reassurance Line: If you are comfortable transitioning between basic stitches and following simple shaping cues, you will have no trouble bringing this moody garland to life!
Finished Measurements
| Size / Component | Inches | Centimeters |
|---|---|---|
| Individual Bat Wingspan | 6.5 in | 16.5 cm |
| Individual Bat Body Height | 2.5 in | 6.4 cm |
| Standard Garland Length (5 Bats) | 60.0 in | 152.4 cm |
| Hanging Cord Length | 72.0 in | 182.9 cm |
Materials You Will Need
- Yarn Weight: Worsted weight (Category 4) matte-black yarn for the bats; optional neutral twine or matching yarn for the hanging cord.
- Crochet Hook: US Size G/6 (4.00 mm) or size needed to obtain gauge.
- Additional Tools: Tapestry needle for weaving ends and embroidering eyes, stitch markers, scissors, and optional white or grey embroidery floss for tiny stitched eyes.
| Color Name / Code | Yarn Weight / Fiber | Yardage Needed |
|---|---|---|
| Matte Black (Main Color) | Worsted (100% Wool or Wool-Blend) | 85 yds / 78 m |
| Charcoal (Hanging Cord / Optional) | Worsted (100% Cotton or Acrylic) | 20 yds / 18 m |
Yarn Suggestions
| Yarn Brand & Line Name | Weight | Yardage per Skein | Notes |
|---|---|---|---|
| Knit Picks Wool of the Andes Worsted | Worsted (4) | 110 yds / 100 m per 50g | Matte finish, excellent stitch definition, holds crisp wing shapes naturally. |
| Lion Brand Basic Stitch Anti Pilling | Worsted (4) | 185 yds / 170 m per 100g | Smooth, consistent matte texture; great for easy care and durability. |
| Cascade 220 Non-Superwash | Worsted (4) | 220 yds / 201 m per 100g | Pure wool grip prevents sagging; creates exceptionally sharp silhouettes. |
⚠️ Note: Avoid highly mercerized cotton or slippery novelty yarns (like faux fur or metallics), as they reflect light too much and obscure the crisp matte silhouette of the bats.
Gauge
| Measurement Type | Stitches / Rows | Imperial | Metric |
|---|---|---|---|
| Body Gauge | 16 sc x 18 rows | 4 x 4 inches | 10 x 10 cm |
| Bat Motif Size | Wingspan tip to tip | 6.5 inches | 16.5 cm |
💡 Designer Tip: Always make a test swatch using your chosen hook and yarn to ensure your fabric is dense enough that the stitches don’t pull open when stretched.
Abbreviations
| Abbreviation | Full Meaning |
|---|---|
| ch | chain |
| sc | single crochet |
| hdc | half double crochet |
| dc | double crochet |
| tr | treble crochet |
| sl st | slip stitch |
| st(s) | stitch(es) |
| rnd(s) | round(s) |
| inv-dec | invisible single crochet decrease |
| rep | repeat |
| FO | fasten off |
Special Stitches Explained
- Invisible Single Crochet Decrease (inv-dec): Insert hook into the front loop only of the next stitch, then insert hook into the front loop only of the following stitch (3 loops on hook). Yarn over and pull through the first 2 loops, yarn over and pull through remaining 2 loops.
- Wingpoint Extension (WPE): Working into the designated stitch: (tr, ch 2, sl st in 2nd ch from hook, tr) all in the same stitch to create a sharp, rigid corner point.
- Picot Cluster: Work
ch 3,sl stin the 3rd chain from the hook, creating a decorative textural bump on the upper ear edge.
Pattern Instructions
Section 1: Bat Body (Make 5 for Standard Garland)
Rnd 1: With Matte Black yarn, ch 4, working in the back bumps of the chain, 2 sc in 2nd ch from hook, sc in next ch, 3 sc in last ch. Working along the opposite side of the chain foundation, sc in next ch, sc in last ch. Join with sl st to first sc. (8 sts)
Rnd 2: Ch 1, 2 sc in first st, sc in next 2 sts, 2 sc in each of next 2 sts, sc in next 2 sts, 2 sc in last st. Join with sl st. (12 sts)
Rnd 3: Ch 1, sc in each st around. Join with sl st. (12 sts)
Section 2: Left and Right Wings
Row 1 (Right Wing): Working directly from the current body position, ch 8, working in 2nd ch from hook, sl st in next ch, sc in next 2 ch, hdc in next 2 ch, dc in last 2 ch. Skip 2 sts on body, sl st into the 3rd st on the body edge. Turn. (7 wing sts)
Row 2: Ch 1, working across the wing sts just made: sc in next 2 sts, hdc in next 2 sts, dc in next 2 sts, WPE in the final tip st. FO yarn tail for weaving, leaving a clean outer edge.
Row 1 (Left Wing): Join Matte Black yarn with a sl st to the symmetrical opposite side of the body base. Ch 8, working in 2nd ch from hook, sl st in next ch, sc in next 2 ch, hdc in next 2 ch, dc in last 2 ch. Skip 2 sts on body, sl st into the 3rd st on the body edge. Turn. (7 wing sts)
Row 2: Ch 1, working across the wing sts: sc in next 2 sts, hdc in next 2 sts, dc in next 2 sts, WPE in the final tip st. FO.
✅ Checkpoint: At this stage, your individual bat motif should feature a symmetrical body with two sharply pointed, rigid wings extending outward. Measure tip-to-tip to confirm it hits approximately 6.5 inches (16.5 cm).
Section 3: Ears and Facial Details
Ear Placement: Join yarn at the top edge of the head area. Ch 2, work a Picot Cluster, sl st into base. Skip 1 st, ch 2, work a Picot Cluster, sl st into base. FO and weave in all loose ends securely.
Embroidery: Using a length of grey or white yarn and a tapestry needle, stitch two small, simple cross-stitches or straight stitches onto the upper center of the bat head to form tiny glowing eyes.
Section 4: Garland Assembly
- Make a total of 5 bats following Sections 1 through 3.
- Cut a length of Charcoal hanging cord measuring 72 inches (182.9 cm).
- Using your tapestry needle, thread the hanging cord through the top center back loops of each bat, spacing them evenly approximately 6 inches apart, leaving 12 inches of empty cord on each end for easy hanging.
- Secure each bat with a tiny hidden stitch around the cord to prevent sliding.
Size Customization Tips
- To adjust garland length: Add or subtract bats by repeating Sections 1 through 3. For every additional bat added, increase your total hanging cord length by roughly 12 inches (30.5 cm) to maintain consistent spacing.
- To make a mini garland: Use Sport-weight yarn (Category 2) with a 3.00 mm hook to shrink the bats by roughly 30% for smaller spaces like mirrors or small window frames.
Care Instructions
- Gently spot clean with a damp cloth and mild detergent as needed.
- Do not machine wash or submerge in hot water to protect the crisp shape of the wool-blend fibers.
- Lay flat to air dry completely before storing flat in a cool, dry place between seasons.
Thank you so much for stitching along with me today! I hope crafting this midnight bat garland brings a wonderfully moody, handmade touch to your Halloween decor.
If you loved this pattern, please be sure to save it to your Pinterest boards, share your finished mantel displays on social media tagging @YourDesignHandle, and leave a comment below letting me know where you plan to hang your spooky garland! Happy crocheting!
📄 Your free PDF pattern