












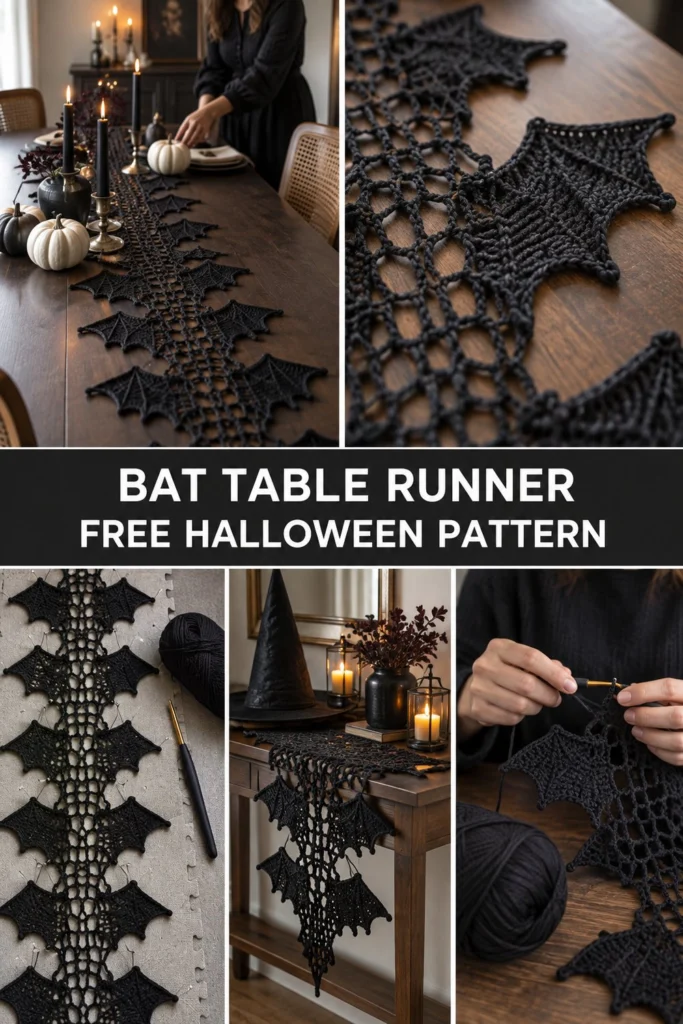
Set a gothic Halloween table one bat wing at a time. This stunning crochet bat table runner adds an instant haunted elegance to your dining room, featuring interconnected lace panels and scalloped wing edges that bring the spooky season to life.
Quick Facts
- Skill level: Intermediate
- Finished size: 12 inches wide by 48 inches long (customizable by adding more motifs)
- Yarn: Sport weight or Light DK #2 black cotton yarn, approx. 450 yards
- Hook: 3.5 mm (US E/4) crochet hook
- Stitches used: ch, sc, hdc, dc, tr, sl st
- Time to make: 6 to 8 hours
💡 Designer Tip: Size customization tips are included further down if you need to fit a longer dining table or a narrow side console.
What Makes This Crochet Bat Table Runner Special
This piece is designed with a brilliant join-as-you-go construction method. Each bat motif is a quick lace piece featuring distinct scalloped wing edges. Instead of working hundreds of tedious seams at the end, you join the motifs in the last round to the adjacent piece. This keeps every scallop crisp, lightweight, and perfectly aligned. The choice of black cotton yarn ensures that the gothic webbing holds its structured shape even after blocking.
If you love pairing gothic motifs together, you can also explore how to combine these with a matching design from our lacy halloween spiderweb table topper free crochet pattern for an even grander tablescape.
Skill Level
- Required skills: Working in the round and in rows, following lace charts or written instructions, joining motifs in the final round, and basic blocking techniques.
- Don’t worry if you haven’t joined-as-you-go before; the instructions below break down every step so you can easily build your runner.
Finished Measurements
| Dimension | Inches | Centimeters |
|---|---|---|
| Width (wingtip to wingtip) | 12 in | 30.5 cm |
| Length (per 4-motif segment) | 24 in | 61 cm |
| Total Length (as shown, 8 motifs) | 48 in | 122 cm |
Materials You Will Need
| Item | Description | Quantity |
|---|---|---|
| Yarn | Sport weight black cotton yarn (#2 fine) | 450 yards / 411 meters |
| Crochet Hook | 3.5 mm (US E/4) | 1 hook |
| Notions | Tapestry needle for weaving ends | 1 needle |
| Blocking Supplies | Blocking mats, rust-proof T-pins | 1 set |
Yarn Suggestions
| Yarn Line | Weight | Skein Yardage | Notes |
| — | — | — |
| Schachenmayr Catania | Sport / Fingering | 137 yards per 50g | Crisp stitch definition, pure cotton |
| Hobbii Rainbow Cotton 8/8 | Sport | 82 yards per 50g | Excellent color depth, sturdy matte black |
| Drops Safran | Sport | 175 yards per 50g | Soft mercerized cotton with a lovely drape |
⚠️ Note: Avoid fuzzy yarns like mohair or acrylic blends for this pattern. You need a smooth mercerized cotton yarn to keep the bat wing scallops sharp and the lace mesh distinct.
Gauge
- Gauge: 1 motif measuring 6 inches wide by 6 inches long using a 3.5 mm hook.
- Getting exact gauge isn’t strictly required for home decor, but checking your gauge ensures your yarn quantity matches the pattern requirements.
Abbreviations
- ch: chain
- sc: single crochet
- hdc: half double crochet
- dc: double crochet
- tr: treble crochet
- sl st: slip stitch
- st(s): stitch(es)
- sp(s): space(s)
- sk: skip
- rep: repeat
- RS: right side
UK/US Conversion Note: UK terms use sc = dc, hdc = htr, dc = tr. This pattern is written in standard US terms.
Special Stitches Explained
- Join-as-You-Go (JAYG): When working the final round of a bat motif, replace a specified chain space with a slip stitch or single crochet into the corresponding chain space of the completed adjacent motif.
- Picot: Ch 3, sl st in the back bump of the first chain made.
Pattern Instructions
Pattern Notes
- The runner is constructed by making individual bat wing motifs and joining them in a central spine, flanked by side mesh sections.
- Rounds are joined with a sl st unless otherwise noted.
Section 1: Center Bat Motif
Make 8 motifs (or as many as needed for your table length).
Rnd 1 (RS): Ch 6, join with sl st in first ch to form a ring. Ch 3 (counts as first dc), work 15 dc into the ring, join with sl st to top of beg ch-3 (16 dc).
Rnd 2: Ch 4 (counts as 1 tr + 1 ch), [sk 1 dc, (1 tr, ch 2, 1 tr) in next dc, ch 1] 7 times, sk last dc, join with sl st to 3rd ch of beg ch-4 (16 tr, 8 ch-2 sps, 8 ch-1 sps).
Rnd 3: Sl st into first ch-1 sp, ch 1, work (1 sc, ch 3, 1 sc) in same ch-1 sp, ch 3, sk next tr group, work (1 sc, ch 3, 1 sc) in next ch-1 sp 7 times, ch 3, join with sl st to first sc (16 sc, 8 ch-3 sps).
Rnd 4 (Wing Scallops): Sl st into first ch-3 sp, ch 1, work [5 dc, picot, 5 dc] in same ch-3 sp, ch 2, work (1 sc, ch 3, 1 sc) in next ch-3 sp, ch 2, work [5 dc, picot, 5 dc] in next ch-3 sp 3 times, ch 2, work (1 sc, ch 3, 1 sc) in last ch-3 sp, ch 2, join with sl st to first sc. Fasten off, leaving a 6-inch tail for weaving (4 wing shell groups, 8 sc).
✅ Checkpoint: You now have completed your first individual bat motif. Check that the wing edges lie flat before proceeding.
Section 2: Connecting and Building the Runner
To form the continuous runner, make subsequent motifs and join them along the inner wing edge during Rnd 4 of each new motif.
Joining Method: When working Rnd 4 on Motif 2 and onward, replace the center ch-3 of the wing shell with a sl st into the matching ch-3 of the adjacent completed motif’s wing tip.
- Motif 1: Complete fully as written in Section 1.
- Motif 2: Work Rnds 1 through 3. On Rnd 4, join to Motif 1 at the two inner wing points. Fasten off.
- Motifs 3 through 8: Repeat the process of Motif 2, linking each new motif end-to-end to create a long, central gothic spine.
Section 3: Mesh Border Edging
To give the runner its structured table-width shape and tie the center motifs together, work a mesh border along both long sides of the joined bat chain.
Row 1: Attach black yarn with a sl st at the top right corner of Motif 1. Ch 5 (counts as 1 dc + ch 2), [sk next space, 1 dc in next st, ch 2] repeat evenly down the entire length of the runner’s side (Mesh row established).
Row 2: Ch 5, turn, 1 dc in next dc, ch 2 across to end, work 1 dc in 3rd ch of turning ch. Fasten off.
Repeat Rows 1 and 2 on the opposite side of the runner.
Assembly & Finishing
- Weave in all loose yarn ends securely on the wrong side using your tapestry needle.
- Blocking (Essential): Pin the runner out on blocking mats, opening up every mesh square and pulling the bat wing scallops sharp. Mist thoroughly with water or steam lightly, and let dry completely before placing on your table.
Size Customization Tips
- Each individual bat motif adds approximately 6 inches to the total length of your runner.
- To make a shorter runner for a coffee table, use 4 motifs (approx. 24 inches).
- For an extra-long dining table seating 10 to 12 people, increase the count to 10 or 12 motifs.
Care Instructions
- Hand wash gently in cool water using a mild wool or cotton detergent.
- Do not wring or twist the delicate lace structure.
- Lay flat on a clean towel to dry, reshaping the bat wings and scallops while damp.
- Store rolled rather than folded to prevent permanent creasing of the cotton lace.
FAQ
Can I use acrylic yarn instead of cotton?
While you can use acrylic yarn, it tends to be softer and may make the bat wing scallops curl up. Mercerized cotton provides the crisp structure needed for gothic lace decor.
How do I clean spills on the table runner?
Because it is made from 100% cotton, you can spot-clean small spills immediately with mild soap and water, then re-block that section if necessary.
Is this pattern suitable for confident beginners?
Yes! If you know basic stitches like double crochet and chains, and you are comfortable working in the round, you can easily master this project by taking it one motif at a time.
Happy Crocheting!
I hope you love setting a haunted, elegant table with your new runner. Save this pin on Pinterest to keep it handy for your autumn crafting, and leave a comment below sharing how many bat motifs you plan to make for your home!
📄 Your free PDF pattern