












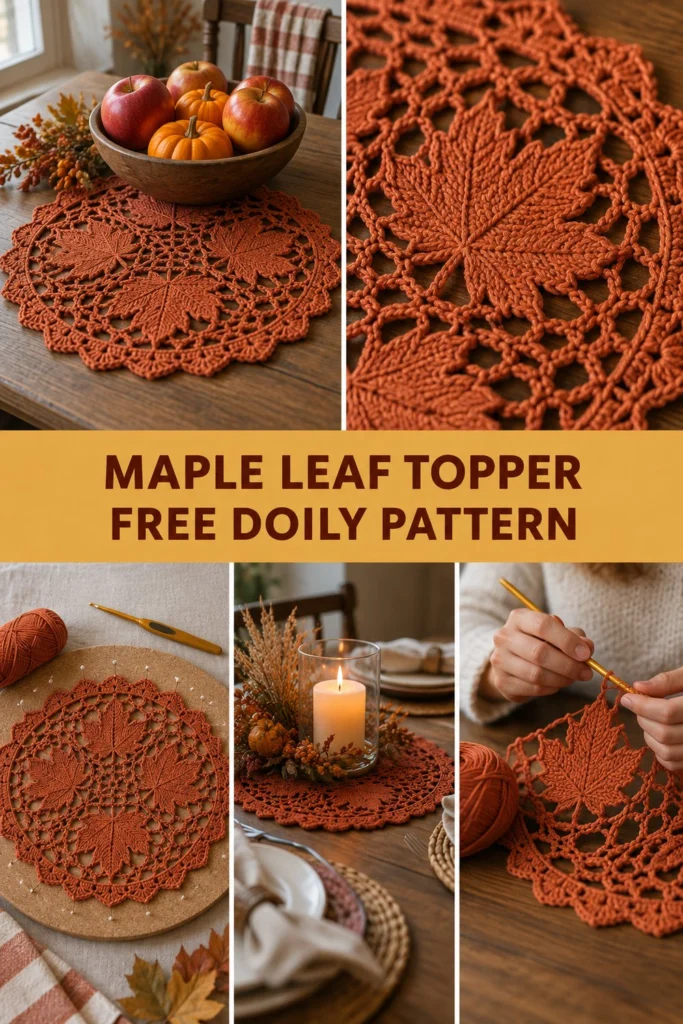
Bring the warmth of autumn right to your dining table with this stunning warm rust doily centerpiece. Five detailed maple leaf motifs branch out symmetrically from an open lace wheel, surrounded by airy mesh spokes and finished with a delicate scalloped edge. Designed for crisp fall gatherings and cozy Thanksgiving tables, this free crochet pattern creates a keepsake heirloom you will cherish year after year.
Quick Facts
- Skill level: Intermediate / Confident Beginner
- Finished size: 18 inches (46 cm) in diameter after blocking
- Yarn: 100% Mercerized Cotton Sport Weight Yarn (Category 2) in Rust / Burnt Orange (~280 yds / 256 m)
- Hook: 3.5 mm (US E-4) ergonomic crochet hook
- Stitches used: ch, sl st, sc, dc, FPdc, FPtr, dc2tog, FPdc3tog, 7-dc shell
- Time to make: 6 to 8 hours (including pin-blocking)
Looking to adjust the dimensions for a smaller side table or a larger dining runner? Scroll down to our size customization section below!
What Makes This Table Topper Special
What makes this crochet maple leaf table topper stand out is the sculptural texture of front-post stitches that build realistic leaf veins right into the lace motif. Worked in the round from the center out, the design seamlessly combines intricate botanical relief with breezy chain-space arches, preventing the piece from feeling heavy or overly dense.
If you loved crafting our Lacy Halloween Spiderweb Table Topper Pattern, you will find this autumn lace centerpiece equally engaging, offering a richer botanical focus that transitions gracefully from September through late November. The scalloped 7-double crochet fan border locks in a perfectly crisp circular silhouette once pinned and wet-blocked flat.
Skill Level
This project is suitable for an intermediate crocheter or an ambitious beginner ready to venture beyond basic stitches.
* Working in joined rounds from a magic ring
* Reading textured front-post stitches (FPdc and FPtr)
* Executing simple double crochet decreases (dc2tog) and front-post cluster decreases (FPdc3tog)
* Maintaining even chain-space lace tension
💡 Designer Tip: Front-post stitches pull slightly tighter than regular double crochets. Keep your yarn tension relaxed on the post stitches to keep your motif lying perfectly flat before blocking!
Finished Measurements
| Dimension | Inches | Centimeters |
|---|---|---|
| Diameter (Point to Point) | 18.0 in | 45.7 cm |
| Central Lace Wheel Diameter | 4.5 in | 11.4 cm |
| Leaf Motif Height | 5.5 in | 14.0 cm |
| Scalloped Border Width | 1.25 in | 3.2 cm |
Materials You Will Need
| Material / Item | Specification | Quantity |
|---|---|---|
| Main Color Yarn | Sport Weight Cotton Yarn in Rust / Terracotta | 280 yds / 256 m (approx. 100g) |
| Crochet Hook | 3.5 mm (US E-4) | 1 hook |
| Tapestry Needle | Blunt-ended yarn needle | 1 needle |
| Stitch Markers | Locking stitch markers | 5 markers |
| Blocking Accessories | Cork/Foam blocking board & stainless steel rust-proof pins | 1 set |
Yarn Suggestions
| Yarn Brand & Line | Fiber Content | Skein Yardage | Notes |
|---|---|---|---|
| Scheepjes Catona | 100% Mercerized Cotton | 137 yds (125 m) / 50g | Colorway Roost (388) or Rust (411); crisp stitch definition |
| Paintbox Yarns Cotton DK | 100% Cotton | 137 yds (125 m) / 50g | Colorway Burnt Orange (424); soft matte finish |
| Rico Baby Cotton Soft | 50% Cotton, 50% Acrylic | 137 yds (125 m) / 50g | Colorway Rust (028); lightweight with gentle sheen |
⚠️ Note: Avoid stretchy acrylic yarns or un-mercerized wool for this project. Pure cotton yarn holds its shape best under steam and wet blocking, ensuring your maple leaf points stay crisp and defined under table decor.
Gauge
| Gauge Measurement | Count | Notes |
|---|---|---|
| 4 x 4 in (10 x 10 cm) | 22 sts x 10 rnds | Worked in lace dc/ch mesh with 3.5 mm hook |
| Rnds 1 to 4 Diameter | 3.5 in (8.9 cm) across | Flat circular central motif check |
Abbreviations
| Abbreviation | Full Term (US Terms) |
|---|---|
| ch / ch-sp | chain / chain space |
| sl st | slip stitch |
| sc | single crochet |
| dc | double crochet |
| FPdc | front post double crochet |
| FPtr | front post treble crochet |
| dc2tog | double crochet 2 together (decrease) |
| FPdc3tog | front post double crochet 3 together (decrease) |
| sk | skip |
| st(s) | stitch(es) / space(s) |
| Rnd(s) | Round(s) |
UK conversion note: sc = dc, hdc = htr, dc = tr, tr = dtr.
Special Stitches Explained
- Front Post Double Crochet (FPdc): Yarn over, insert hook from front to back to front around the post of the indicated stitch, yarn over and pull up a loop (3 loops on hook), [yarn over, pull through 2 loops] twice.
- Front Post Treble Crochet (FPtr): Yarn over twice, insert hook from front to back to front around the post of the indicated stitch, yarn over and pull up a loop (4 loops on hook), [yarn over, pull through 2 loops] 3 times.
- Double Crochet 2 Together (dc2tog): Yarn over, insert hook into next st, yarn over and pull up a loop, yarn over, pull through 2 loops (2 loops on hook). Yarn over, insert hook into following st, yarn over and pull up a loop, yarn over, pull through 2 loops (3 loops on hook). Yarn over, pull through all 3 loops.
- Front Post Double Crochet 3 Together (FPdc3tog): [Yarn over, insert hook around post of next indicated st, yarn over, pull up a loop, yarn over, pull through 2 loops] 3 times across indicated post stitches (4 loops on hook). Yarn over and pull through all 4 loops on hook.
- 7-dc Shell: Work 7 double crochet stitches all into the same indicated chain-space.
Pattern Instructions
Pattern Notes
- The thanksgiving crochet doily is worked in joined rounds from the center outward.
- Beginning ch-3 counts as 1 double crochet throughout unless noted otherwise.
- Join each round with a slip stitch to the 3rd chain of the starting ch-3 or the top of the first stitch.
- Move locking stitch markers up each round into the center stitch of each leaf motif to easily keep track of the 5 radial repeats.
Round-by-Round Instructions
Rnd 1: Begin with a magic ring. Ch 3 (counts as dc), work 14 dc into the magic ring. Pull tail to close center ring snugly. Join with sl st to top of beg ch-3. (15 sts)
Rnd 2: Ch 3 (counts as dc), dc in same st. Work 2 dc in each st around. Join with sl st to top of beg ch-3. (30 sts)
Rnd 3: Ch 3 (counts as dc), dc in next 3 sts, ch 3, sk 2 sts, *dc in next 4 sts, ch 3, sk 2 sts; rep from * 3 more times. Join with sl st to top of beg ch-3. (25 sts and sps)*
Rnd 4: Ch 3 (counts as dc), dc in next 3 dc, work 3 dc in next ch-3 sp, *dc in next 4 dc, 3 dc in next ch-3 sp; rep from * 3 more times. Join with sl st to top of beg ch-3. (35 sts)*
✅ Checkpoint: Your piece should lay flat and measure approximately 3.5 inches (8.9 cm) in diameter across Round 4.
Rnd 5 (Leaf Base Spokes): *FPdc around next st, 2 dc in next st, dc in next 3 sts, 2 dc in next st, FPdc around next st; rep from * 4 more times. Join with sl st to top of first FPdc. (45 sts)*
Rnd 6: *FPdc around FPdc, ch 2, sk 1 st, FPdc around next st, dc in next 3 sts, FPdc around next st, ch 2, sk 1 st, FPdc around FPdc; rep from * 4 more times. Join with sl st to top of first FPdc. (45 sts and sps)*
Rnd 7 (Expanding Leaf Motifs): *FPdc around FPdc, 2 dc in next ch-2 sp, FPdc around FPdc, ch 2, sk 1 dc, FPtr around center dc, ch 2, sk 1 dc, FPdc around FPdc, 2 dc in next ch-2 sp, FPdc around FPdc; rep from * 4 more times. Join with sl st to top of first FPdc. (55 sts and sps)*
Rnd 8 (Vein Structure & Mesh Arches): *FPdc around FPdc, dc in next 2 dc, FPdc around FPdc, ch 3, sk ch-2 sp, 3 dc in next FPtr, ch 3, sk ch-2 sp, FPdc around FPdc, dc in next 2 dc, FPdc around FPdc; rep from * 4 more times. Join with sl st to top of first FPdc. (65 sts and sps)*
✅ Checkpoint: Five distinct leaf bases are now clearly defined around the circle, separated by ch-3 lace windows.
Rnd 9 (Center Leaf Points): *FPdc around FPdc, 2 dc in next dc, dc in next dc, FPdc around FPdc, ch 3, sk ch-3 sp, 2 dc in next dc, FPdc around next dc, 2 dc in next dc, ch 3, sk ch-3 sp, FPdc around FPdc, dc in next dc, 2 dc in next dc, FPdc around FPdc; rep from * 4 more times. Join with sl st to top of first FPdc. (85 sts and sps)*
Rnd 10 (Side Lobe Shaping): *FPdc around FPdc, dc2tog over next 2 dc, dc in next dc, FPdc around FPdc, ch 4, sk ch-3 sp, FPdc around next dc, dc in next 3 dc, FPdc around next dc, ch 4, sk ch-3 sp, FPdc around FPdc, dc in next dc, dc2tog over next 2 dc, FPdc around FPdc; rep from * 4 more times. Join with sl st to top of first FPdc. (75 sts and sps)*
Rnd 11 (Leaf Point Decreases): *FPdc3tog over (FPdc, dc2tog, dc), FPdc around next FPdc, ch 5, sk ch-4 sp, FPdc around FPdc, 2 dc in next dc, FPdc around center dc, 2 dc in next dc, FPdc around FPdc, ch 5, sk ch-4 sp, FPdc around FPdc, FPdc3tog over (dc, dc2tog, FPdc); rep from * 4 more times. Join with sl st to top of first FPdc3tog. (65 sts and sps)*
Rnd 12 (Outer Lace Frame): *sc in FPdc3tog, ch 5, sc in next ch-5 sp, ch 5, sk FPdc, dc2tog over next 2 dc, FPdc around center FPdc, dc2tog over next 2 dc, sk FPdc, ch 5, sc in next ch-5 sp, ch 5, sc in FPdc3tog; rep from * 4 more times. Join with sl st to first sc. (55 sts and sps)*
Rnd 13 (Outer Lace Netting): *sc in next sc, ch 5, sc in next ch-5 sp, ch 5, sc in next sc, ch 5, sk ch-5 sp, FPdc3tog over (dc2tog, FPdc, dc2tog), ch 5, sk ch-5 sp, sc in next sc, ch 5, sc in next ch-5 sp, ch 5; rep from * 4 more times. Join with sl st to first sc. (60 sts and sps)*
Rnd 14 (Mesh Spoke Round): Rnd 14: *sc in next ch-5 sp, ch 5; rep from * 4 more times (30 ch-5 sps total). Join with sl st to first sc. (60 sts and sps)
Rnd 15 (Border Base Mesh): Rnd 15: *(sc, ch 4, sc) in next ch-5 sp; rep from * 29 more times. Join with sl st to first sc. (60 sc, 60 ch-4 sps)
✅ Checkpoint: Your fall crochet decor piece should now have 60 even ch-4 arches along the circumference ready for the scalloped edging.
Rnd 16 (Scalloped Shell Edging): Rnd 16: *(sc in next ch-4 sp, 7 dc in next ch-4 sp); rep from * 14 more times. Join with sl st to first sc. (15 shells of 8 sts each, 120 sts total)
Fasten off yarn, leaving a 6-inch (15 cm) tail for weaving in.
Assembly and Blocking
Because textured front-post stitches pull in slightly, proper pin-blocking is the secret to opening up the openwork mesh and making the maple leaf motifs pop!
- Weave in ends: Thread your yarn tail onto a blunt tapestry needle and weave securely through the back of the solid stitch sectors.
- Soak: Submerge your completed crochet table topper in tepid water with a drop of no-rinse wool wash for 15 minutes. Gently squeeze out excess water in a clean towel (never wring or twist).
- Pin out on board: Lay the damp doily on a foam or cork blocking board. Insert a pin in the center ring.
- Pin leaf tips: Pull each of the 5 leaf tip points outward radially and pin firmly into place.
- Pin outer scallops: Insert a stainless steel pin into the center stitch of each of the 30 scalloped shells around the border.
- Dry: Allow to dry completely (24 hours) before removing pins.
Finishing
Once unpinned, lightly steam with a garment steamer or steam iron held 2 inches above the piece (do not touch the hot metal directly to cotton yarn). Place on your table under a wooden bowl filled with mini pumpkins or a glass candle chimney for a stunning centerpiece!
Size Customization Tips
Want to customize the diameter of your free crochet pattern doily? Follow these gauge math principles:
- Smaller Placemat Size (~12 inches / 30 cm): Use a Fine Cotton Thread (Size 10) with a 1.75 mm steel crochet hook. This scales down the finished piece while retaining all 16 rounds of intricate leaf detail.
- Larger Table Runner Accent (~22 inches / 56 cm): Use DK weight cotton yarn with a 4.0 mm hook. Each additional 0.5 mm in hook size increases total diameter by approximately 2.2 inches (5.5 cm).
- Expanding Lace Mesh: You can easily enlarge the diameter by adding matching repeats of Round 14 (sc, ch 5 mesh). Each extra round of mesh adds roughly 1.4 inches (3.5 cm) to the final diameter.
Care Instructions
- Washing: Hand wash gently in cold water using mild liquid detergent.
- Drying: Lay flat on a dry towel to air dry. Do not tumble dry.
- Restoring Shape: After laundering, lightly spray with fabric starch and iron on medium heat under a damp press cloth to crisp up the leaf edges.
FAQ
Can I use acrylic yarn instead of cotton for this table topper?
While acrylic yarn can be used, pure mercerized cotton is highly recommended for lace doilies. Cotton holds blocking pins precisely and maintains a crisp, flat finish under heavy table centerpieces without melting under heat.
How do I stop my crochet table topper from curling up in the middle?
If your center begins to bowl or ruffle during Rounds 5 to 8, check your post stitch tension. Front-post stitches (FPdc) tend to pull tighter than normal double crochets. Loosening your grip slightly during post stitches keeps the central lace wheel completely flat.
Can I turn this into a set of fall placemats?
Yes! Stopping at Round 12 and adding a simple round of single crochet edging creates a set of matching 12-inch maple leaf coasters or mug rugs perfect for setting a festive holiday table.
Happy Crocheting!
I hope you enjoy creating this warm autumn lace centerpiece for your holiday home! Save this project to your favorite fall crochet board on Pinterest so you can find it easily every season. We would love to hear what yarn color you chose—leave a comment below and let us know how your maple leaf table topper turned out!
📄 Your free PDF pattern