












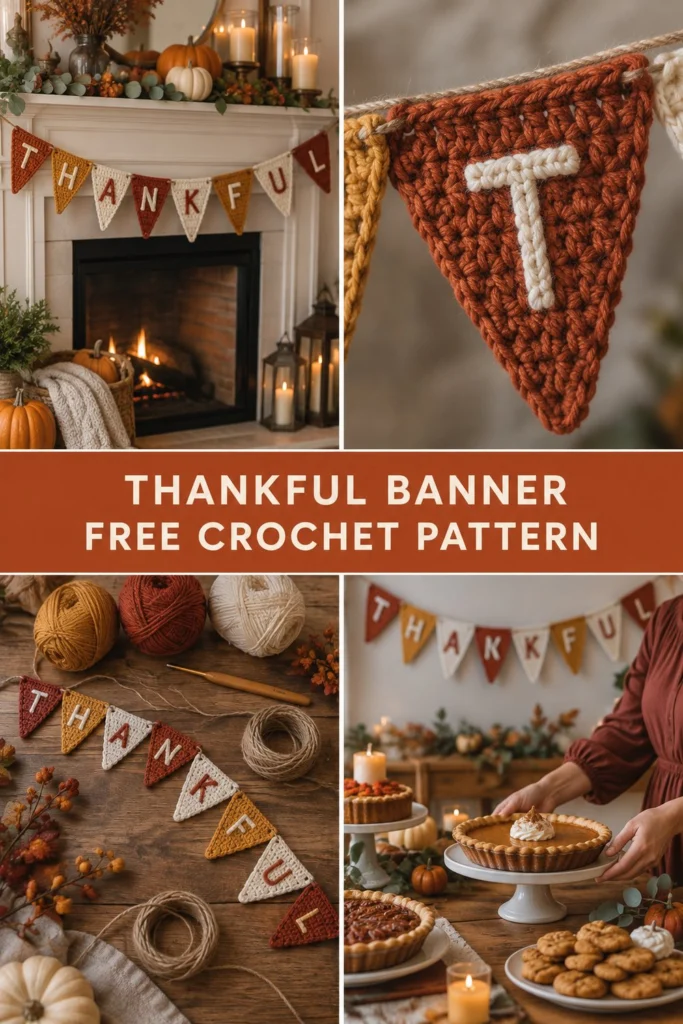
Bring warmth and handmade charm to your seasonal mantel with this cozy Thanksgiving crochet thankful banner. Each classic pennant is worked in simple half double crochet rows, featuring crisp surface-embroidered letters that spell out a message of gratitude.
Quick Facts
- Skill level: Easy Beginner
- Finished size: Each pennant measures 7 inches (18 cm) wide at the top edge and 6.5 inches (16.5 cm) tall. The full banner spans approximately 65 inches (165 cm) depending on spacing.
- Yarn: Worsted weight yarn (Category 4) in Rust, Mustard Gold, Cream, and Dark Orange.
- Hook: 5.0 mm (US H/8) crochet hook.
- Stitches used: Chain (ch), half double crochet (hdc), slip stitch (sl st), surface slip stitch embroidery.
- Time to make: 4 to 6 hours.
Size customization tips are included further down in the guide.
This banner combines simplicity with texture by using the half double crochet stitch throughout, creating a sturdy fabric that holds its triangular shape without curling. The letters are added using a surface slip stitch embroidery technique right onto the finished pennants, giving them a bold, clean contrast that pops against the rich autumn colors. Strung together on rustic jute twine, it creates the ultimate fall mantel decor piece.
Skill Level
- Basic crochet knowledge and ability to work in rows
- Familiarity with decreasing (hdc2tog)
- Basic surface embroidery (slip stitching through fabric)
💡 Designer Tip: Don’t worry if your first pennant looks slightly uneven; blocking the finished triangles with a steam iron or damp towel will instantly crisp up the edges.
Finished Measurements
| Dimension | Inches | Centimeters |
|---|---|---|
| Single Pennant Width (Top) | 7 in | 18 cm |
| Single Pennant Height | 6.5 in | 16.5 cm |
| Total Banner Length | 65 in | 165 cm |
Materials You Will Need
| Material | Color / Description | Yardage / Amount |
|---|---|---|
| Worsted Weight Yarn | Rust | 60 yds (55 m) |
| Worsted Weight Yarn | Mustard Gold | 60 yds (55 m) |
| Worsted Weight Yarn | Cream | 60 yds (55 m) |
| Worsted Weight Yarn | Dark Orange | 40 yds (37 m) |
| Contrast Yarn | Cream (for lettering) | 40 yds (37 m) |
| Crochet Hook | 5.0 mm (US H/8) | 1 hook |
| Notions | Tapestry needle, scissors, jute twine | As needed |
Yarn Suggestions
| Yarn Line | Weight | Skein Yardage | Notes |
|---|---|---|---|
| Lion Brand Vanna’s Choice | Worsted (4) | 170 yds (155 m) | Great stitch definition and rich fall palette |
| Red Heart Super Saver | Worsted (4) | 364 yds (333 m) | Durable, widely available, holds shape well |
| Caron One Pound | Worsted (4) | 454 yds (415 m) | Economical choice for multiple banners |
⚠️ Note: Avoid novelty, eyelash, or heavily textured fuzzy yarns for the pennants, as they will obscure the stitch texture and make surface embroidery difficult to see.
Gauge
- 14 hdc x 11 rows = 4 in (10 cm) using a 5.0 mm hook.
- Check your gauge by making a small swatch before starting.
Abbreviations
| Abbreviation | Meaning |
|---|---|
| ch | chain |
| hdc | half double crochet |
| hdc2tog | half double crochet 2 together (decrease) |
| st(s) | stitch(es) |
| sl st | slip stitch |
| RS | right side |
| WS | wrong side |
UK Terms Equivalent: sc = dc, hdc = htr, dc = tr, sl st = sl st.
Special Stitches Explained
- Half Double Crochet 2 Together (hdc2tog): Yarn over, insert hook into next stitch, yarn over and pull up a loop. Yarn over, insert hook into following stitch, yarn over and pull up a loop. Yarn over and draw through all 5 loops on the hook.
Pattern Instructions
Pattern Notes
- The turning chain 2 at the start of a row does not count as a stitch.
- Work the first hdc of each row in the very first stitch (the same stitch as the base of the turning chain) unless otherwise specified.
- To spell “THANKFUL”, make 8 pennants total following the color order shown in the photo: Rust (T), Mustard Gold (H), Cream (A), Dark Orange (N), Rust (K), Cream (F), Mustard Gold (U), Rust (L).
Pennant Triangle (Make 8 in assorted colors)
Row 1 (RS): Ch 24, hdc in 3rd ch from hook (skipped 2 ch do not count as a stitch), hdc in each remaining ch across (22 hdc). Turn.
Row 2: Ch 2, hdc2tog, hdc in each st across to last 2 sts, hdc2tog (21 hdc). Turn.
Row 3: Ch 2, hdc in each st across (21 hdc). Turn.
Rows 4 to 17: Repeat Rows 2 and 3 alternately, decreasing 2 sts every decrease row:
* Row 4 (dec): (19 hdc)
* Row 5: (19 hdc)
* Row 6 (dec): (17 hdc)
* Row 7: (17 hdc)
* Row 8 (dec): (15 hdc)
* Row 9: (15 hdc)
* Row 10 (dec): (13 hdc)
* Row 11: (13 hdc)
* Row 12 (dec): (11 hdc)
* Row 13: (11 hdc)
* Row 14 (dec): (9 hdc)
* Row 15: (9 hdc)
* Row 16 (dec): (7 hdc)
* Row 17: (7 hdc) Turn.
Row 18 (dec): Ch 2, hdc2tog, hdc in next 3 sts, hdc2tog (5 hdc). Turn.
Row 19: Ch 2, hdc in each st across (5 hdc). Turn.
Row 20 (dec): Ch 2, hdc2tog, hdc in next st, hdc2tog (3 hdc). Turn.
Row 21: Ch 2, hdc in each st across (3 hdc). Turn.
Row 22 (dec): Ch 2, hdc3tog (1 hdc). Fasten off, leaving a 6 in (15 cm) tail to weave in.
✅ Checkpoint: Each completed triangle should have straight, even sloped sides tapering down to a single stitch point at the top.
Surface Embroidery Letters
- Using a photo reference of the finished banner, sketch your letter outlines lightly onto the right side of each pennant if needed.
- Thread your tapestry needle with the contrast Cream yarn. Working from the back to the front, use surface slip stitches to trace out each letter (T, H, A, N, K, F, U, L) centrally on its respective pennant.
- Secure all yarn tails securely on the wrong side.
Assembly & Finishing
- Cut a length of jute twine measuring approximately 65 inches (165 cm).
- Lay your pennants out in order: T – H – A – N – K – F – U – L.
- Fold the top edge of each pennant over the jute twine by about 0.5 inches (1.3 cm) and secure it using a whipstitch with matching yarn or by crocheting a row of slip stitches across the fold trapping the twine inside. Space the pennants evenly about 1 inch (2.5 cm) apart along the twine.
- Leave generous lengths of jute twine on both ends for easy hanging on your mantel or wall.
Size Customization Tips
- Making it longer: You can extend the banner by adding extra pennants for custom names or longer phrases (e.g., “GIVE THANKS”). Each additional pennant requires about 15 yards (14 meters) of yarn.
- Making it smaller: Use DK weight yarn with a 4.0 mm hook for a dainty, smaller banner suitable for a smaller shelf or doorway.
Care Instructions
- Spot clean gently with a damp cloth and mild soap as needed.
- Do not machine wash or tumble dry to preserve the embroidery and shape of the pennants.
- Press with a warm iron on the wrong side under a pressing cloth if flattening is required.
FAQ
Can I use different colors for each letter?
Yes! Feel free to mix and match scrap yarns from your stash to suit your personal autumn decor style.
How do I keep the pennants from sliding on the jute twine?
You can secure each pennant in place by tying a small knot in the jute twine on either side of the folded top tab, or by applying a tiny dot of hot glue to the inside of the fold.
Is this pattern suitable for absolute beginners?
Definitely. As long as you know how to chain, half double crochet, and decrease, you will find this project quick and straightforward.
Happy Crocheting!
I hope you love creating this cozy Thanksgiving crochet thankful banner to warm up your home this holiday season! Be sure to save this pin on Pinterest and leave a comment below with the color palette you chose for your banner.
📄 Your free PDF pattern