












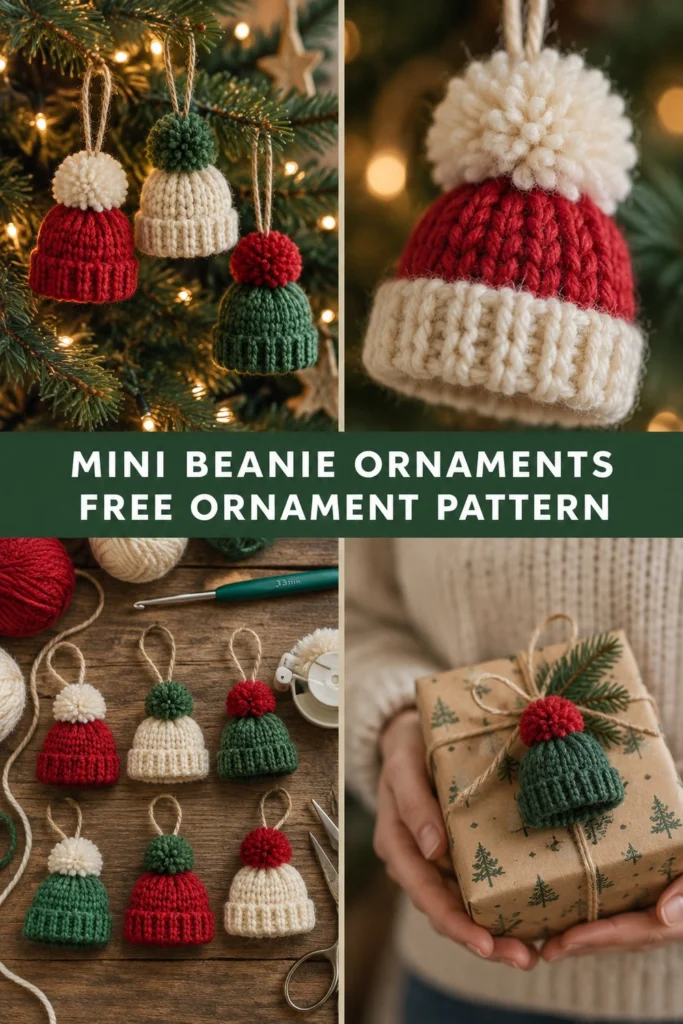
Add a handmade, personal touch to your holiday celebrations with these charming mini beanie ornaments. Inspired by the cozy knit hats we wear all winter, these delightful little decorations work up in minutes using just a handful of yarn scraps. Whether you hang them on your Christmas tree, tuck them into a wreath, or tie them onto a wrapped package as a special gift topper, they bring instant warmth and festive cheer.
Quick Facts
- Skill level: Easy / Beginner-friendly
- Finished size: Approximately 2 inches (5 cm) wide by 2 inches (5 cm) tall (excluding hanging loop and pompom)
- Yarn: Small amounts of worsted weight (Category 4) yarn in two contrasting colors (e.g., Red/White or Green/Red)
- Hook: US E/4 (3.5 mm) crochet hook
- Stitches used: Chain (ch), slip stitch (sl st), single crochet (sc), back loop only (BLO)
- Time to make: About 20 to 30 minutes per ornament
Size customization tips and variations are included further down in this guide.
What Makes This Crochet Mini Beanie Ornament Special
This pattern achieves its realistic knitted look entirely through simple crochet techniques. The body of the hat is worked in continuous rounds of single crochet for a dense, neat texture, while the brim is created by working a single round in the back loop only, which allows the ribbed edge to fold upward naturally. Finishing touches include a handmade yarn pompom and a rustic twine loop for easy hanging.
Skill Level
- Basic crochet knowledge (working in the round, single crochet)
- Ability to work into the back loops of stitches
- Making a small yarn pompom
- Reassurance: If you know the basic single crochet stitch, you can easily master this project!
Finished Measurements
| Measurement | Inches | Centimeters |
|---|---|---|
| Width (Diameter) | 2.0 in | 5.0 cm |
| Height (Including Brim) | 2.0 in | 5.0 cm |
| Hanging Loop Length | 3.5 in | 9.0 cm |
Materials You Will Need
| Material / Notion | Description / Specification |
|---|---|
| Yarn Color A (Brim/Pom) | Worsted weight (Category 4) acrylic or wool blend, approx. 10 yards (9 meters) |
| Yarn Color B (Hat Body) | Worsted weight (Category 4) acrylic or wool blend, approx. 15 yards (14 meters) |
| Crochet Hook | US E/4 (3.5 mm) |
| Twine or Cord | Jute twine, approx. 7 inches (18 cm) for hanging loop |
| Notions | Yarn needle, scissors, small piece of cardboard (about 1.5 inches wide) for pompom |
Yarn Suggestions
| Yarn Line | Weight | Skein Yardage | Notes |
|---|---|---|---|
| Red Heart Super Saver | Worsted (Cat 4) | 364 yds / 333 m | Durable, wide color range, holds shape well for ornaments. |
| Caron Simply Soft | Worsted (Cat 4) | 315 yds / 288 m | Soft with a slight sheen, gives a polished finish to your mini beanies. |
| Lion Brand Vanna’s Choice | Worsted (Cat 4) | 170 yds / 156 m | Excellent stitch definition for the ribbed brim texture. |
⚠️ Note: Avoid novelty yarns like eyelash yarn or super bulky yarns for the main hat body, as they will obscure the stitch texture and make the miniature proportions too large. Stick to smooth worsted weight yarns.
Gauge
- 20 sc x 22 rounds = 4 inches (10 cm) using a 3.5 mm hook.
- Rnds 1 to 3 of the hat crown = approximately 1.0 inch (2.5 cm) across.
Abbreviations
- ch = chain
- sl st = slip stitch
- sc = single crochet
- BLO = back loop only
- st(s) = stitch(es)
- rnd(s) = round(s)
- inc = increase (work 2 sc in the same stitch)
- rep = repeat
Note on UK terms: UK: sc = double crochet (dc). This pattern uses standard US terminology.
Special Stitches Explained
- Magic Ring (MR): A flexible adjustable starting loop. Wrap the yarn around your index finger twice, insert hook under both strands, draw up a loop, ch 1, and work your first round of stitches into the center. Pull the tail to close.
- Back Loop Only (BLO): When working your stitches, insert your hook only under the back loop (the loop furthest from you) of the designated stitch, leaving the front loop free.
Pattern Instructions
Pattern Notes:
* The body of the beanie is worked in continuous spiral rounds without joining. Do not turn at the end of rounds. Use a stitch marker to keep track of the first stitch of each round.
Section 1: Beanie Body (Color B)
- Rnd 1: With Color B, start with a Magic Ring, work 6 sc into the ring (6 sc).
- Rnd 2: Work 2 sc in each st around (12 sc).
- Rnd 3: (1 sc in next st, inc in next st) rep 6 times (18 sc).
- Rnd 4: (1 sc in each of next 2 sts, inc in next st) rep 6 times (24 sc).
- Rnds 5 to 9: sc in each st around (24 sc).
- Rnd 10: Working in BLO (Back Loop Only) for this round, sc in each st around (24 sc).
- Fasten off Color B, leaving a short tail to weave in.
Section 2: Ribbed Brim (Color A)
- Rnd 1: Join Color A to any unworked front loop from Rnd 9 (the round right before the BLO round), ch 1, work 1 sc in the same front loop, then work 1 sc in each remaining front loop around, join with a sl st to the first sc (24 sc).
- Fasten off and weave in all loose ends securely on the inside of the hat.
Section 3: Assembly & Finishing
- Pompom: Using Color A, wrap yarn around a 1.5-inch (3.8 cm) piece of cardboard about 35 times. Carefully slide the bundle off, tie a tight length of yarn securely around the middle, and cut the loops open. Trim into a fluffy 1-inch pompom.
- Hanging Loop: Cut a 7-inch (18 cm) piece of jute twine. Fold it in half to create a loop and knot the ends together.
- Attachment: Using your yarn needle and the tails from the pompom and twine, thread them through the center top (magic ring) of the beanie from the outside to the inside. Tie securely inside the hat crown to anchor both the pompom and the hanging loop firmly in place.
✅ Checkpoint: At this stage, your mini beanie should measure roughly 2 inches wide and 2 inches tall, with a neat ribbed brim folded upward, a secure hanging loop, and a fluffy pompom on top.
Size Customization Tips
- Making it smaller: Omit Rnd 4 of the body to create an extra-tiny newborn-sized beanie ornament (about 1.5 inches wide).
- Making it larger: Add one more increase round (Rnd 5:
[3 sc, inc] x 6, totaling 30 sc) and work 2 extra straight rounds before the brim to make a slightly larger ornament for a fuller tree branch.
Care Instructions
- Spot clean gently with a damp cloth and mild soap if needed.
- Do not submerge in water if using natural jute twine or cardboard-backed pompoms.
- Store flat in a dry ornament box between holiday seasons.
FAQ
Can I use scrap yarn of different weights?
Yes, but keep in mind that using a heavier yarn with a larger hook will make a larger ornament, while lightweight yarn with a smaller hook will make a tiny one. For best results matching the photo, stick to standard worsted weight yarn.
Are these safe to give to young children as toys?
These mini beanies are designed specifically as decorative holiday ornaments and gift toppers. Because they contain small parts like yarn pompoms and twine loops, they are not intended as infant toys.
How do I attach these to wrapped gifts?
Simply slide the jute twine hanging loop over the bow or knot of your gift wrapping twine before tying it off, letting the mini beanie rest proudly on top of the package as a keepsake gift topper!
Happy Crocheting!
I hope you thoroughly enjoy making these festive mini beanie ornaments for your holiday season. Be sure to save this pattern on Pinterest so you can easily find it again next year, and leave a comment below to share what color combinations you decided to use!
📄 Your free PDF pattern