










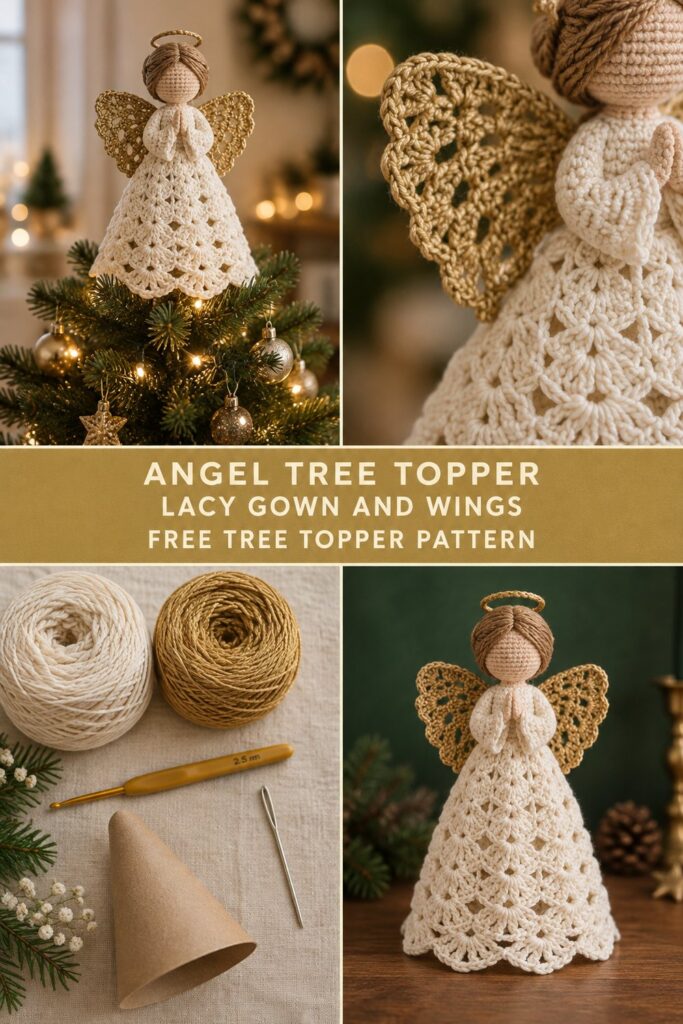
There is something deeply magical about placing a handmade creation at the very peak of the Christmas tree, where the warm fairy lights catch every delicate stitch. This charming crochet angel tree topper brings an heirloom quality to your holiday decor, featuring a lacy cream gown, soft gold wings, and a radiant halo that slips easily over your topmost branch. Designed with sturdy mercerized cotton and worked from the top down, she holds her shape year after year while adding a touch of quiet elegance to your seasonal traditions.
Quick Facts
- Stitches Used: ch, sl st, sc, hdc, dc, tr, shell stitch (see Special Stitches).
- Size Fit: One size fits standard artificial and real Christmas tree top branches (approx. 7 inches tall).
- Estimated Time to Complete: 4 to 6 hours.
- Gift-Appeal Framing: A treasured handmade keepsake that makes a wonderful hostess gift, family heirloom, or special project for holiday craft fairs.
💡 Designer Tip: This project makes a fantastic stash-buster for small amounts of leftover sport or DK weight cotton yarn you might have in your holiday basket!
What Makes This Crochet Angel Tree Topper Special
This design relies on clever construction and crisp stitch definition to achieve its ethereal look. The head and bodice are worked in a continuous spiral for a seamless, smooth finish, while the hollow cone skirt uses expanding shell stitches to provide natural structure without needing heavy plastic inserts. The wings are worked in split rows to create a dimensional, feathered effect that holds its shape beautifully when stiffened slightly. By using a small hook and tightly spun cotton yarn, every single lace loop remains crisp and defined against the glow of your tree lights.
Skill Level
- Intermediate: Comfortable working in the round, basic lace shaping, and simple embroidery-free assembly.
- Required Skills: Magic ring, working into front and back loops, basic increasing, skipping stitches for shell foundations, and whip stitching pieces together.
⚠️ Note: While the stitch combinations are straightforward, keeping a consistent tension is key to ensuring the hollow cone base remains upright and stable on the tree branch.
Finished Measurements
| Measurement | Inches | Centimeters |
|---|---|---|
| Total Height | 7.0 in | 17.8 cm |
| Skirt Base Diameter | 3.5 in | 8.9 cm |
| Wingspan | 4.0 in | 10.2 cm |
Materials You Will Need
| Item | Description | Quantity / Yardage |
|---|---|---|
| Color A (Cream) | Sport Weight Mercerized Cotton (Main Gown) | 85 yds / 78 m |
| Color B (Soft Gold) | Sport Weight Mercerized Cotton (Wings & Halo) | 25 yds / 23 m |
| Crochet Hook | US B/1 (2.5 mm) | 1 hook |
| Notions | Yarn needle, stitch markers, small cardboard cone (optional, for internal support), blocking pins | As needed |
Yarn Suggestions
| Yarn Brand & Line | Weight | Yardage per Skein | Notes |
|---|---|---|---|
| Schachenmayr Catania | Sport (Fine 2) | 137 yds / 125 m per 50g | Exceptional stitch definition and a stunning range of gold and cream shades. |
| Hobbii Rainbow Cotton 8/4 | Fingering / Sport | 186 yds / 170 m per 50g | 100% mercerized cotton with a gorgeous subtle sheen that catches the tree lights. |
| Knit Picks Comfy Sport | Sport (Fine 2) | 136 yds / 124 m per 50g | Soft cotton-acrylic blend with great structure and memory for the cone base. |
⚠️ Note: Avoid stretchy acrylic or fuzzy wool yarns for this crochet angel tree topper. Wool lacks the crisp structural integrity needed for the hollow cone base, and fuzziness will obscure the delicate lace shell stitches.
Gauge
| Gauge Type | Measurement | Stitch / Row Count |
|---|---|---|
| Body (Sc in round) | 4 x 4 inches (10 x 10 cm) | 22 sts x 24 rows using a 2.5 mm hook |
| Lace Skirt | Motif repeat | 1 shell repeat = approx. 0.75 inches wide |
💡 Designer Tip: Always swatch using your chosen hook and yarn before beginning. If your stitches are too loose, the cone base may droop over the branch; go down a hook size if necessary.
Abbreviations
| Abbreviation | Full Meaning |
|---|---|
| ch | chain |
| sl st | slip stitch |
| sc | single crochet |
| hdc | half double crochet |
| dc | double crochet |
| tr | treble crochet |
| st(s) | stitch(es) |
| blo | back loop only |
| flo | front loop only |
| inc | increase (work 2 sts in same st) |
| invdec | invisible single crochet decrease |
| rep | repeat |
| RS | right side |
Special Stitches Explained
- Shell (sh): Work (2 dc, ch 1, 2 dc) into the designated stitch or space.
- Invisible Decrease (invdec): Insert hook into the front loop only of the next two stitches, yarn over, pull through both front loops, yarn over, and pull through remaining two loops on hook.
- Picot: Ch 3, sl st into the back bump of the first chain made.
Pattern Instructions
Section 1: Head and Halo Base (Color A)
Rnd 1: Working in a magic ring, work 6 sc. Pull ring closed tightly. (6 sc)
Rnd 2: [Inc in next st] 6 times. (12 sc)
Rnd 3: [Sc in next st, inc in next st] 6 times. (18 sc)
Rnds 4–6: Sc in each st around. (18 sc for 3 rounds)
Rnd 7: [Sc in next st, invdec] 6 times. (12 sc)
💡 Designer Tip: Lightly stuff the head sphere with a tiny scrap of yarn or fiberfill before closing the neck narrowing.
Rnd 8: [Invdec] 6 times. (6 sc)
Rnd 9: Inc in each st around. (12 sc)
Section 2: Bodice and Hollow Cone Skirt (Color A)
Rnd 10: [Sc in next st, inc in next st] 6 times. (18 sc)
Rnd 11: [Sc in next 2 sts, inc in next st] 6 times. (24 sc)
Rnd 12: Working in blo for this round only, sc in each st around. (24 sc)
Rnd 13: [Sc in next 3 sts, inc in next st] 6 times. (30 sc)
Rnd 14: Sc in each st around. (30 sc)
Rnd 15: [Sc in next 4 sts, inc in next st] 6 times. (36 sc)
Rnd 16: Sc in each st around. (36 sc)
✅ Checkpoint: At the end of Rnd 16, your piece should measure about 2.5 inches from the top of the head and form a secure neck ridge. Count your stitches to ensure exactly (36 sc) before beginning the lacy skirt expansion.
Rnd 17: (Begin Shell Skirt Pattern) Sl st into the first 2 sts to align for shell start, ch 3 (counts as 1 dc), (1 dc, ch 1, 2 dc) in same st (first shell made), skip 2 sts, [shell in next 4th st, skip 3 sts] 8 times around, join with sl st to top of beg ch-3. (8 shells)
Rnd 18: Sl st across to the ch-1 space of the first shell, ch 3, (1 dc, ch 1, 2 dc) in same ch-1 space, ch 1, shell in ch-1 space of next shell around, join with sl st. (8 shells, 8 ch-1 spaces)
Rnd 19: Working into each shell and ch-1 space, work [shell in next shell, ch 1] around around, join with sl st. (24 dc groups)
Rnd 20: Shell in each shell, ch 2 between shells around, join with sl st. (8 shells)
Rnd 21: Work [shell, picot, shell] in every other ch-2 space, and shell in remaining ch-2 spaces around, join with sl st and fasten off securely. Weave in all loose ends.
Section 3: Wings (Make 2, Color B)
Row 1: Ch 10, dc in 4th ch from hook, (ch 1, dc) in each ch across, turn.
Row 2: Ch 4, dc in first ch-1 space, [ch 2, dc in next ch-1 space] across, turn.
Row 3: Ch 3, (dc, ch 2, 2 dc) in each ch-2 space across, turn.
Row 4: Ch 1, (sc, ch 3, sc) in each ch-2 space across, fasten off leaving a long tail for sewing.
Section 4: Halo (Color B)
Rnd 1: Ch 14, join with a sl st to form a ring, being careful not to twist the chain. Ch 1, work 20 sc around the ring, join with sl st, fasten off leaving a 6-inch tail for attaching.
Section 5: Assembly and Finishing
- Position the two wings on the back of the bodice just below the neck ridge, angling them outward slightly. Use the long yarn tails to whip stitch them securely to Rnds 12–15.
- Shape the halo ring and stitch it firmly to the top back of the head.
- Block your finished crochet angel tree topper lightly by spritzing with a mixture of water and a few drops of fabric stiffener (or a weak water-glue solution), pinning the lace skirt flat until completely dry.
- Slip the hollow cone base directly onto the top branch of your Christmas tree.
Size Customization Tips
- To make a larger angel: Use a DK or Worsted weight cotton yarn with a 3.5 mm hook and work 2 additional increase rounds in the cone skirt before starting the shell pattern. This will increase the total height to roughly 9 inches.
- To make a smaller angel: Use a fingering weight crochet thread (size 10) with a 1.5 mm hook, reducing the beginning head ring to 5 sc and omitting Rnd 15 of the bodice.
Care Instructions
- Gently dust your crochet angel tree topper with a soft, dry brush before packing her away.
- If stiffener was applied, store in a breathable cotton bag away from direct moisture and crushing weight.
- Do not submerge in water unless washing; spot clean gently with a damp cloth and mild soap if needed, then reshape and dry flat.
Closing
There is truly nothing quite like finishing a cherished holiday project with your own hands. I hope this crochet angel tree topper brings an extra touch of warmth, peace, and handmade beauty to your festive celebrations this season.
If you make this free Christmas crochet pattern, I would love to see your gorgeous creations! Please share photos on social media using the hashtags #CrochetAngel #TreeTopper #FreeCrochetPattern #ChristmasCrochet #HolidayCrochet, tag my account, save this design to your favorite Pinterest boards for easy access, and leave a comment below to let me know how your tree topper turned out!
📄 Your free PDF pattern