












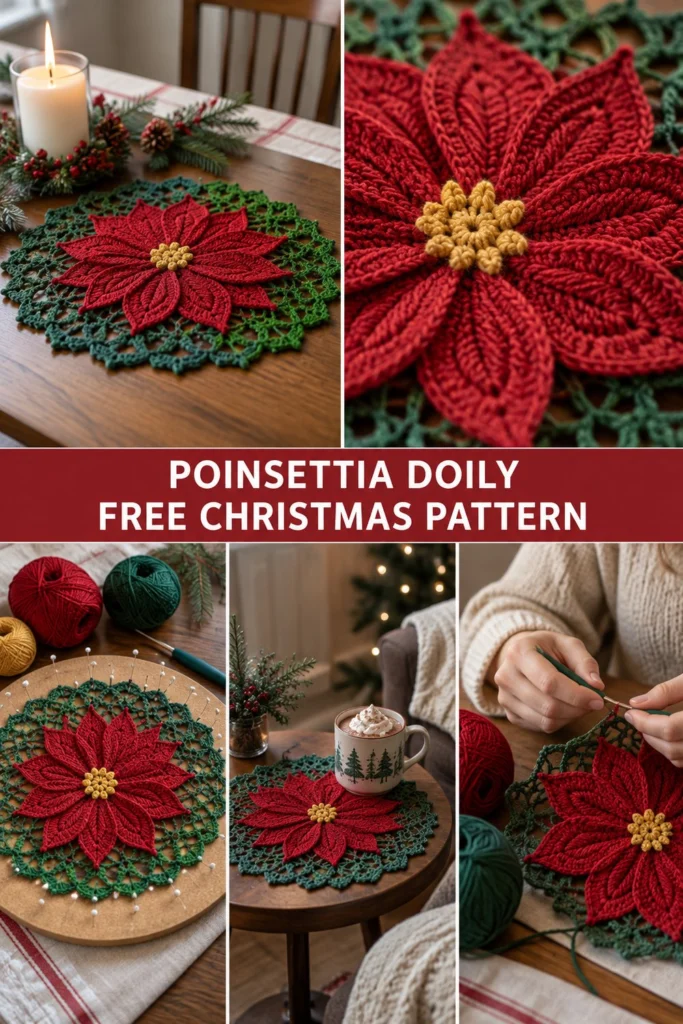
Bring the magic of the holidays to your coffee table with this stunning, textured centrepiece that blooms all season long. Worked from the centre out in joined rounds, this crochet poinsettia doily features raised, pointed red petals, a cheerful yellow centre, and a delicate green lace border.
Quick Facts
- Skill level: Intermediate
- Finished size: Approximately 14 inches (35.5 cm) in diameter after blocking
- Yarn: Worsted weight (Category 4) cotton or cotton-blend yarn in Red, Green, and Yellow
- Hook: 4.0 mm (US G/6) crochet hook
- Stitches used: Ch, sl st, sc, hdc, dc, tr, fpdc, bpdc, picot
- Time to make: 4 to 6 hours
Size customization tips are included further down the page to help you adapt your doily for different tables and settings.
What Makes This Poinsettia Doily Special
This design relies on joined rounds and clever post-stitch shaping to create dimensional texture without any extra sewing. The flower begins at the very centre with small yellow puffs, then builds outward into rich, textured red petals that mimic the real botanical flower. Once the bloom is complete, you join your green yarn to build an airy chain-space lace border that stabilizes the flower and gives the whole piece a light, sophisticated medallion shape. It fits beautifully under a holiday candle, a festive cake stand, or a decorative bowl of ornaments.
Skill Level
- Comfortable working in the round and joining with slip stitches
- Familiarity with front post and back post stitches (fpdc, bpdc)
- Basic understanding of chain-space lace formations
- Ability to block lace projects to achieve crisp points
💡 Designer Tip: Do not skip the blocking stage! Cotton lace motifs look wonderful off the hook, but pinning them out flat reveals the true star-like symmetry of the poinsettia petals and the delicate geometry of the green lace.
Finished Measurements
| Dimension | Inches | Centimeters |
|---|---|---|
| Diameter (Blocked) | 14 in | 35.5 cm |
| Flower Diameter | 7.5 in | 19 cm |
Materials You Will Need
| Material | Color | Details | Quantity / Amount |
|---|---|---|---|
| Yarn (Red) | Festive Red | Worsted / Category 4 Cotton | approx. 90 yards (82 meters) |
| Yarn (Green) | Forest Green | Worsted / Category 4 Cotton | approx. 110 yards (100 meters) |
| Yarn (Yellow) | Bright Yellow | Worsted / Category 4 Cotton | approx. 15 yards (14 meters) |
| Crochet Hook | – | 4.0 mm (US G/6) | 1 hook |
| Notions | – | Tapestry needle for weaving ends | 1 needle |
| Notions | – | Blocking board, pins, and rust-proof pins | 1 set |
Yarn Suggestions
| Yarn Name | Weight | Notes |
|---|---|---|
| Lily Sugar’n Cream | Worsted (4) | 100% cotton, great stitch definition, crisp blocking |
| Drops Paris | Worsted (4) | 100% combed cotton, soft matte finish |
| Bernat Handicrafter Cotton | Worsted (4) | Durable, widely available, holds sharp floral shapes |
⚠️ Note: Avoid stretchy acrylic or fuzzy novelty yarns for this project. Smooth 100% cotton yarn provides the stiffness and stitch clarity needed for the petal ridges and open lace border to hold their shape properly.
Gauge
- Flower Centre: Rnds 1 to 3 measure approximately 2 inches (5 cm) across.
- Full Doily: 16 Rnds measure 14 inches (35.5 cm) across when fully blocked.
Abbreviations (US Terms)
- ch – chain
- sl st – slip stitch
- sc – single crochet
- hdc – half double crochet
- dc – double crochet
- tr – treble crochet
- fpdc – front post double crochet
- bpdc – back post double crochet
- picot – ch 3, sl st in the 3rd ch from hook
- st(s) – stitch(es)
- sp(s) – space(s)
- sk – skip
- rep – repeat
- rnd(s) – round(s)
- yo – yarn over
- inc – increase (work 2 sts in the same st)
UK terminology note: sc = dc, hdc = htr, dc = tr.
Special Stitches Explained
- Magic Ring: Wrap yarn around your index finger twice to form a ring, insert hook into ring, pull up a loop, and work the starting ch.
- Picot: Ch 3, insert hook into the back bump and front loop of the first chain made, yo and pull through all loops on hook.
- Front Post Double Crochet (fpdc): Yo, insert hook from front to back to front around the post of the specified stitch from the row below, yo, pull up a loop, [yo and pull through 2 loops] twice.
Pattern Instructions
Pattern Notes: Work all rounds from the centre out, joining each round with a sl st to the first st unless otherwise noted. Turning chains do not count as stitches unless specified.
Section 1: Flower Centre and Inner Base (Yellow)
Rnd 1: With Yellow, make a magic ring, ch 1, work 8 sc in ring, join with sl st to first sc. (8 sc)
Rnd 2: Ch 1, *[yo, insert hook in st, yo and pull up a loop] 3 times in same st (7 loops on hook), yo and pull through all 7 loops, ch 2, rep from * around, join with sl st to top of first puff st. (8 puff sts, 8 ch-2 sps)
Rnd 3: Sl st into first ch-2 sp, ch 1, work (1 sc, 2 hdc, 1 sc) in each ch-2 sp around, join with sl st to first sc. Fasten off Yellow, leaving a 6-inch tail to weave in. (32 sts)
Section 2: Inner Petals (Red, Make 8)
Rnd 4: Join Red with a sl st in the back loop of any 2nd hdc of a 4-st group from Rnd 3. Ch 1, sc in same st, ch 5, working down the ch: sc in 2nd ch from hook, hdc in next ch, dc in next 2 ch; skip next 2 sts on Rnd 3, sc in next st, turn to work along opposite side of starting chain: work dc in next 2 ch, hdc in next ch, sc in last ch, join with sl st to base sc. Fasten off Red, leaving a tail. Repeat this petal construction 7 more times evenly around the centre base, attaching each petal securely. (8 Petals created)
Section 3: Outer Petal Reinforcement and Lace Foundation (Green)
Rnd 5: *Join Green with a sl st to the base sc between any two inner red petals. Ch 1, ch 7, working behind the red petal, sc in the base sc between the next two red petals; rep from * around 7 times, ending with ch 3 and a dc in the first joining sl st (this places your hook in the middle of the ch-7 space). (8 ch-7 sps)
Rnd 6: Ch 1, *work (1 sc, 1 hdc, 3 dc, 1 hdc, 1 sc) in same ch-sp, work (1 sc, 1 hdc, 3 dc, 1 hdc, 1 sc) in next ch-sp; rep from * around, join with sl st to first sc. (56 sts)
✅ Checkpoint: At the end of Rnd 6, you have a solid ring of green petals cradling your red poinsettia centre. Check that your stitch count around this entire round is 56 stitches.
Section 4: Green Lace Border
Rnd 7: Ch 1, *sc in first st, ch 5, skip next 6 sts, sc in next st; rep from * around, ending with ch 2 and a dc in first sc to position hook in middle of loop. (8 ch-5 sps)
Rnd 8: Ch 1, *sc in same ch-sp, ch 6, sc in next ch-5 sp; rep from * around, ending with ch 3 and a dc in first sc. (8 ch-6 sps)
Rnd 9: Ch 1, *sc in same ch-sp, ch 3, (3 dc, ch 2, 3 dc) in next ch-6 sp (shell made), ch 3, sc in next ch-6 sp; rep from * around, ending with ch 3, join with sl st to first sc. (4 shells, 4 sc sps)
Rnd 10: *Sl st into first ch-3 sp, ch 1, (sc, ch 3, sc) in ch-3 sp, ch 3, work 1 fpdc around each of the next 3 dc of the shell, ch 2, work 1 fpdc around each of the next 3 dc of the shell, ch 3, (sc, ch 3, sc) in next ch-3 sp; rep from * around, join with sl st to first sc. (8 fpdc groups)
Rnd 11: *Sl st into first ch-3 sp, ch 1, (sc, ch 3, sc) in same ch-sp, ch 4, skip next ch-3 sp, work 1 fpdc around each of the first 3 fpdc, 2 dc in ch-2 sp, work 1 fpdc around each of the next 3 fpdc, ch 4, (sc, ch 3, sc) in next ch-3 sp; rep from * around, join with sl st to first sc. (8 dc blocks)
Rnd 12: *Sl st into first ch-3 sp, ch 1, (sc, ch 3, sc) in same ch-sp, ch 5, skip next ch-4 sp, work [1 fpdc around next fpdc, ch 1] across next 8 dc sts, ch 4, (sc, ch 3, sc) in next ch-3 sp; rep from * around, join with sl st to first sc. (Lace fan formed)
Rnd 13: *Sl st into first ch-3 sp, ch 1, (sc, ch 3, sc) in same ch-sp, ch 5, work 1 sc in first ch-1 sp of the fan, [ch 3, sc in next ch-1 sp] 7 times, ch 5, (sc, ch 3, sc) in next ch-3 sp; rep from * around, join with sl st to first sc. (7 small ch-3 loops per fan)
Rnd 14: *Sl st into first ch-3 sp, ch 1, (sc, ch 3, sc) in same ch-sp, ch 5, skip next ch-5 sp, work 1 sc in first ch-3 loop, [ch 3, sc in next ch-3 loop] 6 times, ch 5, (sc, ch 3, sc) in next ch-3 sp; rep from * around, join with sl st to first sc. (6 small ch-3 loops per fan)
Rnd 15: *Sl st into first ch-3 sp, ch 1, (sc, ch 3, sc) in same ch-sp, ch 6, skip next ch-5 sp, work 1 sc in first ch-3 loop, [ch 3, sc in next ch-3 loop] 5 times, ch 6, (sc, ch 3, sc) in next ch-3 sp; rep from * around, join with sl st to first sc. (5 small ch-3 loops per fan)
Rnd 16: *Sl st into first ch-3 sp, ch 1, work (sc, picot, sc) in same ch-sp, [work (sc, picot, sc) in next ch-6 sp, work (sc, picot, sc) in each ch-3 loop across to next corner ch-3 sp, work (sc, picot, sc) in corner ch-3 sp]; rep from * around, join with sl st to first sc. Fasten off. (Picot edge complete)
Assembly
No assembly is required as the piece is worked entirely in one seamless progression from the centre out. Simply weave in all loose ends securely on the wrong side of the work using your tapestry needle.
Finishing
- Submerge your completed doily in lukewarm water mixed with a few drops of mild wool wash or gentle soap for 15 minutes.
- Gently squeeze out excess water—do not wring or twist.
- Lay the doily flat on a blocking mat or clean towel.
- Pin the centre yellow circle flat, then pull each red petal outward and pin the tip.
- Pin out each picot point along the outer green lace border to create crisp, open geometric spaces.
- Allow to dry completely before removing pins.
https://dreket.com/lacy-halloween-spiderweb-table-topper-free-crochet-pattern/
Size Customization Tips
- Larger Centerpiece: To make a larger mat, you can repeat Rnds 14 and 15 once more, adding an extra round of chain loops before working the final picot edge on Rnd 16. Each added round of lace increases the total diameter by approximately 1.5 inches.
- Thinner Yarn: If you use size 10 crochet cotton with a 1.75 mm hook, your finished doily will measure roughly 9 inches across, making it ideal for a delicate placemat or ornament display.
Care Instructions
- Hand wash gently in cold water with mild detergent.
- Lay flat to dry on a towel, reshaping while damp.
- Do not bleach, tumble dry, or iron directly on high heat.
FAQ
Can I use acrylic yarn instead of cotton?
You can use acrylic yarn, but the doily will drape softly rather than holding the crisp, flat shape required for a table centrepiece. Cotton yarn is strongly recommended for structure and stitch definition.
How do I keep my lace border from curling?
Curling usually happens if your tension is too tight or if the piece is not blocked properly. Make sure to pin out every picot point firmly when wet-blocking your doily.
Can I make the poinsettia flower larger with more petals?
The centre base has 8 groups of stitches, which naturally accommodates 8 red petals. Changing the base count would require altering the math for the subsequent lace rounds, so sticking to 8 petals provides the best geometric balance.
Happy Crocheting!
I hope you love creating this festive holiday centrepiece for your home! Save this pin on Pinterest to easily find it later, and leave a comment below to let me know what colors you chose for your poinsettia.
📄 Your free PDF pattern