
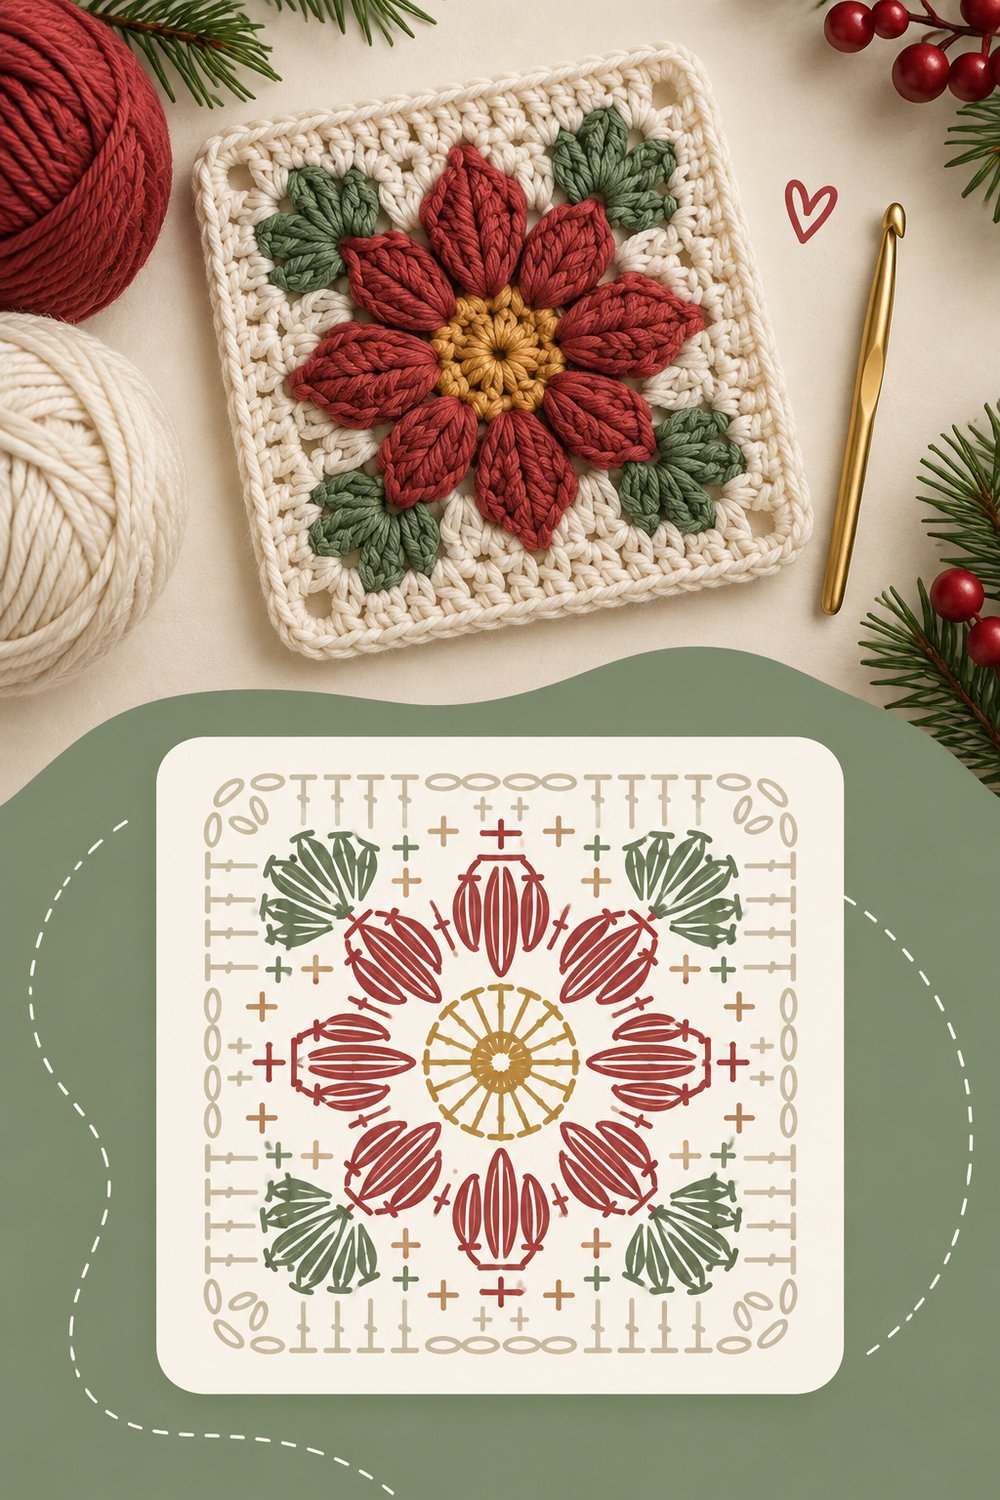
There is nothing quite like cozying up with a warm cup of tea while stitching festive heirlooms for the winter season, and this motif brings instant holiday magic to your hook. Whether you are building a stunning heirloom throw or whipping up a quick festive pillow, this design combines classic comfort with botanical charm.
Christmas Poinsettia Granny Square Pattern | Easy Crochet Chart Tutorial
Quick Facts
- Stitches Used: ch, sl st, sc, hdc, dc, tr, puff stitch, cluster
- Size Fit: One standard 6-inch motif (easily customizable into blankets, pillows, and runners)
- Estimated Hours to Complete: 1 to 1.5 hours per square
- Gift-Appeal Framing: Ideal for quick holiday gift-making, heirloom blankets, festive cushion covers, and handmade holiday market items
Easily customize your project size by swapping yarn weights or joining multiple squares together for larger holiday home decor pieces.
What Makes This Poinsettia Granny Square Special
This square is designed to achieve a striking, tactile three-dimensional effect without complicated assembly. By utilizing stacked puff stitches for the brick-red petals, the poinsettia flower pops directly off the surface with rich texture and depth. The foundation begins with a soft gold center ring, blooms outward into eight distinct red petals, transitions into natural sage green leaf clusters nestled neatly in the corners, and finally squares off with a clean, balancing cream border. Paired with the included color-coded crochet symbol chart, every round flows intuitively from one layer to the next, ensuring a relaxing and rewarding stitch experience.
Skill Level
- Skill Level: Easy / Intermediate Beginner
- Basic understanding of crochet terminology and rounds in the round
- Familiarity with working into chain spaces
- Willingness to try textured stitches like the puff stitch
💡 Designer Tip: If you are new to puff stitches, keep your working loops slightly loose and uniform in height to ensure your petals pop out cleanly and your hook slides smoothly through the final closure loop.
Finished Measurements
| Motif Dimension | Inches | Centimeters |
|---|---|---|
| Width (Side to Side) | 6.0 in | 15.2 cm |
| Height (Top to Bottom) | 6.0 in | 15.2 cm |
| Diagonal Span | 8.5 in | 21.6 cm |
Materials You Will Need
- Yarn Weight: #4 Worsted Weight / Medium Aran Cotton Yarn
- Crochet Hook: US G/6 (4.0 mm) or size needed to obtain gauge
- Notions: Yarn needle, scissors, stitch markers
| Color Name | Color Role in Design | Yarn Weight | Yardage Needed |
|---|---|---|---|
| Warm Gold | Center Ring | #4 Worsted | 8 yds (7 m) |
| Muted Brick Red | Poinsettia Petals | #4 Worsted | 25 yds (23 m) |
| Sage Green | Leaf Corners | #4 Worsted | 15 yds (14 m) |
| Warm Cream | Outer Border & Background | #4 Worsted | 20 yds (20 m) |
Yarn Suggestions
| Brand & Line Name | Yarn Weight | Skein Yardage | Notes |
|---|---|---|---|
| Lion Brand 24/7 Cotton | #4 Worsted | 186 yds / 100g | Crisp stitch definition, mercerized sheen, zero-pill finish |
| Knit Picks Dishie | #4 Worsted | 190 yds / 100g | Tight twist, highly durable, perfect matte holiday colors |
| Painbox Yarns Cotton Aran | #4 Worsted | 93 yds / 50g | Incredible color range; highly recommended for exact shade matching |
⚠️ Note: Avoid using fuzzy acrylic or novelty eyelash yarns for this pattern. The complex petal structure relies entirely on clean stitch definition to look like a true poinsettia flower.
Gauge
| Measurement Type | Stitch / Row Count | Finished Size |
|---|---|---|
| Motif Gauge | Rounds 1 through 3 complete | 3.5 inches (9 cm) across |
| Full Square Gauge | Rounds 1 through 5 complete | 6.0 inches (15.2 cm) square |
Always work a test motif to check your personal tension before committing to a large-scale christmas crochet blanket.
Abbreviations
| Abbreviation | Full Term |
|---|---|
| ch | Chain |
| sl st | Slip stitch |
| sc | Single crochet |
| hdc | Half double crochet |
| dc | Double crochet |
| tr | Treble crochet |
| puff | Puff stitch (see Special Stitches) |
| cluster | 3-dc cluster (see Special Stitches) |
| st(s) | Stitch(es) |
| sp(s) | Space(s) |
| MC | Main Color (Warm Cream) |
| RS | Right Side |
Special Stitches Explained
- Puff Stitch (puff): [Yarn over, insert hook into indicated stitch/space, yarn over and pull up a long loop] 4 times into the same st/sp (9 loops on hook), yarn over and draw through all 9 loops on hook, ch 1 to secure the puff.
- 3-dc Cluster (cluster): [Yarn over, insert hook into st/sp, yarn over and pull up loop, yarn over and pull through 2 loops] 3 times in the same st/sp (4 loops on hook), yarn over and pull through all 4 loops on hook.
Pattern Instructions
Section 1: Round 1 – The Gold Center Ring
With Warm Gold, leave a 6-inch tail for weaving in.
– Step 1: Ch 4, join with a sl st to the first ch to form a ring.
– Step 2: Ch 1 (does not count as st), work 8 sc directly into the center of the ring. Join with a sl st to the first sc. Fasten off Gold, leaving a short tail. (8 sc)
✅ Checkpoint: You should have a small, neat gold circle with exactly 8 single crochet stitches.
Section 2: Round 2 – The Petal Foundation
Join Muted Brick Red with a sl st in any sc space around the gold ring.
– Step 1: Ch 3 (counts as first dc here and throughout), work 1 dc in the same st.
– Step 2: Work 2 dc in each sc around. Join with a sl st to the top of the initial ch-3. Fasten off Brick Red. (16 dc)
Section 3: Round 3 – Brick Red Puff-Stitch Petals
Join Muted Brick Red with a sl st in the space between any two 2-dc groups from Round 2.
– Step 1: Work 1 puff in the same inter-stitch space, ch 2.
– Step 2: Work 1 puff in the next inter-stitch space between 2-dc groups, ch 2; repeat from * around. Join with a sl st to the top of the first puff. Fasten off Brick Red. (8 puff sts, 8 ch-2 sps)*
✅ Checkpoint: Verify you have exactly 8 brick-red puff petals alternating evenly with 8 chain-2 spaces before moving to the leaves.
Section 4: Round 4 – Sage Green Leaf Corners
Join Sage Green with a sl st in any ch-2 space between puff stitches.
– Step 2: Work (2 dc, ch 2, 2 dc) in the same ch-2 space (first corner made).
– Step 3: In the next ch-2 space, work 1 hdc, 1 sc, 1 hdc.
– Step 4: In the next ch-2 space, work 1 hdc, 1 sc, 1 hdc.
– Step 5: (2 dc, ch 2, 2 dc) in the next ch-2 space, work (1 hdc, 1 sc, 1 hdc) in each of the next 2 ch-2 spaces; repeat from * around twice more. Join with a sl st to the top of the initial ch-3. Fasten off Sage Green. (16 dc, 12 hdc, 8 sc, 4 ch-2 corner sps)*
Section 5: Round 5 – Warm Cream Outer Border
Join Warm Cream with a sl st in any ch-2 corner space.
– Step 1: Ch 3, work (2 dc, ch 2, 3 dc) in the same ch-2 corner space.
– Step 2: Skip next st, work 1 dc in each of the next 9 sts across the side up to the next corner space.
– Step 3: (3 dc, ch 2, 3 dc) in the next ch-2 corner space, skip next st, work 1 dc in each of the next 9 sts across; repeat from * around twice more. Join with a sl st to the top of the initial ch-3. Fasten off cream and weave in all ends securely. (48 dc, 4 ch-2 corner sps)*
✅ Checkpoint: Your finished square should measure precisely 6 inches across, lay completely flat on a flat surface, and feature crisp ninety-degree corners.
Size Customization Tips
- Scaling Up for Pillows: Use bulky #5 yarn with a US J/10 (6.0 mm) hook to increase your square size to roughly 8 inches per motif.
- Scaling Down for Ornaments: Use size #1 fingering yarn with a US B/1 (2.25 mm) hook to create delicate 3-inch poinsettia motifs perfect for hanging on your Christmas tree.
- Joining Method: Join your completed squares using a flat braid join or a continuous whipstitch on the wrong side to maintain a professional finish across your christmas crochet blanket.
Care Instructions
- Hand wash gently in cool water with mild wool wash, or machine wash on a delicate cold cycle inside a mesh garment bag.
- Do not bleach or wring out vigorously to protect the loft of the puff stitches.
- Lay flat to block into exact square dimensions on a foam blocking mat. Air dry completely before storing or gifting.
Christmas Poinsettia Granny Square Pattern | Easy Crochet Chart Tutorial
Thank you so much for stitching along with me today! I hope this poinsettia granny square brings warmth and handmade joy to your holiday season.
If you make your own holiday crochet blanket or festive cushions using this pattern, please share your creations! Tag me on social media @YourDesignHandle, use the hashtags #ChristmasGrannySquare and #PoinsettiaCrochet, save this tutorial to your Pinterest boards for easy reference, and leave a comment below to let me know how your project turned out! Happy crocheting!