
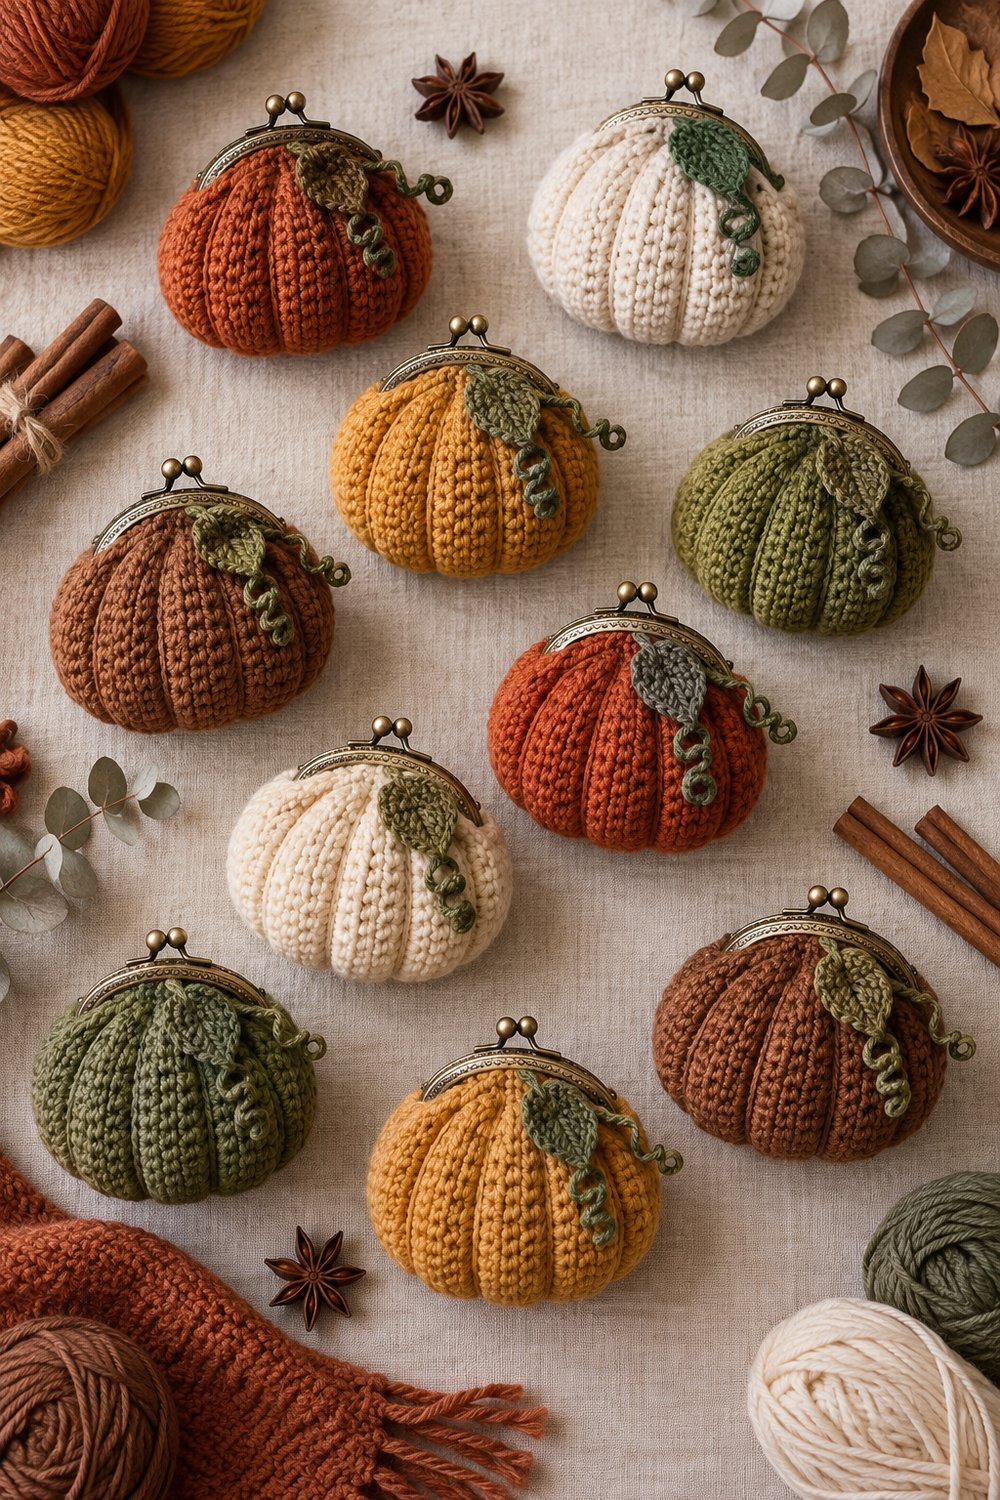
There is nothing quite like the crisp rustle of autumn leaves and the cozy comfort of working with rich, warm autumn wool as the weather turns chilly. Bringing that seasonal magic right to your fingertips, this charming little accessory captures the quintessential spirit of fall harvests while serving up everyday practicality.
Adorable Fall Pumpkin Crochet Coin Purse Free Pattern
Quick Facts
- Stitches Used: Slip stitch (sl st), single crochet (sc), half double crochet (hdc), back loop only single crochet (blo-sc), surface slip stitch.
- Size Fit: One size miniature coin purse (fits coins, folded cash, or small stitch markers).
- Estimated Time to Complete: 2 to 3 hours.
- Gift-Appeal Framing: Makes a wonderful, fast-to-make autumn gift, Thanksgiving table favor, or charming Halloween crochet accessory that friends and family will adore.
💡 Designer Tip: Read through all instructions and special stitches once before picking up your hook to ensure a smooth, relaxing crafting session!
What Makes This Pumpkin Crochet Coin Purse Special
What sets this little autumn coin purse apart is its clever blend of traditional amigurumi shaping and functional hardware installation. Instead of working in continuous rounds, the main body is created using a textured back loop only single crochet ribbing technique that mimics the natural undulating ridges of a real heirloom pumpkin. Working horizontally and seaming the short edges creates a seamless tube that cinches neatly at the top and bottom.
To elevate the design from a simple pouch to a polished boutique accessory, the project incorporates an antique brass metal kiss-lock frame. Securely hand-sewing the finished crochet opening into the metal channels ensures a professional, sturdy closure that won’t spill your treasures. Finally, the whimsical twisted green vine and textured leaf details—worked with simple chain loops and half double crochet clusters—add an organic finishing touch that brings the entire miniature pumpkin patch aesthetic to life.
Skill Level
- Beginner to Intermediate (Requires basic amigurumi knowledge, familiarity with working in back loops, and basic hand-sewing skills to attach the kiss-lock frame).
⚠️ Note: Sewing the crochet body into the kiss-lock frame requires patience and a steady hand. Take your time aligning the stitches evenly before securing with double strands of strong sewing thread!
Finished Measurements
| Measurement | Inches | Centimeters |
|---|---|---|
| Diameter (Widest Point) | 3.5 inches | 9 cm |
| Height (Excluding Stem) | 3.0 inches | 7.5 cm |
| Total Height (Including Stem/Clasp) | 4.0 inches | 10 cm |
Materials You Will Need
- Yarn Weight: Sport weight / fine (#2) or lightweight DK (#3) cotton-blend yarn.
- Hook: 2.5 mm crochet hook.
- Hardware: 8.5 cm (3.3 inches) antique brass round metal kiss-lock purse frame.
- Notions: Tapestry needle, stitch markers, strong matching sewing thread, sewing needle, polyester fiberfill stuffing, scissors.
| Color | Exact Color Name | Yarn Weight / Type | Estimated Yardage Needed |
|---|---|---|---|
| Color A | Burnt Terracotta | Sport Weight Cotton/Acrylic | 35 yards (32 meters) |
| Color B | Sage Green | Sport Weight Cotton/Acrylic | 10 yards (9 meters) |
| Color C | Cinnamon Brown | Sport Weight Cotton/Acrylic | 5 yards (5 meters) |
Yarn Suggestions
| Brand & Line Name | Yarn Weight | Yardage per Skein | Notes |
|---|---|---|---|
| Schachenmayr Catania | Sport (#2) | 137 yards / 125m per 50g | 100% mercerized cotton; offers crisp stitch definition and vivid fall shades. |
| Hobbii Friends Cotton 8/6 | Sport (#2) | 115 yards / 105m per 50g | 100% cotton; soft matte finish that holds its structure beautifully for purses. |
| Knit Picks CotLin | DK (#3) | 123 yards / 112m per 50g | Linen-cotton blend; adds a lovely rustic texture ideal for autumn projects. |
⚠️ Note: Avoid fluffy acrylic yarns like mohair or heavy blanket yarns for this project. They obscure the intricate vertical ribbing stitches and make fitting the piece into the kiss-lock frame extremely difficult.
Gauge
- 22 stitches and 24 rows = 4 inches (10 cm) in blo-sc ribbing pattern using a 2.5 mm hook.
- Always take time to check your gauge and swatch before beginning to ensure your finished purse fits the kiss-lock frame correctly!
| Gauge Type | Measurement | Stitch / Row Count |
|---|---|---|
| Width | 4 inches (10 cm) | 22 blo-sc stitches |
| Height | 4 inches (10 cm) | 24 rows |
Abbreviations
| Abbreviation | Full Meaning |
|---|---|
| ch | Chain |
| sl st | Slip stitch |
| sc | Single crochet |
| hdc | Half double crochet |
| blo-sc | Back loop only single crochet |
| st(s) | Stitch(es) |
| rep | Repeat |
| RS | Right side |
| WS | Wrong side |
Special Stitches Explained
- Back Loop Only Single Crochet (blo-sc): Insert hook under the back loop only of the designated stitch, yarn over, pull up a loop, yarn over, and draw through both loops on the hook. This creates the signature ribbed texture of the pumpkin.
- Surface Slip Stitch: Working on the surface of the fabric rather than through loops, insert hook from front to back through the work, yarn over on the back, pull loop through to the front, and pull directly through the loop on your hook.
- Twisted Vine Loop: Chain a specified number of chains loosely, then work 2 sc in each chain back down to the base; the chain will naturally twist into a spring-like corkscrew vine.
Pattern Instructions
Section 1: Main Pumpkin Body (Worked Flat in Rows)
Using Color A (Burnt Terracotta) and a 2.5 mm hook, ch 22.
- Row 1: Working in the back bumps of the foundation chain, sc in 2nd ch from hook and in each ch across, turn. (21 sc)
- Row 2: Ch 1 (does not count as st here and throughout), working in blo-sc across, turn. (21 blo-sc)
- Rows 3–36: Repeat Row 2 thirty-four more times. (21 blo-sc per row)
✅ Checkpoint: You should now have a rectangular ribbed fabric measuring approximately 8.5 inches long by 3.5 inches tall. Do not fasten off yet.
Fold the rectangle in half, bringing the short starting edge and Row 36 together with the Right Side facing inward. Working through both thicknesses, slip stitch the short edges together to form a seamless cylinder. Fasten off, leaving a 12-inch tail.
Section 2: Cinching and Shaping the Pumpkin
- Thread your tapestry needle with the 12-inch tail. Weave the needle in and out around the bottom opening edge of the cylinder.
- Pull tightly to cinch the bottom closed completely, secure with a knot, and weave in ends securely.
- Turn the pumpkin body right side out. Lightly stuff the interior with polyester fiberfill, keeping it plump but not overly stretched so the kiss-lock frame will still close easily.
- Thread a separate 12-inch strand of Color A, weave around the top opening edge, pull gently to snug it slightly, and secure with a temporary knot.
Section 3: Stem and Vine Details
Using Color C (Cinnamon Brown):
– Round 1: Join yarn to the center top opening of the pumpkin, ch 1, work 6 sc evenly around the inner ring. Join with sl st to first sc. (6 sc)
– Rounds 2–4: Ch 1, sc in each st around. Join with sl st. (6 sc)
– Round 5: [Sc 2tog] 3 times. Fasten off, leaving a long tail to sew the top closed. (3 sc)
Using Color B (Sage Green):
– Leaf: Ch 6, sc in 2nd ch from hook, hdc in next 2 chs, sc in next ch, sl st in last ch. Fasten off, leaving a tail. Attach at the base of the stem.
– Twisted Vine: Join yarn near the stem base, ch 12 loosely. Work 2 sc in 2nd ch from hook and in each remaining ch down to the base. Fasten off and weave in ends.
Section 4: Attaching the Kiss-Lock Frame
- Position the top opening of your stuffed pumpkin evenly inside the channel of the antique brass kiss-lock frame.
- Using strong sewing thread matching Color A, whipstitch securely through the pre-drilled holes in the metal frame and directly through the top crochet stitches of the pumpkin.
- Work your way carefully from one side of the hinge to the other, then repeat on the reverse side to ensure maximum stability. Tie off securely and hide all knots inside the purse.
Size Customization Tips
- Sizing Up: To make a larger coin purse or small storage pouch, increase your starting chain length in increments of 3 stitches and work more total rows to match the wider circumference of a larger kiss-lock frame.
- Sizing Down: To craft an extra-miniature version suitable for stitch markers or charms, start with 15 chains and work fewer total rows using a 2.0 mm crochet hook.
Care Instructions
- Spot clean gently with a damp cloth and mild soap.
- Do not submerge in water or machine wash, as moisture can rust the metal kiss-lock frame and warp the interior fiberfill stuffing.
- Air dry completely away from direct sunlight.
Closing
Adorable Fall Pumpkin Crochet Coin Purse Free Pattern
I hope you had so much fun stitching up this little piece of autumn magic! Whether you are tucking it into your tote bag or gifting it to a cherished friend, I would love to see your handmade creations. Please snap a photo of your finished pumpkin purse, share it on social media, tag me, and pin this project to your favorite Fall Crochet board on Pinterest so fellow makers can join the fun! Leave a comment below telling me which fall color you chose for your pumpkin. Happy crocheting!