











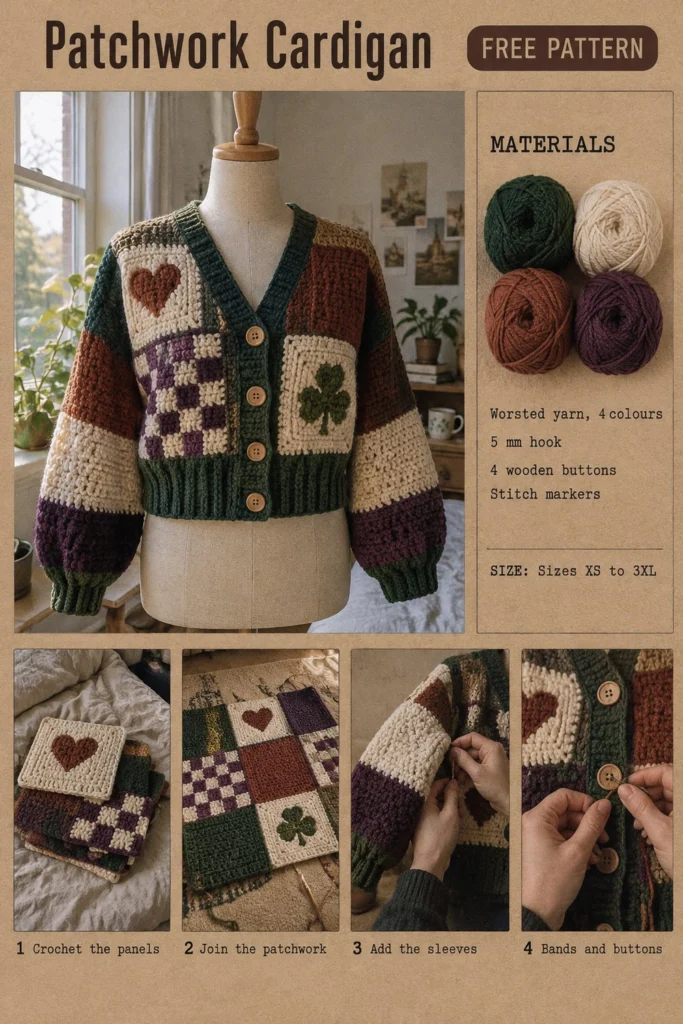
There is nothing quite like slipping into a garment that feels like a wearable quilt, and this cropped patchwork cardigan is one of my absolute favourite designs to date. Working with forest green, cream, rust brown, and plum worsted yarn, you’ll create square panels featuring a heart, a checkerboard, and a clover motif before joining them together and finishing with cozy balloon sleeves and a button band.
Free Crochet Pattern: Patchwork Cardigan with Tapestry Motifs
Quick Facts
- Skill level: Intermediate
- Finished size: Sizes XS to 3XL (see measurements table below)
- Yarn: Worsted weight (Category 4) in 4 colours: Forest Green, Cream, Rust Brown, and Plum
- Hook: 5 mm (US H/8) crochet hook
- Stitches used: Chain (ch), single crochet (sc), slip stitch (sl st), back loop only (BLO)
- Time to make: Approximately 25 to 35 hours depending on skill level
💡 Designer Tip: Size-specific instructions are detailed throughout the pattern sections below so you can easily customise your fit.
What Makes This Crochet Cardigan Special
This patchwork cardigan pattern brings together traditional tapestry crochet and modern garment construction. Instead of sewing endless small squares, you work larger rectangular panels featuring clean graphic motifs—a heart, a checkerboard, and a clover—using straightforward color-work techniques. Joining the pieces on the wrong side creates a subtle, raised quilt-like seam, while the balloon sleeves and ribbing give it a chic, contemporary drape.
Skill Level
- Confident control of basic crochet stitches (sc, sl st)
- Experience or willingness to learn tapestry crochet (changing colours mid-row and carrying yarn)
- Following charts and written row-by-row instructions
- Basic garment seaming and picking up stitches
- Reassurance line: If you can single crochet and follow a grid chart, you can master these panels!
Finished Measurements
Garment sizing covers XS (S, M, L, XL, 2XL, 3XL) with approximately 2 to 4 inches of positive ease built in for a relaxed, cropped fit.
| Size | Chest / Bust (in) | Chest / Bust (cm) | Length (in) | Length (cm) | Sleeve Length (in) | Sleeve Length (cm) |
|---|---|---|---|---|---|---|
| XS | 34 | 86.5 | 18 | 45.5 | 18 | 45.5 |
| S | 38 | 96.5 | 19 | 48.0 | 18.5 | 47.0 |
| M | 42 | 106.5 | 20 | 51.0 | 19 | 48.0 |
| L | 46 | 117.0 | 21 | 53.5 | 19.5 | 49.5 |
| XL | 50 | 127.0 | 22 | 56.0 | 20 | 51.0 |
| 2XL | 54 | 137.0 | 23 | 58.5 | 20.5 | 52.0 |
| 3XL | 58 | 147.5 | 24 | 61.0 | 21 | 53.5 |
Materials You Will Need
- Yarn: Worsted weight (Category 4) acrylic or wool-blend yarn
- Colour A (Forest Green): 400 (430, 460, 500, 540, 580, 620) yards / 365 (393, 420, 457, 494, 530, 567) meters
- Colour B (Cream): 300 (320, 340, 370, 400, 430, 460) yards / 274 (292, 311, 338, 365, 393, 420) meters
- Colour C (Rust Brown): 250 (270, 290, 310, 330, 360, 390) yards / 228 (247, 265, 283, 301, 329, 356) meters
- Colour D (Plum): 250 (270, 290, 310, 330, 360, 390) yards / 228 (247, 265, 283, 301, 329, 356) meters
- Hook: 5 mm (US H/8) crochet hook
- Notions: 4 wooden buttons (approx. 25 mm / 1 inch), locking stitch markers, tapestry needle for weaving ends and seaming
Yarn Suggestions
| Brand & Line | Weight | Yards / Skein | Notes |
|---|---|---|---|
| Lion Brand Vanna’s Choice | Worsted (4) | 170 yds / 156 m | Great stitch definition and rich color palette |
| Caron Simply Soft | Worsted (4) | 315 yds / 288 m | Beautiful drape, slight sheen |
| Paintbox Yarns Simply Aran | Worsted (4) | 201 yds / 184 m | Massive color range, very consistent tension |
⚠️ Note: Avoid novelty, eyelash, or extremely fuzzy novelty yarns for the tapestry panels, as they will obscure the color-work motifs. Stick to smooth, tightly plied acrylic or wool yarns for crisp results.
Gauge
14 sc and 16 rows = 4 in / 10 cm using a 5 mm hook in single crochet. Checking your gauge ensures your panels fit together neatly without puckering.
Abbreviations
- ch: chain
- sc: single crochet
- sl st: slip stitch
- BLO: back loop only
- st(s): stitch(es)
- RS: right side
- WS: wrong side
- inc: increase (work 2 sc in the same st)
- dec: decrease (sc2tog)
- [ … ]: work instructions within brackets as directed
UK: sc = dc, hdc = htr, dc = tr.
Special Stitches Explained
- Tapestry Crochet Color Change: When switching colours, work the last step of the previous stitch with the new colour. Carry the unused color(s) along the top of the working row, encasing the yarn inside the stitches as you go.
- BLO Ribbing: Work single crochet stitches inserting your hook only under the back loop of the stitch from the previous row, creating a stretchy ribbed ridge.
Pattern Instructions
Section 1: Crochet the Panels
All panels are worked flat in rows of single crochet. Ch 1 at the beginning of a row does not count as a stitch unless stated otherwise. Turn at the end of each row.
Heart Panel (Make 2 – Front Left and Front Right)
Using Col B (Cream) for background and Col C (Rust Brown) for the heart motif.
* Foundation: With Col B, ch 26, turn.
* Row 1: Sc in 2nd ch from hook and in each ch across (25 sc).
* Rows 2 to 25: Follow the tapestry chart, working 25 sc per row, maintaining a square shape approximately 18 x 18 cm (25 sc per row).
* Fasten off, leaving a 12-inch tail for seaming.
Checkerboard Panel (Make 4 – Back and Sleeves)
Using Col A (Forest Green) and Col D (Plum), alternating 5-st blocks.
* Foundation: With Col A, ch 26, turn.
* Row 1: Sc in 2nd ch from hook and in each ch across (25 sc).
* Rows 2 to 25: Alternate 5 sts of Col A and 5 sts of Col D across the row for a classic checkerboard grid (25 sc per row).
* Fasten off, leaving a 12-inch tail for seaming.
Clover Panel (Make 2 – Back)
Using Col B (Cream) for background and Col A (Forest Green) for the clover motif.
* Foundation: With Col B, ch 26, turn.
* Row 1: Sc in 2nd ch from hook and in each ch across (25 sc).
* Rows 2 to 25: Follow the clover tapestry chart across 25 sts (25 sc per row).
* Fasten off, leaving a 12-inch tail for seaming.
✅ Checkpoint: You should have a total of 8 square panels (2 Heart, 4 Checkerboard, 2 Clover) blocking evenly to roughly 18 x 18 cm each.
Section 2: Join the Patchwork
Lay out your panels flat like a quilt following the garment configuration:
* Back: 4 panels arranged in a 2×2 grid (Clover top-left, Checkerboard top-right, Checkerboard bottom-left, Clover bottom-right).
* Front Left: 1 Heart panel.
* Front Right: 1 Heart panel.
* Sleeves: 1 Checkerboard panel per sleeve, folded and seamed.
With RS facing out, hold panel edges together with wrong sides touching. Join yarn with a sl st through both thicknesses and work a slip stitch seam through the back loops only across each joining edge. Fasten off securely.
Section 3: Add the Sleeves
Working directly into the armhole opening of the joined body panels:
* Rnd 1: Join Col A at the underarm seam, ch 1, work 48 (52, 56, 60, 64, 68, 72) sc evenly around the armhole opening, join with sl st to first sc (48, 52, 56, 60, 64, 68, 72 sc).
* Rnds 2 to 20: Sc in each st around (48, 52, 56, 60, 64, 68, 72 sc).
* Cuff Rnd 1: [2 sc, dec] around to create the balloon sleeve taper (36, 39, 42, 45, 48, 51, 54 sc).
* Cuff Rnds 2 to 6: Working in BLO, sc in each st around for ribbed cuff (36, 39, 42, 45, 48, 51, 54 sc).
* Fasten off and repeat for the second sleeve.
- Bottom Hem: Join Col A along the lower edge of the cardigan. Work 5 rows of single crochet in BLO for a sturdy ribbed hem. Fasten off.
- Front Button Band: Join Col A along the right front edge. Work 4 rows of single crochet evenly up the front, across the back neckline, and down the left front edge. On the buttonhole band side (right side for women’s standard), create 4 evenly spaced buttonholes on Row 2 by working [ch 2, skip 2 sts].
- Buttons: Align the 4 wooden buttons along the opposite band and sew them securely in place using your tapestry needle and matching yarn tails.
✅ Checkpoint: All ends are securely woven in, buttons are firmly attached, and your seams lie flat on the wrong side.
Size Customization Tips
If you need to adjust the sizing between standard steps, remember that each 5-stitch block in the checkerboard motif adds approximately 1.4 inches (3.5 cm) to your panel width. Ensure your gauge matches 14 sts per 4 inches for accurate scaling.
Care Instructions
Hand wash gently in cool water with mild wool detergent. Do not bleach. Lay flat on a clean towel in the shade to dry, shaping your patchwork panels back to square dimensions while damp. Do not iron directly over acrylic yarns.
FAQ
Can I use different colours for the panels?
Yes! Feel free to mix and match your leftover worsted stash colours as long as all yarns share the same fiber content and weight for consistent gauge.
How do I make the cardigan longer?
You can add extra plain rows of single crochet to the top or bottom edges of the panels before seaming them together, or extend the ribbed bottom hem by a few extra rows.
This adult cardigan uses wooden buttons sewn securely with heavy-duty yarn. If adapting this pattern for infants or toddlers, omit buttons entirely or use embroidered toggles to prevent choking hazards.
Happy Crocheting!
I hope you adore making and wearing your new patchwork cardigan. Be sure to save this pin on Pinterest and drop a comment below sharing which four colours you picked for your project!
📄 Your free PDF pattern