











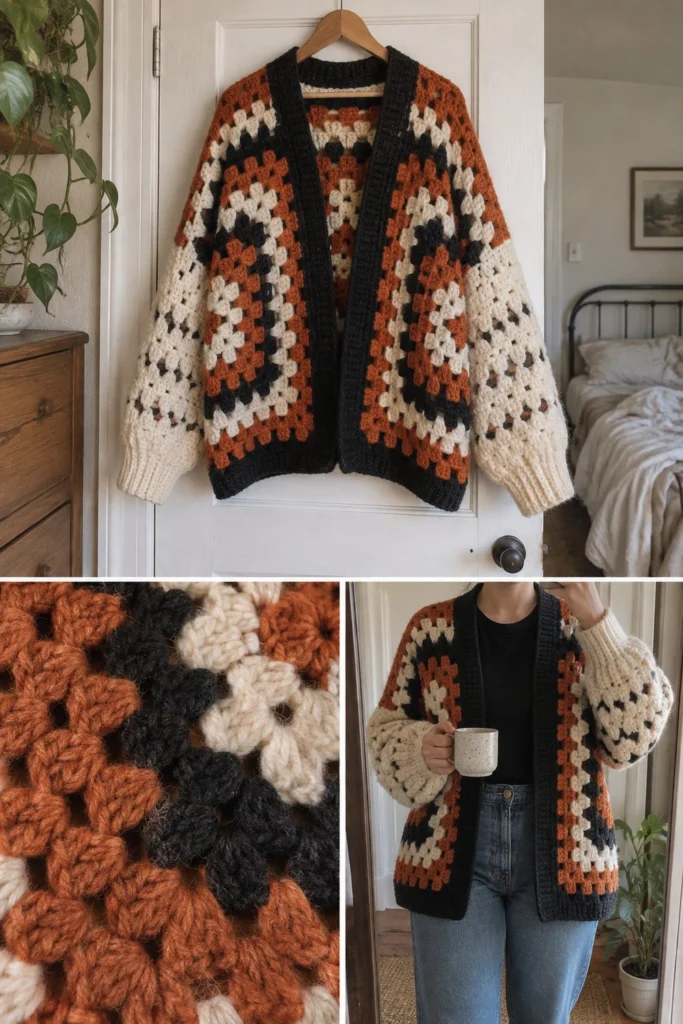
If you have ever wanted to craft your own handmade sweater without stressing over complicated shaping, complex grading math, or dragging out a measuring tape, this oversized hexagon cardigan is your dream project.
Free Crochet Hexagon Cardigan Pattern: Size It Without a Measuring Tape
Quick Facts
- Skill level: Intermediate
- Finished size: XS through 3XL (customizable bust and length)
- Yarn: Worsted weight yarn in 4 distinct colors: Burnt Orange, Black, Cream, and Dark Charcoal
- Hook: 5.5 mm (US I-9) crochet hook
- Stitches used: ch, sl st, sc, dc, 3-dc cluster, shell
- Time to make: 12 to 18 hours
You will find sizing tips, round charts, and custom adjustment instructions further down the page to ensure your garment fits you like a glove.
What Makes This Hexagon Cardigan Special
This cardigan relies on a brilliant construction method: two identical granny hexagons folded geometrically in half and joined together. Instead of relying on rigid sizing numbers right from the start, you crochet each hexagon outward in expanding rounds and hold it directly against your own body. Once the diagonal span reaches snugly from your back armpit across your shoulder to your front armpit, your base panels are done! A simple shoulder seam, underarm seam, cuff extension, and front ribbed band transform two flat hexagons into a cozy, statement-making piece. The rich burnt orange, warm cream, textured black, and subtle dark charcoal palette creates a striking retro look that pairs effortlessly with everyday denim and basic tees.
Skill Level
- Confident beginner to intermediate
- Comfortable working in the round from a center magic ring
- Familiar with traditional granny clusters and chain spaces
- Able to follow simple geometric folding and seaming diagrams
- Don’t let the geometric angles intimidate you—if you can make a classic granny square, you can easily master this stunning cardigan!
Finished Measurements
| Size | Bust Width (Flat) | Total Length | Sleeve Length | Recommended Ease |
|---|---|---|---|---|
| XS | 20 in / 51 cm | 24 in / 61 cm | 18 in / 46 cm | +6 to +8 in |
| S | 22 in / 56 cm | 25 in / 64 cm | 18 in / 46 cm | +6 to +8 in |
| M | 24 in / 61 cm | 26 in / 66 cm | 19 in / 48 cm | +6 to +8 in |
| L | 26 in / 66 cm | 27 in / 69 cm | 19 in / 48 cm | +6 to +8 in |
| XL | 28 in / 71 cm | 28 in / 71 cm | 20 in / 51 cm | +6 to +8 in |
| 2XL | 30 in / 76 cm | 29 in / 74 cm | 20 in / 51 cm | +6 to +8 in |
| 3XL | 32 in / 81 cm | 30 in / 76 cm | 21 in / 53 cm | +6 to +8 in |
Materials You Will Need
| Color Name | Yarn Type / Weight | Yardage Required | Meterage Required |
|---|---|---|---|
| Burnt Orange | Worsted / Aran (4) Acrylic | 600 yds | 550 m |
| Black | Worsted / Aran (4) Acrylic | 500 yds | 460 m |
| Cream | Worsted / Aran (4) Acrylic | 650 yds | 595 m |
| Dark Charcoal | Worsted / Aran (4) Acrylic | 350 yds | 320 m |
- Crochet Hook: 5.5 mm (US I-9)
- Notions: Tapestry needle for weaving ends, locking stitch markers, measuring tape (optional, for checking length)
Yarn Suggestions
| Yarn Line | Skein Yardage | Notes |
|---|---|---|
| Lion Brand Pound of Love | 1020 yds / 932 m | Excellent economy choice; use for Cream and Burnt Orange |
| Caron One Pound | 812 yds / 742 m | Durable, holds its shape well for Black and Dark Charcoal |
| Paintbox Yarns Simply Aran | 201 yds / 184 m | Great brilliant color selection for matching palette |
⚠️ Note: Avoid novelty fuzzy yarns or slub yarns for the main hexagon body, as they obscure the crisp granny cluster stitches and make counting rounds difficult. Stick to smooth worsted weight acrylic or wool blends.
Gauge
- Granny Hexagon Rounds: Rnds 1 through 5 of a hexagon measure approximately 5.5 in / 14 cm across from flat side to flat side using a 5.5 mm hook.
- Ribbing Band (Dark Charcoal): 8 sts and 12 rows = 4 in / 10 cm in working back-loop-only single crochet ribbing.
Abbreviations
- ch: chain
- sl st: slip stitch
- sc: single crochet
- dc: double crochet
- blo: back loop only
- st(s): stitch(es)
- sp(s): space(s)
- sk: skip
- rnd(s): round(s)
- row(s): row(s)
- 3-dc cluster: 3 double crochet stitches worked into the same stitch or space
- shell: (3 dc, ch 2, 3 dc) worked into the designated corner chain-2 space
UK terms equivalent: sc = dc, dc = tr.
Special Stitches Explained
- Magic Ring: Wrap yarn around your index finger twice to form a loop. Insert hook into center of loop, pull up a loop, ch 1, and work the required number of stitches into the ring. Pull tail to close tightly.
- 3-dc Cluster: Yarn over, insert hook into space, yarn over and pull up loop, yarn over and draw through 2 loops on hook (2 loops remaining); [yarn over, insert hook into same space, yarn over and pull up loop, yarn over and draw through 2 loops] 2 more times (4 loops on hook), yarn over and draw through all 4 loops.
- Hexagon Corner (Shell): Work (3 dc, ch 2, 3 dc) into a single ch-2 space from the previous round. This forms the 6 sharp corners of your hexagon.
- Back Loop Only (BLO) Ribbing: Work single crochet stitches inserting your hook only under the back loop of each stitch from the row below, creating a stretchy ribbed texture.
Pattern Instructions
Pattern Notes
- Each hexagon starts with a magic ring.
- Rounds are joined with a slip stitch to the top of the starting chain unless otherwise noted.
- Color changes happen at the start of a round. Fasten off the old color and join the new color cleanly in any corner ch-2 space.
Section 1: Main Hexagon Panels (Make 2)
You will make two identical large hexagons. The color sequence below creates the bold retro banding visible in the photos. Refer to the photo close-ups for precise shade transitions.
Color Sequence:
– Rnds 1 to 2: Burnt Orange
– Rnd 3: Black
– Rnds 4 to 5: Cream
– Rnd 6: Burnt Orange
– Rnd 7: Black
– Rnd 8: Cream
– Rnds 9 to 10: Burnt Orange
– Rnd 11: Dark Charcoal
– Rnd 12: Cream
– Rnds 13 to 14: Burnt Orange
– Rnd 15: Black
– Rnds 16 to 17: Cream
Rnd 1: With Burnt Orange, start with a magic ring. Ch 3 (counts as first dc), work 2 dc into ring, ch 2, [3-dc cluster, ch 2] 5 times into ring; join with sl st to top of starting ch-3. Fasten off Burnt Orange. (6 clusters, 6 ch-2 sps)
Rnd 2: Join Burnt Orange in any ch-2 corner sp. Ch 3, (2 dc, ch 2, 3 dc) in same corner sp, *ch 1, skip 3 sts, shell in next ch-2 corner sp*; rep from * to * 4 more times, ch 1, skip 3 sts; join with sl st to top of starting ch-3. Fasten off Burnt Orange. *(12 clusters, 6 corners)*
Rnd 3: Join Black in any ch-2 corner sp. Ch 3, (2 dc, ch 2, 3 dc) in same corner sp, *ch 1, [3 dc in next ch-1 sp, ch 1], shell in next ch-2 corner sp*; rep from * around, ending with ch 1, 3 dc in last ch-1 sp, ch 1; join with sl st to top of starting ch-3. Fasten off Black. *(18 clusters, 6 corners)*
Rnd 4: Join Cream in any ch-2 corner sp. Ch 3, (2 dc, ch 2, 3 dc) in same corner sp, *ch 1, [3 dc in next ch-1 sp, ch 1] across to next corner, shell in ch-2 corner sp*; rep from * around, ending with ch 1, 3 dc in last ch-1 sp, ch 1; join with sl st to top of starting ch-3. Fasten off Cream. *(24 clusters, 6 corners)*
Rnd 5: Join Cream in any corner sp. Rep Rnd 4, working 3 dc in every ch-1 space along the sides and a shell in every ch-2 corner sp. Fasten off Cream. (30 clusters, 6 corners)
Rnd 6: Join Burnt Orange in any corner sp. Rep Rnd 4. Fasten off Burnt Orange. (36 clusters, 6 corners)
Rnd 7: Join Black in any corner sp. Rep Rnd 4. Fasten off Black. (42 clusters, 6 corners)
Rnd 8: Join Cream in any corner sp. Rep Rnd 4. Fasten off Cream. (48 clusters, 6 corners)
Rnds 9 to 10: Join Burnt Orange in any corner sp. Rep Rnd 4 for two rounds. Fasten off Burnt Orange at end of Rnd 10. (60 clusters, 6 corners at Rnd 10)
Rnd 11: Join Dark Charcoal in any corner sp. Rep Rnd 4. Fasten off Dark Charcoal. (66 clusters, 6 corners)
Rnd 12: Join Cream in any corner sp. Rep Rnd 4. Fasten off Cream. (72 clusters, 6 corners)
Rnds 13 to 14: Join Burnt Orange in any corner sp. Rep Rnd 4 for two rounds. Fasten off Burnt Orange at end of Rnd 14. (84 clusters, 6 corners at Rnd 14)
Rnd 15: Join Black in any corner sp. Rep Rnd 4. Fasten off Black. (90 clusters, 6 corners)
Rnds 16 to 17: Join Cream in any corner sp. Rep Rnd 4 for two rounds. Fasten off Cream at end of Rnd 17. (102 clusters, 6 corners at Rnd 17)
✅ Checkpoint: At the end of Rnd 17, lay your hexagon flat on a table. Measure across the center from one flat side to the opposite flat side. It should measure approximately 26 to 28 inches (66 to 71 cm), fitting a standard Medium/Large size. If you need a larger size (XL to 3XL), add 2 to 3 more granny rounds following the exact same increase pattern.
Section 2: Geometric Folding and Seaming
- Lay your finished hexagon flat on a clean surface.
- Fold the hexagon in half by bringing two parallel edges together (top edge folded down to meet the bottom edge), forming an irregular L-shape or house shape as shown in the garment construction diagram.
- Align the back seam: Slip stitch or mattress stitch along the top straight edge from the outer corner halfway inward toward the center back collar point, leaving the front panels open.
- Align the sleeve seam: Fold the side cuff edges together and seam along the top of the arm from wrist toward the shoulder, leaving an appropriate armhole opening. Repeat all steps for the second hexagon panel.
Section 3: Sleeve Extensions (Cream)
If your hexagon sleeves feel slightly short before reaching your wrists, you can work additional granny rounds directly onto the sleeve cuffs.
Rnd 1: Join Cream yarn at the underarm of the sleeve opening. Ch 3, work 3 dc in each ch-1 space around the sleeve cuff, skipping across corners as needed; join with sl st to top of starting ch-3. (45 dc)
Rnds 2 to 4: Ch 3, work 3 dc in each ch-1 space around, join with sl st to top of starting ch-3. Fasten off Cream. (45 dc)
Section 4: Cuff Ribbing (Dark Charcoal)
Row 1: Join Dark Charcoal at the sleeve cuff edge. Ch 9. Working into the back bumps of the chain, sc in 2nd ch from hook and across next 7 chs, sl st into the next 2 unworked stitches of the sleeve edge. Turn. (8 sc)
Row 2: Skip 2 sl st anchors, working in BLO, sc across 8 sts to end. Ch 1, turn. (8 sc)
Row 3: Working in BLO, sc across 8 sts. Sl st into next 2 sleeve edge sts, turn. (8 sc)
Rows 4 and beyond: Repeat Rows 2 and 3 all the way around the sleeve cuff opening. Join the final row to the starting edge with slip stitches. Fasten off. Repeat for the second sleeve.
Section 5: Front Opening and Collar Band (Dark Charcoal)
Working a sturdy ribbed band around the entire front opening and back neck creates a polished, professional finish.
Row 1: Join Dark Charcoal at the bottom right front hem. Ch 11. Working into the back bumps of the chain, sc in 2nd ch from hook and across next 9 chs (10 sc). Sl st into the first 2 sts along the cardigan front edge. Turn. (10 sc)
Row 2: Skip 2 sl st anchors, working in BLO, sc across 10 sts. Ch 1, turn. (10 sc)
Row 3: Working in BLO, sc across 10 sts. Sl st into next 2 cardigan edge sts, turn. (10 sc)
Following Rows: Repeat Rows 2 and 3 continuously up the right front edge, around the back neck collar, and down the left front edge. Ensure you ease the ribbing slightly around curves so it lies flat without flaring. Fasten off and secure all remaining yarn tails.
Size Customization Tips
- Adding Length & Width: Every additional 2 rounds added to your hexagon increases the total diagonal width by approximately 3 inches (7.5 cm) and the armhole depth proportionally.
- Adjusting Sleeve Length: Simply add or subtract straight granny rounds in Cream before adding the Dark Charcoal ribbed cuff.
Care Instructions
- Hand wash gently in cool water using mild wool wash.
- Do not bleach or wring out aggressively.
- Roll flat in a clean towel to press out excess moisture.
- Dry flat in shade on a blocking mat to maintain sharp geometric angles.
- Store folded; do not hang on hangers, as heavy granny cardigans can stretch out of shape.
FAQ
Can I use different yarn weights for this cardigan?
Yes, but changing the yarn weight will alter your gauge and finished dimensions. If you use a lightweight yarn, your hexagon will come out much smaller unless you add extra rounds. Stick to worsted or aran weight for the best drape and chunkiness shown in the photos.
How do I know when my hexagon is big enough?
Fold your hexagon in half and hold the folded corner against your center back shoulder, letting the bottom point drop down. If the fold reaches comfortably from your back armpit across to your front armpit without pulling tightly, your hexagon has reached the correct size.
Is this project suitable for beginners?
While it looks advanced due to the striking colorwork and sharp angles, it is actually very beginner-friendly because you only need to know basic double crochets, chains, and granny cluster placement. If you can make a classic granny square, you can successfully make this sweater!
Happy Crocheting!
I hope you love creating and wearing your gorgeous new retro hexagon cardigan as much as I loved designing it! Be sure to save this pin on Pinterest to your favorite crochet boards, and leave a comment below letting me know what stunning color combination you plan to use for your make.
📄 Your free PDF pattern