












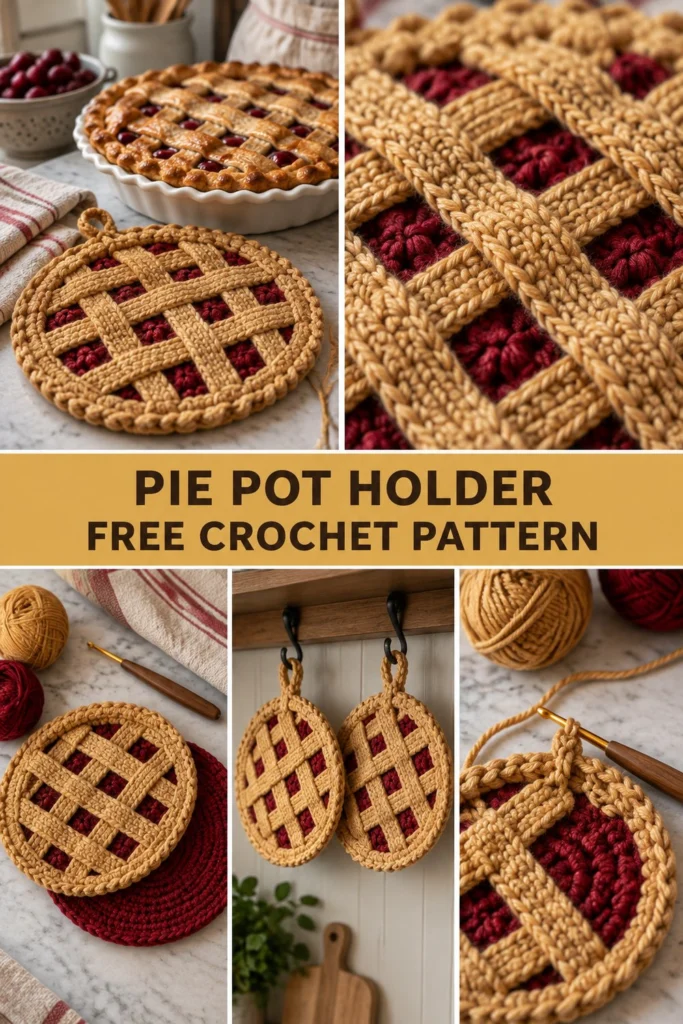
Bring the comforting warmth of a country kitchen to your table with this delightful crochet pie pot holder! Worked in thick, sturdy cotton with a rich berry center and a golden lattice crust, this project looks good enough to eat while safely protecting your hands and counters from hot pans.
Quick Facts
- Skill level: Intermediate
- Finished size: 8.5 inches (21.5 cm) in diameter
- Yarn: 100% Worsted Weight Cotton (Aran/Category 4) in Berry Red and Golden Yellow
- Hook: US H/8 (5.0 mm) crochet hook
- Stitches used: Chain (ch), single crochet (sc), half double crochet (hdc), slip stitch (sl st), front loop only (FLO), back loop only (BLO)
- Time to make: 3 to 4 hours
Size customization tips are included further down in this article.
What Makes This Crochet Pie Pot Holder Special
Unlike flimsy decorative hot pads, this design is worked double-thick to provide reliable heat protection when pulling heavy Thanksgiving casseroles from the oven. The base is crocheted in two solid circles (one for the red berry filling and one for the backing), then joined together with a crimped pastry-style edge. The lattice strips are worked separately as long, narrow chains and single crochet rows, then woven in a classic over-under pattern before being securely stitched around the perimeter.
Skill Level
- Working in the round and in rows
- Basic increases and decreases
- Simple surface weaving and sewing
- Reassurance line: If you can single crochet in the round and weave simple strips, you have all the skills needed to complete this project!
Finished Measurements
| Dimension | Inches | Centimeters |
|---|---|---|
| Diameter | 8.5 in | 21.5 cm |
| Thickness | 0.5 in | 1.3 cm |
Materials You Will Need
| Color | Yarn Line | Weight | Yardage | Meters |
|---|---|---|---|---|
| Berry Red | 100% Cotton Worsted | Aran (4) | 120 yds | 110 m |
| Golden Yellow | 100% Cotton Worsted | Aran (4) | 90 yds | 82 m |
- Hook: US H/8 (5.0 mm) crochet hook
- Notions: Tapestry needle for weaving ends and sewing, locking stitch markers, scissors
Yarn Suggestions
| Yarn Name | Skein Yardage | Notes |
|---|---|---|
| Lily Sugar’n Cream Solid | 120 yds (113 g) | Highly durable, excellent heat absorption |
| Bernat Handicrafter Cotton | 80 yds (50 g) | Budget-friendly, great stitch definition |
| Dishie by WeCrochet | 190 yds (100 g) | Tightly spun, resists splitting |
⚠️ Note: Always use 100% natural cotton yarn for hot pads and pot holders. Acrylic, polyester, and wool yarns melt, scorch, or trap heat poorly when in contact with hot cookware.
Gauge
- 14 sc x 15 rows = 4 inches (10 cm) using a 5.0 mm hook.
- Circle check: Rnds 1 to 5 of the flat circle = 3.5 inches (9 cm) across.
Abbreviations
- ch: chain
- sl st: slip stitch
- sc: single crochet
- hdc: half double crochet
- inc: 2 sc in the same stitch (increase)
- dec: single crochet 2 stitches together (decrease)
- st(s): stitch(es)
- FLO: front loop only
- BLO: back loop only
- Rnd: round
- Row: row
- sk: skip
- rep: repeat
- RS: right side
UK: sc = dc, hdc = htr, dc = tr.
Special Stitches Explained
- Magic Ring: Wrap yarn around your index finger twice to form a ring, insert hook into center, draw up a loop, and work your starting stitches into the ring. Pull the tail to close securely.
- Invisible Decrease (inv-dec): Insert hook into the front loop only of the next stitch, then insert hook into the front loop only of the following stitch. Yarn over and pull through both front loops, yarn over and pull through remaining two loops on hook.
Pattern Instructions
- Pattern Notes:
- Work in continuous rounds unless otherwise stated; use a stitch marker to keep track of the first stitch of each round.
- Turning chains do not count as a stitch unless specified.
Section 1: Front Berry Circle
Using Berry Red, make a magic ring.
* Rnd 1: 6 sc in magic ring (6 sc)
* Rnd 2: inc in each st around (12 sc)
* Rnd 3: (1 sc, inc) x 6 (18 sc)
* Rnd 4: (2 sc, inc) x 6 (24 sc)
* Rnd 5: (3 sc, inc) x 6 (30 sc)
* Rnd 6: (4 sc, inc) x 6 (36 sc)
* Rnd 7: (5 sc, inc) x 6 (42 sc)
* Rnd 8: (6 sc, inc) x 6 (48 sc)
* Rnd 9: (7 sc, inc) x 6 (54 sc)
* Rnd 10: (8 sc, inc) x 6 (60 sc)
* Rnd 11: (9 sc, inc) x 6 (66 sc)
* Rnd 12: (10 sc, inc) x 6 (72 sc)
* Rnd 13: (11 sc, inc) x 6 (78 sc)
* Rnd 14: (12 sc, inc) x 6 (84 sc)
Fasten off, weave in ends.
Section 2: Back Pot Holder Circle
Using Berry Red, repeat Rnds 1 through 14 of the Front Berry Circle. Do not fasten off.
Section 3: Joining and Crimped Edge
Place Front Berry Circle directly on top of Back Pot Holder Circle (wrong sides facing together). Working through both thicknesses simultaneously:
* Rnd 1: Working in BLO of both circles, join Golden Yellow with a sl st, work (1 sc, hdc, 1 sc) in the same st, sk 1 st, (1 sc, hdc, 1 sc) in next st, sk 1 st rep around to create the ruffled pastry crimp. Join with a sl st to first st. Fasten off and weave in ends.
Section 4: Lattice Strips
Using Golden Yellow, make 8 strips.
* Row 1: Ch 42, sc in 2nd ch from hook and in each ch across (41 sc).
Fasten off, leaving a 6-inch (15 cm) tail on each end for sewing.
Section 5: Hanging Loop
Using Golden Yellow:
* Row 1: Ch 12, join with sl st to form a ring, ch 1, work 16 sc into the ring, join with sl st. Fasten off, leaving a tail to attach to the top edge of the pot holder.
✅ Checkpoint: You should now have one solid double-thick red circle with a yellow crimped edge, 8 long golden lattice strips, and 1 small hanging loop.
Assembly
- Lay the 8 lattice strips across the red berry circle in a woven grid pattern (4 vertical strips, 4 horizontal strips), spacing them evenly to create square gaps showing the red berry filling beneath.
- Pin the ends of the lattice strips securely to the outer edge of the red circle, just inside the yellow crimped border.
- Using matching golden yarn and a tapestry needle, whipstitch each strip end firmly to the pot holder base. Trim excess yarn.
- Sew the hanging loop securely to the top center point of the pot holder edge.
Finishing
Weave in all remaining loose yarn ends. Gently steam block your finished pot holder under a damp cloth to flatten the lattice and crisp up the edges.
Size Customization Tips
To make a larger pot holder for giant baking dishes, continue the circle increase pattern for additional rounds (+6 stitches per round), adding 2 extra lattice strips (1 horizontal, 1 vertical) for every 1.5 inches of increased diameter.
Care Instructions
Machine wash cold on a gentle cycle with similar colors. Reshape while damp and lay flat to dry. Do not bleach or tumble dry on high heat to preserve the 100% cotton structure.
FAQ
Can I use acrylic yarn instead of cotton?
No. Acrylic yarn melts or weakens under high kitchen heat. Always use 100% natural cotton for items that touch hot pans and baking sheets.
How do I make the lattice weave stay in place?
Pin the woven strips thoroughly before sewing, and take a few small anchoring stitches at the intersection points of the center lattice squares to keep the grid perfectly aligned during use.
Is this pot holder thick enough for hot pans?
Yes! By working the front and back circles separately and joining them together, the finished pot holder is double-thick, offering excellent heat insulation for everyday kitchen tasks.
Happy Crocheting!
I hope you love making and using your new crochet pie pot holder! Save this pin on Pinterest to find it later, and let me know in the comments what color “filling” you chose for your pie.
📄 Your free PDF pattern