












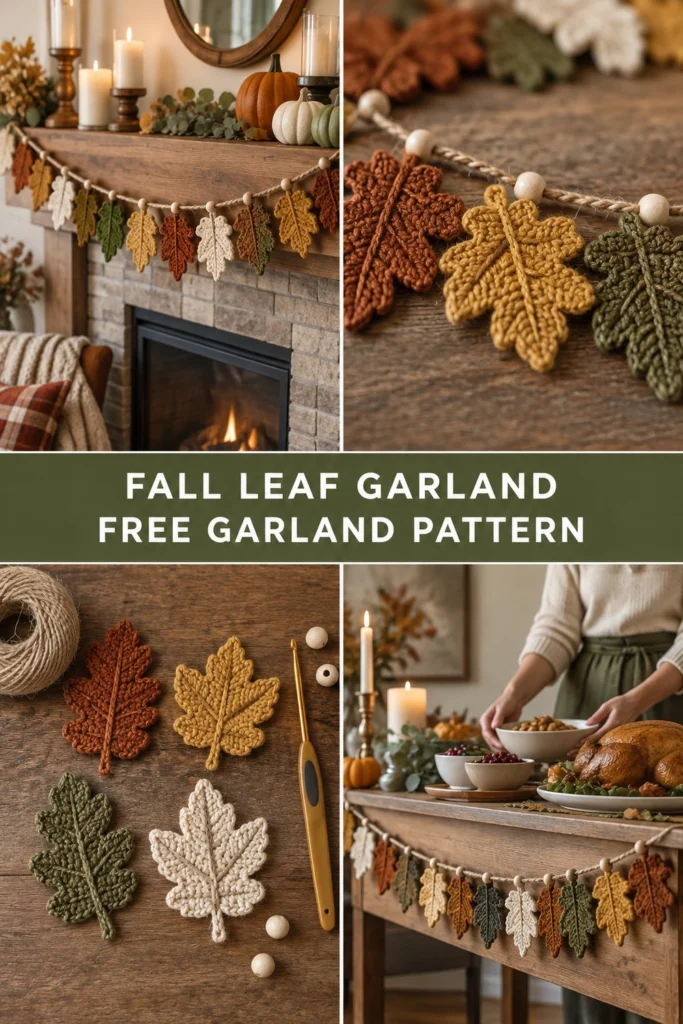
Bring the cozy warmth of autumn indoors with this gorgeous, nature-inspired Thanksgiving garland. Featuring three distinct fall leaf designs—sculpted oak, classic maple, and serrated birch—strung along natural jute twine with smooth wooden accent beads, this project creates an inviting focal point for your fireplace mantel, dining table display, or thanksgiving backdrop. It is a quick and satisfying stash-buster worked in rich fall hues of copper rust, golden mustard, forest olive, and soft cream.
Quick Facts
- Skill level: Easy / Advanced Beginner
- Finished size: Leaf motifs measure 3.5–4.5 in (9–11.5 cm) tall; complete garland is 60 in (150 cm) long (adjustable)
- Yarn: Worsted weight / Medium (4) yarn in Rust, Mustard, Olive, and Cream
- Hook: 3.75 mm (US F/5) crochet hook
- Stitches used: Chain, slip stitch, single crochet, half double crochet, double crochet, treble crochet, double treble crochet, picot
- Time to make: 3 to 4 hours total (approx. 12–15 minutes per leaf)
Customization tips for altering length, leaf density, or motif sizes are provided further down in this guide.
What Makes This Fall Leaf Garland Special
- Realistic Leaf Textures: Each leaf motif begins with a solid foundation chain rib that creates a realistic central leaf vein before expanding outward into distinct lobes.
- Three Unique Botanicals: You will create oak leaves with rounded deep lobes, crisp 5-point maple leaves, and delicate serrated birch leaves for authentic visual variety.
- Natural Rustic Finishing: Combining soft crocheted yarn with earthy jute twine and raw wooden beads mirrors the exact cozy warmth shown in the mantel and dining room photo styling.
- Zero-Waste Scrap Project: Requiring under 45 yards of each autumn color, this pattern is the ultimate stash-buster for left-over worsted weight skeins.
Skill Level
- Working flat in rounds around a central chain
- Basic stitch height variations (sc up to double treble crochet)
- Working picot stitches for leaf points
- Threading beads and assembling hanging garlands
If you can work basic stitches and keep even tension around a chain, you can complete these botanical motifs with ease!
Finished Measurements
| Component | Width | Height / Length |
|---|---|---|
| Oak Leaf Motif | 3.25 in (8 cm) | 4.5 in (11.5 cm) |
| Maple Leaf Motif | 3.5 in (9 cm) | 4.0 in (10 cm) |
| Birch Leaf Motif | 2.5 in (6.5 cm) | 3.5 in (9 cm) |
| Complete Garland | 0.5 in (beads) | 60 in (150 cm) length |
Materials You Will Need
| Material | Details | Quantity / Measurement |
|---|---|---|
| Rust Yarn | Worsted Weight #4, 100% Acrylic or Wool Blend | 45 yds (41 m) |
| Mustard Yarn | Worsted Weight #4, 100% Acrylic or Wool Blend | 45 yds (41 m) |
| Olive Green Yarn | Worsted Weight #4, 100% Acrylic or Wool Blend | 45 yds (41 m) |
| Cream Yarn | Worsted Weight #4, 100% Acrylic or Wool Blend | 35 yds (32 m) |
| Crochet Hook | 3.75 mm (US F/5) ergonomic aluminum hook | 1 hook |
| Jute Twine | Natural 2 mm thin craft jute twine / rope | 2.5 yds (2.3 m) |
| Wooden Beads | Unfinished natural wood beads (14 mm or 16 mm diameter) | 16 beads |
| Tapestry Needle | Large-eye steel yarn needle | 1 needle |
| Extras | Scissors, tape measure, bead threader or wire loop | 1 set |
Yarn Suggestions
| Yarn Brand & Name | Weight / Fiber | Yardage per Skein | Notes |
|---|---|---|---|
| Lion Brand Wool-Ease | Worsted / 80% Acrylic, 20% Wool | 197 yds (180 m) / 85g | Excellent crisp stitch definition and cozy earthy shades. |
| Cascade Yarns 220 Superwash | Worsted / 100% Superwash Wool | 220 yds (200 m) / 100g | Vibrant botanical color palette with natural wool texture. |
| Paintbox Yarns Simply Aran | Worsted / 100% Premium Acrylic | 201 yds (184 m) / 100g | Soft, durable, budget-friendly option with many autumn tones. |
⚠️ Note: Avoid using overly shiny Mercerized cotton yarn or slippery chenille velvet yarns for this garland. Stiff, matte worsted acrylic or wool blends hold the leaf points and serrated lobes crisp without drooping when suspended.
Gauge
| Gauge Measurement | Stitch Count x Row Count | Size |
|---|---|---|
| Standard Sc Swatch | 18 sts x 20 rows in single crochet | 4 in x 4 in (10 cm x 10 cm) |
| Oak Leaf Rib Check | Rnd 1 foundation rib of Oak Leaf Motif | 3.5 in (9 cm) long |
💡 Designer Tip: Exact gauge is not critical for decorative leaf motifs. However, maintaining consistent tight tension ensures the leaves remain flat and do not curl up at the tips.
Abbreviations
| Abbreviation | Full Term (US Crochet Terminology) |
|---|---|
| ch | chain |
| sl st | slip stitch |
| sc | single crochet |
| hdc | half double crochet |
| dc | double crochet |
| tr | treble crochet |
| dtr | double treble crochet (yarn over 3 times) |
| picot | picot stitch (ch 2, sl st in 1st ch) |
| st(s) | stitch(es) |
| rnd(s) | round(s) |
| sp | space |
| BLO | back loop only |
UK terminology converter: sc = dc, hdc = htr, dc = tr, tr = dtr.
Special Stitches Explained
1. Leaf Tip Picot Stitch (picot)
Chain 2, insert your hook under the front loop and top vertical strand of the last worked stitch, yarn over and draw through all loops on your hook. This creates a tiny, crisp leaf point.
2. Double Treble Crochet (dtr)
Yarn over 3 times. Insert hook into stitch, yarn over and pull up a loop (5 loops on hook). [Yarn over and pull through 2 loops on hook] 4 times until 1 loop remains.
3. Surface Slip Stitch Vein (Optional Accent)
To add a high-contrast raised leaf vein (as shown in the cream and rust motifs), join contrasting yarn at the leaf stem base. Keep yarn on the back of the work, insert hook from front to back through the central chain spaces, yarn over, pull loop to the front, and slip stitch loosely up the central rib to the leaf tip.
Pattern Instructions
Pattern Notes
- Leaf motifs are worked flat in two expanded rounds around a central foundation chain.
- Rnd 1 creates the central spine and leaf blade outline. Rnd 2 builds out the lobes and points.
- Turning chains do not count as stitches unless explicitly noted.
- Total color distribution for a 60-inch mantel garland: 5 Oak Leaves, 5 Maple Leaves, and 5 Birch Leaves.
Section 1: Oak Leaf Motif (Make 5 Total)
Make 3 in Rust, 2 in Olive Green.
Foundation: Ch 13.
Rnd 1: Working into the back ridge loops of the foundation chain, sc in 2nd ch from hook, hdc in next 2 ch, dc in next 3 ch, hdc in next 3 ch, sc in next 2 ch; in last ch work (sc, ch 2, sc) to turn; working down opposite loops of foundation chain, sc in next 2 ch, hdc in next 3 ch, dc in next 3 ch, hdc in next 2 ch, sc in last ch; sl st to first sc to join (24 sts + 1 ch-2 sp).
Rnd 2 (Oak Lobes):
– Lower Lobe: Sl st in next st, (sc, hdc) in next st, 3 dc in next st, (hdc, sc) in next st, sl st in next st.
– Middle Lobe: (sc, hdc) in next st, (2 dc, picot) in next st, (hdc, sc) in next st, sl st in next st.
– Upper Lobe: (sc, hdc, dc) in next st, (2 tr, picot) in next st, (dc, hdc, sc) in next st.
– Top Tip: In ch-2 sp work (sc, hdc, picot, hdc, sc).
– Upper Lobe (Opposite): (sc, hdc, dc) in next st, (2 tr, picot) in next st, (dc, hdc, sc) in next st, sl st in next st.
– Middle Lobe (Opposite): (sc, hdc) in next st, (picot, 2 dc) in next st, (hdc, sc) in next st, sl st in next st.
– Lower Lobe (Opposite): (sc, hdc) in next st, 3 dc in next st, (hdc, sc) in next st, sl st in last st.
– Stem: Ch 4, sl st in 2nd ch from hook and next 2 ch, sl st to base of leaf. Fasten off leaving a 6 in (15 cm) tail for weaving (55 sts + 5 picots).
✅ Checkpoint: Lay the oak leaf flat. You should have 3 distinct rounded lobes on each side plus 1 top point tip, with a sturdy 3-stitch stem at the base.
Section 2: Maple Leaf Motif (Make 5 Total)
Make 3 in Mustard, 2 in Cream.
Foundation: Ch 11.
Rnd 1: Sc in 2nd ch from hook, hdc in next 2 ch, dc in next 3 ch, hdc in next 2 ch, sc in next ch; in last ch work (sc, ch 2, sc) to turn; working down opposite loops of foundation chain, sc in next ch, hdc in next 2 ch, dc in next 3 ch, hdc in next 2 ch, sc in last ch; sl st to first sc to join (20 sts + 1 ch-2 sp).
Rnd 2 (Maple Points):
– Base Lobe Left: Sl st in next st, (sc, hdc) in next st, (dc, tr, picot, dc) in next st, (hdc, sc) in next st, sl st in next st.
– Side Point Left: (sc, hdc) in next st, (2 dc, tr, picot, tr) in next st, (hdc, sc) in next st, sl st in next st.
– Center Top Point: (hdc, dc) in next st; in ch-2 tip sp work (tr, dtr, picot, dtr, tr); (dc, hdc) in next st, sl st in next st.
– Side Point Right: (sc, hdc) in next st, (tr, picot, tr, 2 dc) in next st, (hdc, sc) in next st, sl st in next st.
– Base Lobe Right: (sc, hdc) in next st, (dc, picot, tr, dc) in next st, (hdc, sc) in next st, sl st in last st.
– Stem: Ch 4, sl st in 2nd ch from hook and next 2 ch, sl st to base of leaf. Fasten off leaving a 6 in (15 cm) tail (47 sts + 5 picots).
✅ Checkpoint: The maple leaf should showcase 5 wide, sharp points spreading out symmetrically from the main rib.
Section 3: Birch Leaf Motif (Make 5 Total)
Make 3 in Olive, 2 in Rust.
Foundation: Ch 10.
Rnd 1: Sc in 2nd ch from hook, hdc in next 2 ch, dc in next 3 ch, hdc in next 2 ch; in last ch work (sc, ch 2, sc) to turn; working down opposite loops of foundation chain, hdc in next 2 ch, dc in next 3 ch, hdc in next 2 ch, sc in last ch; sl st to first sc to join (18 sts + 1 ch-2 sp).
Rnd 2 (Serrated Edge):
– Side 1: Sl st in next st, (sc, picot, hdc) in next st, sl st in next st, (hdc, picot, dc) in next st, sl st in next st, (dc, picot, dc) in next st, sl st in next st, (hdc, picot, sc) in next st, sl st in next st.
– Tip: In ch-2 sp work (sc, hdc, picot, hdc, sc).
– Side 2: Sl st in next st, (sc, picot, hdc) in next st, sl st in next st, (dc, picot, dc) in next st, sl st in next st, (dc, picot, hdc) in next st, sl st in next st, (hdc, picot, sc) in next st, sl st in last st.
– Stem: Ch 4, sl st in 2nd ch from hook and next 2 ch, sl st to base of leaf. Fasten off leaving a 6 in (15 cm) tail (33 sts + 9 picots).
Section 4: Garland Assembly & Stringing
Stringing Method (As Pictured)
- Thread yarn needle with the 2.5 yd (2.3 m) length of jute twine. Tie a 2 in loop at one end for hanging.
- String 1 wooden bead onto the twine.
- Attach the first leaf: insert needle through the top central chain-space of Leaf #1 (or through the base loop behind the top stem), sliding the leaf up near the bead.
- String another wooden bead onto the jute cord.
- Repeat alternating leaves and wooden beads in the following visually balanced color sequence:
- Oak Rust → Bead → Maple Mustard → Bead → Birch Olive → Bead → Maple Cream → Bead → Oak Olive → Bead → Birch Rust → Bead → Maple Mustard → Bead → Oak Rust → Bead → Birch Olive → Bead → Maple Cream → Bead → Oak Rust → Bead → Birch Olive → Bead → Maple Mustard → Bead → Oak Olive → Bead → Birch Rust → Bead.
- Finish with a final wooden bead, tie a matching 2 in hanging loop at the opposite end of the jute twine, and adjust swags smoothly.
Join-As-You-Go Strand Option
If you prefer an all-crochet garland line without separate twine threading:
– With Mustard yarn, chain 15, thread 1 wooden bead onto your working loop, sl st through the top tip of Leaf #1, ch 8, thread bead, sl st to top tip of Leaf #2; repeat from * across all 15 leaves, end with ch 15 and fasten off.
Finishing
- Thread all starting and ending yarn tails onto a tapestry needle and weave securely through the dense center back loops of each leaf.
- Blocking (Recommended): Lightly steam-block each leaf motif using a steam iron held 2 inches away, or spray with water and pin flat to a foam blocking board until dry. Steam setting crisp picots prevents curling edges over long display seasons.
Size Customization Tips
- Mantel Garland (60 in / 150 cm): 15 leaves + 16 wooden beads as detailed in pattern.
- Dining Table Runner Garland (80 in / 200 cm): Increase leaf count to 21 leaves (7 of each style) and 22 wooden beads. Add 15 inches of twine on both ends.
- Mini Tree / Wreath Accents (30 in / 75 cm): Make 7 leaves total (3 Oak, 2 Maple, 2 Birch) with 8 beads, spaced 3.5 inches apart on twine.
- Thicker Leaves: Substitute Super Bulky yarn with a 6.5 mm (US K/10.5) hook to yield oversized 7-inch leaves perfect for door wreaths or wall hangings.
Care Instructions
- Storage: Lay the garland flat or coil loosely around a card piece inside an airtight container. Avoid tightly squishing leaf edges.
- Cleaning: Spot clean gently with cold water and mild detergent. Do not submerge wooden beads in standing water.
- Reshaping: If leaf points flatten during storage, lightly spritz with water and smooth flat with your fingers.
FAQ
Can I use cotton yarn instead of acrylic or wool for this pattern?
Yes! Worsted weight (Category 4) 100% unmercerized cotton yarn works wonderfully for crochet leaves. It provides crisp stitch definition and holds flat shapes nicely without needing heavy steam blocking.
How do I stop my leaves from curling inward?
Leaf curling happens when tension is too tight around turning points or picots. Ensure you do not pull picot slip stitches excessively tight. Performing a light steam-blocking step after weaving in ends will instantly flatten any stubborn leaf edges.
Can I make this garland without wooden beads?
Absolutely! You can replace wooden beads with crocheted acorn motifs, small cream pom-poms, or simply space the leaves evenly along natural jute cord using simple knot placements.
Happy Crocheting!
You now have a warm, handmade fall leaf garland ready to brighten your Thanksgiving mantel or autumn feast table! I would love to see the rich palette you chose for your hearth. Save this pattern to your autumn crochet boards on Pinterest, and leave a comment below sharing your favorite yarn combinations!
📄 Your free PDF pattern