









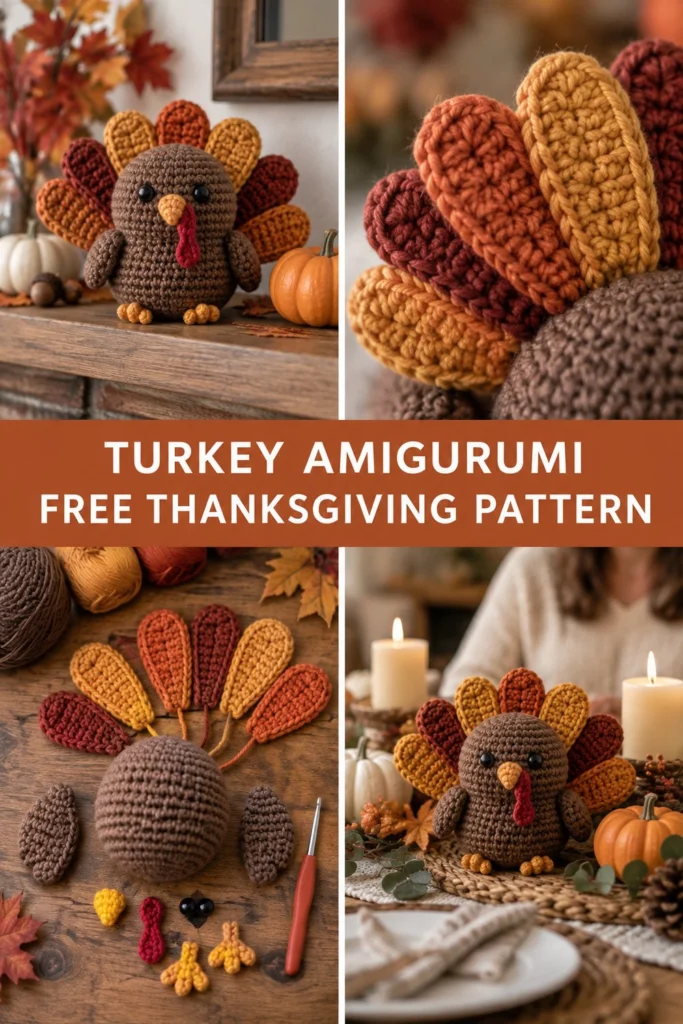
Bring festive warmth and autumnal charm to your home with this Thanksgiving turkey crochet shelf sitter. With its plump, rounded body and vibrant fan of six colorful tail feathers, this free amigurumi pattern makes a delightful mantel accent or Thanksgiving table centerpiece. Designed in continuous rounds with simple flat-worked feather paddles, this beginner-friendly project comes together quickly using worsted weight yarn in rich fall tones.
Quick Facts
- Skill level: Easy / Advanced Beginner
- Finished size: Approx. 6.5 in (16.5 cm) tall by 6 in (15 cm) wide
- Yarn: Worsted weight (Category 4) acrylic or cotton yarn in Brown, Mustard, Burnt Orange, Burgundy, Yellow, and Red
- Hook: 3.5 mm (US E-4) crochet hook
- Stitches used: Magic ring, single crochet, half double crochet, double crochet, increase, invisible decrease, slip stitch
- Time to make: 3 to 5 hours
Custom size customization options are included later in this article.
What Makes This Turkey Shelf Sitter Special
This chubby turkey amigurumi combines rustic texture with clever construction tricks. The main body is worked as a single seamless sphere that sits perfectly flat on any table, mantel, or floating shelf. The signature tail features six individual paddle-shaped feathers crocheted in classic autumn shades (mustard, burnt orange, rust, and burgundy) arranged in a fan behind the body. Simple surface sewing attaches the tiny wings, conical beak, cheerful red wattle, and cute three-toed feet, creating a sturdy decor piece you can display season after season.
Skill Level
This project is suitable for an easy to advanced beginner crocheter. You will need to know:
– Crocheting in continuous spiral rounds (amigurumi style)
– Working around both sides of a foundation chain (oval rounds)
– Basic increases and decreases
– Simple assembly and embroidery
If you can hold a hook and make single crochet stitches, you can make this turkey with ease!
Finished Measurements
| Dimension | Inches | Centimeters |
|---|---|---|
| Height (base to top of tail feathers) | 6.5 in | 16.5 cm |
| Width (wing to wing) | 5.5 in | 14.0 cm |
| Body Diameter (at widest point) | 4.25 in | 10.8 cm |
| Feather Length | 3.25 in | 8.2 cm |
Materials You Will Need
| Material / Item | Details | Quantity |
|---|---|---|
| Main Body Yarn | Medium brown worsted weight yarn | 65 yds / 60 m |
| Wing Yarn | Dark brown worsted weight yarn | 15 yds / 14 m |
| Feather Yarn (Color A) | Mustard Yellow worsted weight yarn | 18 yds / 16 m |
| Feather Yarn (Color B) | Burnt Orange worsted weight yarn | 18 yds / 16 m |
| Feather Yarn (Color C) | Burgundy / Wine red worsted weight yarn | 18 yds / 16 m |
| Beak & Feet Yarn | Bright Yellow worsted weight yarn | 8 yds / 7 m |
| Wattle Yarn | Red worsted weight yarn | 4 yds / 4 m |
| Crochet Hook | Size 3.5 mm (US E-4) | 1 hook |
| Safety Eyes | 10 mm black safety eyes (or black embroidery floss) | 1 pair |
| Fiberfill Stuffing | Polyester fiberfill | Approx. 2 oz / 55 g |
| Notions | Stitch marker, tapestry needle, pins, scissors | 1 set |
Yarn Suggestions
| Yarn Brand & Line | Weight | Yardage per Skein | Fiber Content / Notes |
|---|---|---|---|
| Lion Brand Vanna’s Choice | Worsted (#4) | 170 yds / 156 m (100g) | Excellent stitch definition, durable, rich fall palette. |
| Red Heart Super Saver | Worsted (#4) | 364 yds / 333 m (198g) | Sturdy acrylic holding shape extremely well for shelf sitters. |
| Paintbox Yarns Simply Aran | Worsted (#4) | 201 yds / 184 m (100g) | Soft acrylic available in exact autumn shade matches. |
⚠️ Note: Avoid using overly soft or slippery yarns like velvet or chenille for the tail feathers unless you plan to insert wire, as they require stiff acrylic or cotton yarn to stay standing upright without flopping.
Gauge
- Single Crochet Gauge: 20 sc x 22 rnds = 4 in x 4 in (10 cm x 10 cm) worked in continuous rounds with a 3.5 mm hook.
- Circle Test: Rnds 1–6 of the main body circle should measure 2.25 in (5.7 cm) across.
Abbreviations
| Abbreviation | Full Term (US Crochet Terms) |
|---|---|
| ch | Chain |
| sc | Single crochet |
| hdc | Half double crochet |
| dc | Double crochet |
| inc | Increase (2 single crochet in same stitch) |
| dec | Invisible decrease (sc2tog through front loops only) |
| sl st | Slip stitch |
| st(s) | Stitch(es) |
| rnd(s) | Round(s) |
| row(s) | Row(s) |
| MR | Magic Ring |
| FO | Fasten off |
UK Conversion Note: US sc = UK dc, US hdc = UK htr, US dc = UK tr.
Special Stitches Explained
1. Magic Ring (MR)
Create a loop with yarn, insert hook through loop, yarn over and pull up a loop. Chain 1, then work the required number of single crochet stitches directly into the ring. Pull the yarn tail firmly to close the ring hole completely.
2. Invisible Decrease (dec)
Insert hook into the front loop only of the first stitch, then immediately insert hook into the front loop only of the next stitch. Yarn over, pull through both front loops, yarn over and pull through remaining 2 loops on hook. This creates a smooth decrease without gaps.
Pattern Instructions
Pattern Notes
- Work in continuous spirals: Do not join rounds or turn unless explicitly instructed. Place a stitch marker in the first stitch of each round and move it up as you work.
- Stuffing: Stuff the main body firmly before closing to maintain its rounded shape. Feathers, wings, beak, feet, and wattle remain unstuffed.
Section 1: Main Body (Medium Brown, Make 1)
Using Medium Brown yarn and 3.5 mm hook:
- Rnd 1: 6 sc in MR (6 sc)
- Rnd 2: inc in each st around (12 sc)
- Rnd 3: (1 sc, inc) x 6 (18 sc)
- Rnd 4: (2 sc, inc) x 6 (24 sc)
- Rnd 5: (3 sc, inc) x 6 (30 sc)
- Rnd 6: (4 sc, inc) x 6 (36 sc)
- Rnd 7: (5 sc, inc) x 6 (42 sc)
- Rnd 8: (6 sc, inc) x 6 (48 sc)
- Rnds 9–18 (10 rounds): sc in each st around (48 sc)
✅ Checkpoint: At the end of Rnd 18, your body piece should measure approx. 3.25 inches tall and 4.25 inches wide. Insert 10 mm black safety eyes between Rnds 12 and 13, spaced 7 stitches apart.
- Rnd 19: (6 sc, dec) x 6 (42 sc)
- Rnd 20: (5 sc, dec) x 6 (36 sc)
- Rnd 21: (4 sc, dec) x 6 (30 sc)
- Rnd 22: (3 sc, dec) x 6 (24 sc)
- Stuff body firmly with polyester fiberfill.
- Rnd 23: (2 sc, dec) x 6 (18 sc)
- Rnd 24: (1 sc, dec) x 6 (12 sc)
- Top off stuffing tightly.
- Rnd 25: dec x 6 (6 sc)
FO, leaving an 8 in (20 cm) yarn tail. Thread needle through front loops of remaining 6 stitches and pull tightly to seal the bottom. Weave in yarn end securely.
Section 2: Tail Feathers (Make 6 Total: 2 Mustard Yellow, 2 Burnt Orange, 2 Burgundy)
Feathers are worked in continuous oval rounds around a center chain.
Using selected Feather Yarn and 3.5 mm hook:
- Ch 10.
- Rnd 1: Working into back ridges of foundation chain: sc in 2nd ch from hook, sc in next 7 ch, 3 sc in last ch; rotate to work down opposite side of foundation chain: sc in next 7 ch, inc in last ch (20 sts)
- Rnd 2: inc in first st, sc in next 7 sts, hdc in next st, 3 hdc in next st, hdc in next st, sc in next 7 sts, inc in next st, sc in last st (24 sts)
- Rnd 3: sc in next 2 sts, hdc in next 7 sts, dc in next 2 sts, 3 dc in next st, dc in next 2 sts, hdc in next 7 sts, sc in last 3 sts (26 sts)
FO, leaving a 10 in (25 cm) tail for sewing. Repeat to make 6 feathers total (2 in each of your 3 chosen feather colors). Do not stuff.
Section 3: Wings (Dark Brown, Make 2)
Worked in continuous oval rounds.
Using Dark Brown yarn and 3.5 mm hook:
- Ch 7.
- Rnd 1: sc in 2nd ch from hook, sc in next 4 ch, 3 sc in last ch; rotate work down opposite side of chain: sc in next 4 ch, inc in last ch (14 sc)
- Rnd 2: inc in first st, sc in next 4 sts, hdc in next st, 3 hdc in next st, hdc in next st, sc in next 4 sts, inc in next st, sc in last st (18 sts)
FO, leaving an 8 in (20 cm) tail for sewing. Do not stuff.
Section 4: Beak (Bright Yellow, Make 1)
Worked in continuous rounds.
Using Bright Yellow yarn and 3.5 mm hook:
- Rnd 1: 4 sc in MR (4 sc)
- Rnd 2: (1 sc, inc) x 2 (6 sc)
- Rnd 3: (1 sc, inc) x 3 (9 sc)
FO, leaving an 8 in (20 cm) tail for sewing. Do not stuff.
Section 5: Wattle / Snood (Red, Make 1)
Worked in a short turned row.
Using Red yarn and 3.5 mm hook:
- Ch 8.
- Row 1: sc in 2nd ch from hook, hdc in next ch, 3 dc in next ch, hdc in next ch, sc in next 3 ch (9 sts)
FO, leaving a 6 in (15 cm) tail for sewing.
Section 6: Feet (Bright Yellow, Make 2)
Worked as a small three-toed motif.
Using Bright Yellow yarn and 3.5 mm hook:
- Toe 1: Ch 4, sl st in 2nd ch from hook, sl st in next 2 ch (3 sl st).
- Toe 2: Ch 3, sl st in 2nd ch from hook, sl st in next ch (2 sl st).
- Toe 3: Ch 3, sl st in 2nd ch from hook, sl st in next ch (2 sl st).
- Join: Slip stitch through the base of Toe 1 to unite all three toes into a foot cluster (1 sl st).
FO, leaving an 8 in (20 cm) tail for sewing.
Assembly
- Assemble Tail Fan: Arrange the 6 feathers flat in an overlapping arc fan shape (alternating colors: Burgundy, Mustard, Burnt Orange, Burgundy, Mustard, Burnt Orange). Stitch the lower third edges of the feathers together using yarn tails so they form a stable fan.
- Attach Tail to Body: Pin the assembled tail fan upright onto the back of the brown body, spanning between Rnds 6 and 18. Sew securely along the base and lower sides of the feathers using a tapestry needle.
- Attach Beak & Wattle: Pin the yellow beak centered between the eyes on Rnds 12 and 13. Sew in place. Sew the red wattle so it drapes gently from the top right edge of the beak down past the chin.
- Attach Wings: Pin the wings onto either side of the body between Rnds 11 and 16, angled slightly backward. Sew only along the top third of each wing so the lower tips rest loose against the body.
- Attach Feet: Pin the two yellow feet onto the underside of the front body at Rnd 22, spaced 2 stitches apart, pointing forward. Stitch down firmly.
💡 Designer Tip: Pin all pieces in place before sewing a single stitch! Checking proportions from the front and side guarantees your turkey stays symmetrical and sits steady without rolling.
Finishing
Weave in all remaining yarn ends inside the stuffed body. Lightly flatten the base of the turkey with your palm so it sits squarely on flat surfaces. Your Thanksgiving turkey shelf sitter is ready to decorate your home!
Size Customization Tips
- Jumbo Turkey: Use super bulky yarn (Category 6) with a 6.0 mm (US J-10) hook. Follow the pattern exactly to yield a oversized turkey plush measuring roughly 12 inches (30 cm) tall.
- Mini Ornament Turkey: Use sport/DK yarn (Category 3) with a 2.5 mm hook to make a small turkey perfect for autumn tree ornaments or garland attachments!
Care Instructions
- Cleaning: Spot clean with a damp cloth and mild detergent. Do not submerge completely in water or put in a washing machine to preserve shape and tension.
- Storage: Store flat in a breathable storage bin during off-seasons. Lightly reshape feathers by hand after removing from storage.
FAQ
Can I substitute different colors for the tail feathers?
Yes! Feel free to customize the tail feathers using any autumn palette you love, such as olive green, cream, terracota, plum, or metallic gold yarns.
How do I ensure the tail feathers stay standing upright?
Crocheting with a slightly smaller hook (3.5 mm) creates tight stitches that naturally give the feathers stiffness. Stitching the feathers together side-by-side into a single fan before sewing them onto the body gives them collective structure to stay erect.
Is this toy safe for babies or toddlers under 3 years old?
To make this item baby-safe, embroider the eyes using black yarn or embroidery thread instead of plastic safety eyes, and ensure all parts are stitched doubly secure.
Happy Crocheting!
I hope you enjoy making this festive Thanksgiving turkey shelf sitter! Save this pin to your Thanksgiving or Autumn crochet board on Pinterest so you can easily find it every autumn season. Drop a comment below to share your color choices!
📄 Your free PDF pattern