
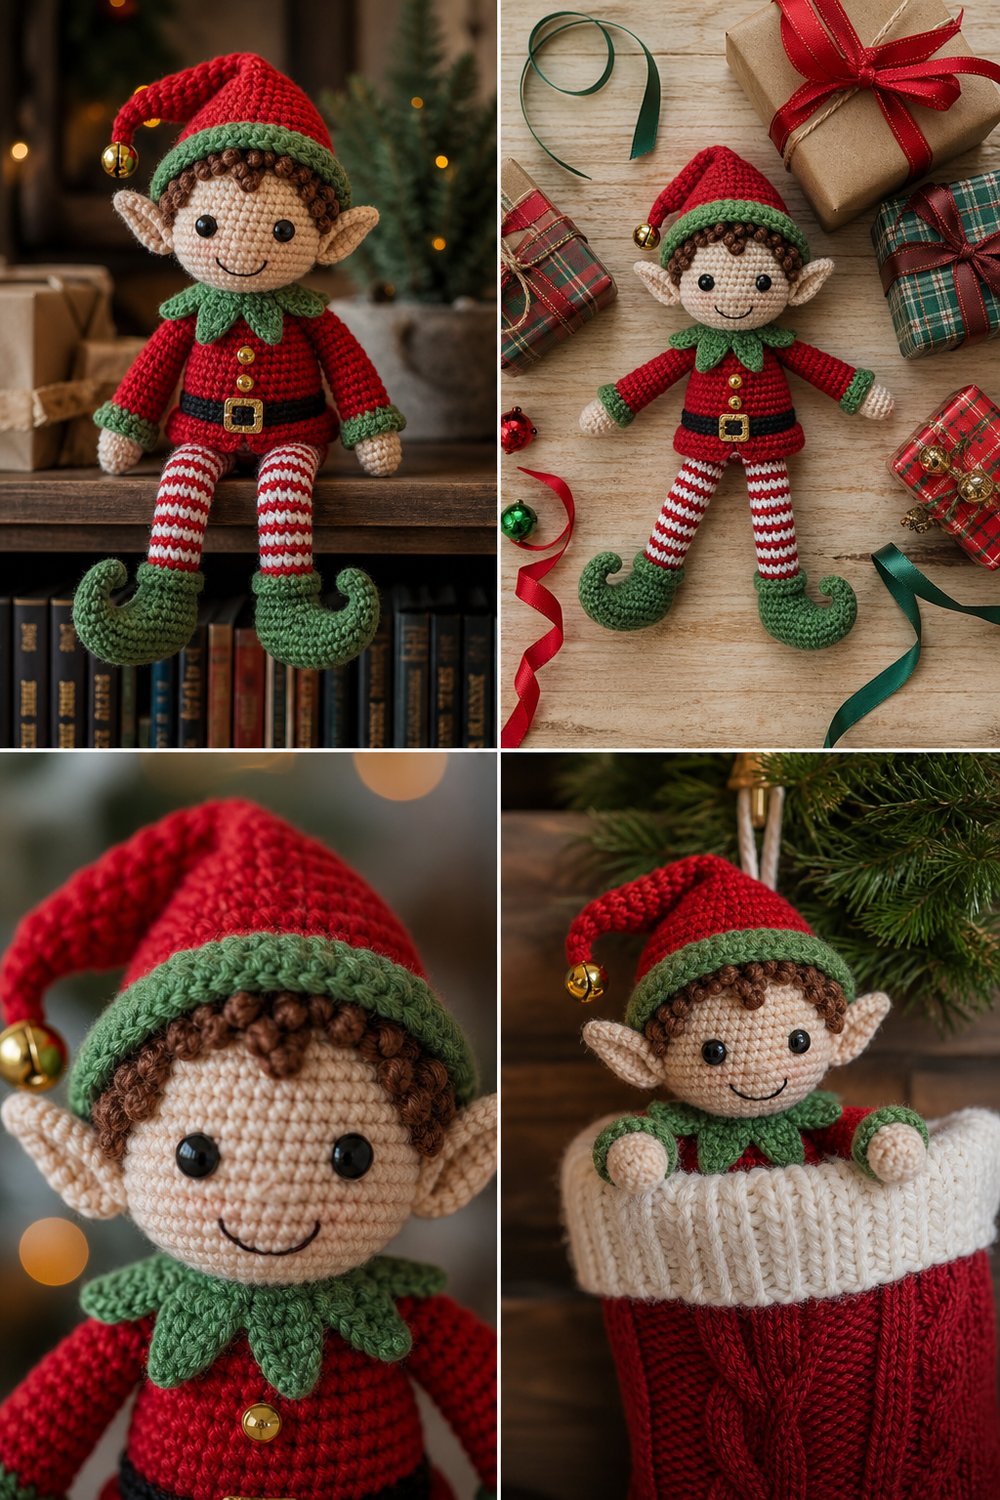
Bring a touch of whimsical holiday magic to your home decor with this delightful freestanding shelf sitter, designed to sit charmingly with its striped legs dangling over any ledge. Crafted with crisp cotton yarn and finished with a tiny brass jingle bell, it captures the classic aesthetic of heirloom Christmas treasures.
Cheerful Christmas Elf Shelf Sitter Free Character Pattern
Quick Facts
- Stitches Used: sc, hdc, dc, sl st, inv-dec, bobble stitch
- Size Fit: Standard 10-inch shelf sitter character
- Estimated Time to Complete: 6 to 8 hours
- Gift-Appeal: Ideal as a cherished holiday mantle display, children’s bedroom companion, or thoughtful handmade Christmas gift
Sizing customization tips are included later in the pattern to help you easily adjust the finished height.
What Makes This Cheerful Christmas Elf Shelf Sitter Special
This design relies on seamless amigurumi construction techniques to ensure the toy maintains its structural integrity while sitting upright. By working continuously in the round for the torso and head, and utilizing tight single crochets over a dense gauge, the toy holds its shape without requiring excessive internal armature. The striped red-and-white legs are worked with clean color changes that prevent unsightly jogs, while the curly-toed shoes incorporate a clever shaping technique using short rows and decreases to achieve that iconic fantasy sweep. A tiny brass jingle bell securely fastened to the floppy pointed hat completes the professional boutique finish.
Skill Level
- Required Skills: Working in the continuous round, increasing and decreasing invisibly, basic embroidery for facial features, simple color changes, and basic amigurumi assembly.
- Reassurance line: If you are comfortable with basic amigurumi shapes and reading standard crochet abbreviations, you will find this project a delightful and achievable weekend make.
Finished Measurements
| Measurement Type | Inches | Centimeters |
|---|---|---|
| Total Height (Hat to Seat) | 10.0 in | 25.4 cm |
| Sitting Height (Hat to Dangle) | 6.5 in | 16.5 cm |
| Leg Length | 5.5 in | 14.0 cm |
| Head Circumference | 8.0 in | 20.3 cm |
Materials You Will Need
- Yarn: Sport to Light Worsted weight mercerized cotton yarn
- Hook: US C/2 (2.75 mm) crochet hook
- Notions: Polyester fiberfill stuffing, stitch markers, tapestry needle, small brass jingle bell (approx. 10mm), embroidery floss for the smile.
| Color | Yarn Weight / Type | Yardage Needed |
|---|---|---|
| Red (Color A) | Sport / Mercerized Cotton | 80 yds (73 m) |
| Green (Color B) | Sport / Mercerized Cotton | 60 yds (55 m) |
| White (Color C) | Sport / Mercerized Cotton | 40 yds (37 m) |
| Flesh / Peach (Color D) | Sport / Mercerized Cotton | 45 yds (41 m) |
| Brown (Color E) | Sport / Mercerized Cotton | 25 yds (23 m) |
💡 Designer Tip: Using a hook one size smaller than recommended on your yarn label ensures a dense fabric that keeps the fiberfill securely tucked inside without gaps.
Yarn Suggestions
| Brand & Line Name | Yarn Weight | Yardage per Skein | Notes |
|---|---|---|---|
| Schachenmayr Catania | Sport (Fine 2) | 137 yds (125 m) per 50g | Exceptional stitch definition and rich holiday color palette. |
| Hobbii Rainbow Cotton 8/8 | DK (Light 3) | 82 yds (75 m) per 50g | Extremely durable with a wonderful matte cotton finish. |
| DMC Natura Just Cotton | Sport (Fine 2) | 125 yds (115 m) per 50g | 100% combed cotton providing a soft yet sturdy structure. |
⚠️ Note: Avoid loosely spun single-ply yarns or fuzzy novelty yarns, as they obscure stitch definition and make amigurumi shaping difficult to see.
Gauge
| Measurement | Stitches | Rows |
|---|---|---|
| 4 in x 4 in (10 cm x 10 cm) | 22 sc | 24 rounds |
💡 Designer Tip: Be sure to work up a small gauge swatch using your 2.75mm hook before starting. Consistent tension is the secret to a professional-looking character.
Abbreviations
| Abbreviation | Full Meaning |
|---|---|
| ch | chain |
| sc | single crochet |
| hdc | half double crochet |
| dc | double crochet |
| inc | single crochet increase (2 sc in same stitch) |
| inv-dec | invisible single crochet decrease |
| sl st | slip stitch |
| st(s) | stitch(es) |
| rnd(s) | round(s) |
| FO | fasten off |
| BLO | back loop only |
| FLO | front loop only |
Special Stitches Explained
- Invisible Decrease (inv-dec): Insert hook into the front loop only of the next stitch, then insert hook into the front loop only of the following stitch (3 loops on hook). Yarn over and pull through the first 2 loops, yarn over and pull through remaining 2 loops.
- Bobble Stitch (5-dc bobble): Yarn over, insert hook into designated stitch, yarn over and pull up a loop, yarn over and pull through 2 loops (2 loops on hook). Repeat 4 more times in the same stitch (6 loops on hook). Yarn over and pull through all 6 loops.
Pattern Instructions
Section 1: Head and Torso
Using Color D (Flesh), work in continuous rounds without joining unless specified.
– Rnd 1: Start 6 sc in a magic ring. (6 sc)
– Rnd 2: Inc in each st around. (12 sc)
– Rnd 3: (1 sc, inc) 6 times. (18 sc)
– Rnd 4: (2 sc, inc) 6 times. (24 sc)
– Rnd 5: (3 sc, inc) 6 times. (30 sc)
– Rnd 6: (4 sc, inc) 6 times. (36 sc)
– Rnds 7–13: Sc in each st around. (36 sc)
– Rnd 14: (4 sc, inv-dec) 6 times. (30 sc)
– Rnd 15: (3 sc, inv-dec) 6 times. (24 sc)
– Rnd 16: (2 sc, inv-dec) 6 times. (18 sc)
(Begin stuffing the head firmly with fiberfill)
– Rnd 17: (1 sc, inv-dec) 6 times. (12 sc)
– Rnd 18: Change to Color B (Green) for collar base. Working in BLO: (1 sc, inc) 6 times. (18 sc)
– Rnd 19: (2 sc, inc) 6 times. (24 sc)
– Rnd 20: (3 sc, inc) 6 times. (30 sc)
– Rnds 21–25: Sc in each st around. (30 sc)
– Rnd 26: Change to Color A (Red) for jacket. Sc in each st around. (30 sc)
– Rnd 27: (3 sc, inv-dec) 6 times. (24 sc)
– Rnds 28–29: Sc in each st around. (24 sc)
– Rnd 30: (2 sc, inv-dec) 6 times. (18 sc)
– Rnd 31: Sc in each st around. (18 sc)
(Stuff the torso firmly)
– Rnd 32: (1 sc, inv-dec) 6 times. (12 sc)
– Rnd 33: Inv-dec 6 times. (6 sc)
FO, leaving a long tail to weave closed.
✅ Checkpoint: At the end of Section 1, your torso and head should form a solid, firmly stuffed cylinder measuring approximately 4.5 inches tall from the base of the jacket to the top of the head.
Section 2: Collar
Using Color B (Green), attach yarn to the unworked front loops of Rnd 18 on the neck.
– Rnd 1: [Ch 3, 2 dc in same st, sl st in next st] repeat around to form pointed collar flaps. FO and weave in ends.
Section 3: Legs (Make 2)
Starting with Color E (Brown) for the curly shoes.
– Rnd 1: Start 6 sc in a magic ring. (6 sc)
– Rnd 2: (1 sc, inc) 3 times. (9 sc)
– Rnd 3: Sc in each st around. (9 sc)
– Rnd 4: (2 sc, inc) 3 times. (12 sc)
– Rnds 5–6: Sc in each st around. (12 sc)
– Rnd 7: Shape the toe: 4 sc, turn your work, skip the remaining sts, and work 4 sc back across the top of the toe to create the upward curl. FO, stuff shoe toe lightly, and join Color C (White) to the open ankle stitches.
– Rnd 8: Work 10 sc evenly around the ankle opening. (10 sc)
– Rnds 9–10: With Color C (White), sc around. (10 sc)
– Rnds 11–12: Change to Color A (Red), sc around. (10 sc)
(Stripe sequence: 2 rounds White, 2 rounds Red. Repeat this sequence until leg measures 5.5 inches long)
– Rnd 30: Fold top of leg flat and sc across both sides to close: 5 sc. (5 sc)
FO, leaving a long tail for sewing to the base of the torso.
💡 Designer Tip: When changing colors on the striped legs, carry the unused yarn loosely inside the tube rather than cutting it every two rounds to minimize ends to weave in.
Section 4: Arms (Make 2)
Starting with Color D (Flesh).
– Rnd 1: Start 5 sc in a magic ring. (5 sc)
– Rnd 2: Inc in each st around. (10 sc)
– Rnds 3–4: Sc in each st around. (10 sc)
– Rnd 5: Change to Color B (Green). Sc in each st around. (10 sc)
– Rnds 6–18: Continue in Color B, sc in each st around. (10 sc)
(Stuff the lower hand lightly; leave upper arm unstuffed so arms drape naturally)
– Rnd 19: Flatten opening and work 5 sc across both sides to close. (5 sc)
FO, leaving a long tail for assembly.
Section 5: Elf Hat
Using Color A (Red).
– Rnd 1: Start 6 sc in a magic ring. (6 sc)
– Rnd 2: Sc in each st around. (6 sc)
– Rnd 3: (1 sc, inc) 3 times. (9 sc)
– Rnds 4–5: Sc in each st around. (9 sc)
– Rnd 6: (2 sc, inc) 3 times. (12 sc)
– Rnds 7–8: Sc in each st around. (12 sc)
– Rnd 9: (3 sc, inc) 3 times. (15 sc)
– Rnds 10–11: Sc in each st around. (15 sc)
– Rnd 12: (4 sc, inc) 3 times. (18 sc)
– Rnds 13–14: Sc in each st around. (18 sc)
– Rnd 15: (2 sc, inc) 6 times. (24 sc)
– Rnd 16: Sc in each st around. (24 sc)
– Rnd 17: (3 sc, inc) 6 times. (30 sc)
– Rnds 18–19: Sc in each st around. (30 sc)
– Rnd 20: Change to Color B (Green) for brim band. Sc in each st around. (30 sc)
– Rnd 21: (4 sc, inc) 6 times. (36 sc)
– Rnds 22–23: Sc in each st around. (36 sc)
FO, leaving a long tail. Sew hat securely to the top of the head, tilting slightly to one side. Attach the small brass jingle bell to the very tip of the hat using matching thread.
Section 6: Assembly & Finishing
- Position the finished legs securely to the bottom underside of the torso, ensuring they face forward so they will dangle correctly over a shelf edge.
- Sew the arms to the upper sides of the jacket just below the green collar.
- Embroider safety eyes (or use 6mm black safety eyes inserted between Rnds 10 and 11 of the head with 6 stitches between them).
- Using black embroidery floss, stitch a cheerful smiling mouth centered three rows below the eyes.
- Weave in all remaining loose yarn ends securely inside the body cavities.
Size Customization Tips
To make your elf smaller or larger, simply adjust your yarn weight and hook size accordingly. Using a DK weight yarn with a 3.25mm hook will increase the finished sitting height to approximately 12 inches, while using embroidery thread with a 1.5mm hook yields a miniature 4-inch ornament version. Remember to adjust your fiberfill amounts proportionally to maintain firm structure.
Care Instructions
Spot clean gently with a damp cloth and mild soap. Do not submerge in water or machine wash, as the internal fiberfill and metal jingle bell require careful handling to maintain their shape and prevent rusting.
Cheerful Christmas Elf Shelf Sitter Free Character Pattern
Thank you so much for joining me in making this festive holiday companion! I would love to see your finished elf sitting proudly on your mantle. Please share your photos on social media, tag me in your posts, save this project to your Pinterest holiday boards for easy reference next season, and leave a warm comment below sharing how you customized your elf’s colors!