










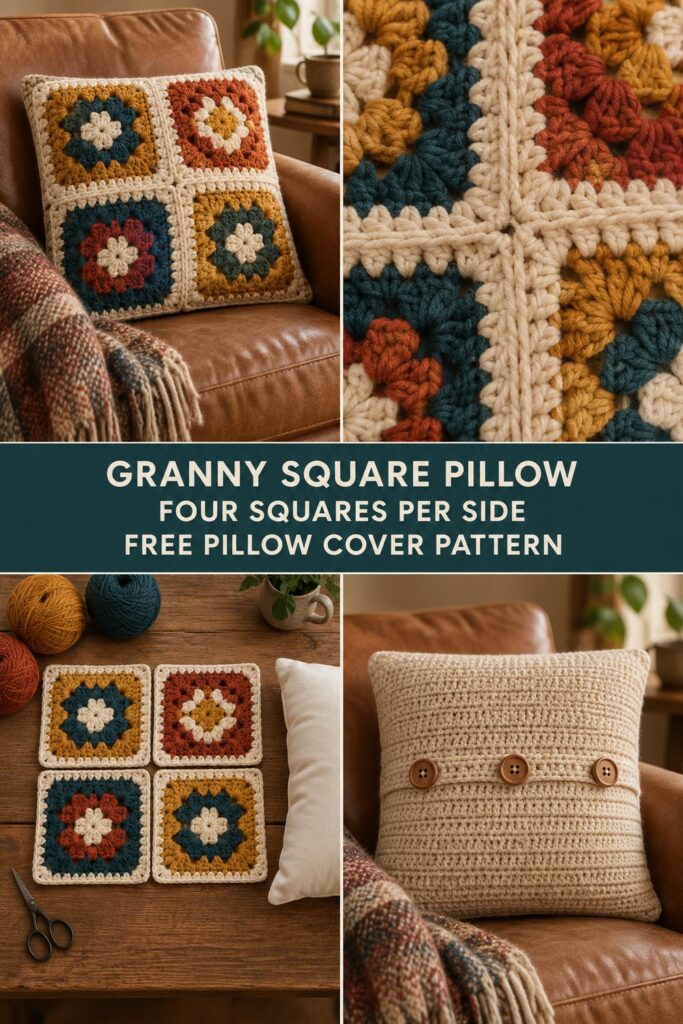
There is something deeply satisfying about watching a plain, utilitarian cushion pad transform into an heirloom-quality piece of home decor using nothing more than yarn and a hook. This project combines classic granny square construction with a modern, earthy palette of mustard, rust, cream, and deep teal, resulting in a timeless crochet cushion cover that looks right at home propped on a tan leather armchair or tossed across a cozy wool throw.
Quick Facts
- Stitches Used: Chain (ch), slip stitch (sl st), double crochet (dc).
- Size Fit: Designed to fit an 18” x 18” (45 cm x 45 cm) square cushion insert.
- Estimated Hours to Complete: 6–8 hours from first loop to final button.
- Gift-Appeal: Ideal for housewarmings, weddings, or a quick weekend refresh for your own living room.
💡 Designer Tip: If you want to make this as a gift, buy the cushion insert first so you can check the fit of your panels as you assemble them!
Want to adjust this to fit a larger or smaller pillow? Scroll down for the size customization tips later in the article.
What Makes This Granny Square Crochet Pillow Cover Special
This free crochet pattern takes the traditional, nostalgic granny square and modernizes it through a deliberate, high-contrast color palette and clean construction techniques. Instead of a chaotic scrap-yarn project, this cover uses four distinct colors—mustard, rust, cream, and deep teal—distributed evenly across four identical squares for the front panel, while the back is a solid, plain-stitched fabric.
To give the cover a crisp, professional finish, the front and back panels are joined using a neat whip-stitch seam that aligns every corner cleanly. The back features a functional overlapping envelope closure fastened with three wooden buttons, making the cover entirely removable for effortless washing. No floppy, ill-fitting crochet here—just structured, geometric beauty that showcases true beginner-friendly crochet home decor at its finest.
Skill Level
- Beginner
Required Skills:
– Working in the round and creating magic rings (or an alternative chain-4 loop).
– Basic double crochet clusters and chain spaces.
– Basic seaming (whip stitch) and simple buttonhole placement.
✅ Checkpoint: If you can confidently crochet a standard four-round granny square, you have all the skills needed to complete this entire project!
Finished Measurements
- Width: 18 inches (45.5 cm)
- Length: 18 inches (45.5 cm)
- Depth / Gusset: Fits a standard 18” x 18” x 4” cushion insert comfortably.
| Measurement | Inches | Centimeters |
|---|---|---|
| Width (Flat) | 18″ | 45.5 cm |
| Length (Flat) | 18″ | 45.5 cm |
| Target Cushion Size | 18″ x 18″ | 45 cm x 45 cm |
Materials You Will Need
- Yarn: Worsted weight (Medium / #4) yarn. Approximately 600 yards total.
- Crochet Hook: US J/10 (6.0 mm) hook, or size needed to obtain gauge.
- Notions: Tapestry needle for weaving in ends and seaming, scissors, three 1-inch (25 mm) wooden buttons.
- Insert: One 18” x 18” square cushion pad.
| Color Order | Yarn Color Name | Weight Category | Estimated Yardage Needed |
|---|---|---|---|
| Color 1 | Mustard | Worsted (#4) | 150 yards (137 m) |
| Color 2 | Rust | Worsted (#4) | 150 yards (137 m) |
| Color 3 | Cream | Worsted (#4) | 150 yards (137 m) |
| Color 4 | Deep Teal | Worsted (#4) | 150 yards (137 m) |
Yarn Suggestions
To achieve the exact look of the featured product image, look for a smooth, matte acrylic, wool blend, or cotton yarn with good stitch definition.
| Brand & Line Name | Yarn Weight | Skein Yardage | Notes |
|---|---|---|---|
| Lion Brand Vanna’s Choice | Worsted (#4) | 145 yd / 100g | Excellent stitch definition, extensive earth-tone palette. |
| Paintbox Yarns Simply Aran | Aran / Worsted (#4) | 201 yd / 100g | Incredible range of exact mustard, rust, cream, and teal shades. |
| Knit Picks Brava Worsted | Worsted (#4) | 218 yd / 100g | Durable, washable, budget-friendly 100% premium acrylic. |
⚠️ Note: Avoid novelty, fuzzy, or highly textured novelty yarns (like boucle or eyelash yarn) for this project, as they will obscure your granny square stitches and make counting clusters difficult.
Gauge
- Square Gauge: One completed 4-round granny square measures approximately 9 inches x 9 inches (23 cm x 23 cm) using a US J/10 (6.0 mm) hook.
- Stitch Gauge: 3 granny clusters and 3 chain-1 spaces = 4 inches (10 cm).
💡 Designer Tip: Always make a test square first! If your square is coming out too large, drop down a hook size. If it’s too small, go up a hook size.
| Gauge Type | Measurement | Stitch / Row Equivalent |
|---|---|---|
| Motif Size | 9″ x 9″ (23 cm) | 4 Rounds per square |
| Cluster Width | 4 inches (10 cm) | 3 Clusters + 3 ch-1 sps |
Abbreviations
| Abbreviation | Full Term |
|---|---|
| ch | Chain |
| dc | Double crochet |
| sl st | Slip stitch |
| sp | Space |
| st(s) | Stitch(es) |
| rnd | Round |
| rep | Repeat |
| sk | Skip |
Special Stitches Explained
- Cluster (cl): Work 3 dc into the same designated space or stitch.
- Corner Cluster: Work [3 dc, ch 2, 3 dc] into the designated corner chain-2 space.
- Standing Double Crochet (Standing dc): With slip knot on hook, yarn over, insert hook into indicated st, yarn over, pull up a loop, [yarn over, pull through 2 loops] twice.
Pattern Instructions
Section 1: Crocheting the Granny Squares
You will need to make a total of 4 identical granny squares for the front panel. You can distribute your mustard, rust, cream, and teal colors across the 4 rounds of each square however you prefer, but we recommend changing colors every round for that classic, balanced aesthetic.
Rnd 1: With Color of choice, ch 4, sl st to first ch to form a ring. Ch 3 (counts as first dc here and throughout), work 2 dc into the ring, ch 2. [Work 3 dc into ring, ch 2] 3 times total. Sl st to top of starting ch-3 to join. Fasten off current color. (12 dc, 4 ch-2 sps)
Rnd 2: *Join next color with a sl st (or standing dc) in any ch-2 corner sp. Ch 3, [2 dc, ch 2, 3 dc] in same corner sp. Ch 1, skip next 3 sts, [3 dc, ch 2, 3 dc] in next corner sp; rep from * to * twice more, ch 1, skip next 3 sts, sl st to top of starting ch-3 to join. Fasten off current color. (24 dc, 4 ch-1 sps, 4 ch-2 sps)
Rnd 3: *Join next color with a sl st (or standing dc) in any ch-2 corner sp. Ch 3, [2 dc, ch 2, 3 dc] in same corner sp. Ch 1, skip next 3 dc, work 3 dc in next ch-1 sp, ch 1, skip next 3 dc, [3 dc, ch 2, 3 dc] in next corner sp; rep from * to * twice more, ch 1, skip next 3 dc, work 3 dc in next ch-1 sp, ch 1, skip next 3 dc, sl st to top of starting ch-3 to join. Fasten off current color. (36 dc, 8 ch-1 sps, 4 ch-2 sps)
Rnd 4: *Join final color with a sl st (or standing dc) in any ch-2 corner sp. Ch 3, [2 dc, ch 2, 3 dc] in same corner sp. [Ch 1, skip next 3 dc, work 3 dc in next ch-1 sp] across to next corner sp, ch 1, skip next 3 dc, [3 dc, ch 2, 3 dc] in next corner sp; rep from * to * twice more, working along the final side, [ch 1, skip next 3 dc, work 3 dc in next ch-1 sp] across, ch 1, skip next 3 dc, sl st to top of starting ch-3 to join. Fasten off, leaving a 6-inch tail to weave in later. (48 dc, 12 ch-1 sps, 4 ch-2 sps)
✅ Checkpoint: Measure your completed square. It should measure approximately 9 inches across before blocking. Make sure you have all 4 squares completed before moving on to assembly.
Section 2: Front Panel Assembly
- Lay out 4 finished squares in a 2×2 grid, arranging your mustard, rust, cream, and teal squares to create a balanced, pleasing color layout.
- With right sides facing up and using a tapestry needle and a length of matching yarn, whip-stitch the top two squares together along their inner edge, going through the back loops only for a flat seam.
- Whip-stitch the bottom two squares together.
- Join the top row to the bottom row with a horizontal whip-stitch seam, matching the center corners precisely.
- Weave in all loose ends on the wrong side of the front panel. (Front panel measures 18″ x 18″)
Section 3: Back Panel Assembly (Envelope Closure)
To create the solid back panel, chain 60. Work in single crochet (sc) back and forth in rows until the piece measures 18″ x 18″.
- Take 2 of your remaining granny squares and join them side-by-side using a whip-stitch seam to form a horizontal rectangle measuring 9” tall by 18” wide. This forms the Upper Back Flap.
- Take your final 2 granny squares and join them side-by-side in the same manner to form the Lower Back Flap.
- Creating Buttonholes: Along the bottom straight edge of the Upper Back Flap, attach yarn and work a row of sc evenly across, creating 3 small buttonhole loops (ch 3, skip 3 sts) spaced evenly apart. Fasten off.
- Weave in all loose ends.
Section 4: Final Joining & Finishing
- Lay the Front Panel down with the right side facing UP.
- Place the back panel on top with the right side facing DOWN, aligning its edges with the Front Panel.
- Place the Upper Back Flap on top with the right side facing DOWN, letting its top and side raw edges align with the top and sides of the Front Panel. The two back flaps will overlap in the middle by about 3 inches, creating your button pocket.
- Pin all four layers securely around the outer perimeter (ensuring you do not accidentally stitch the envelope opening shut!).
- Using a secure whip stitch or single crochet join through all outer layers, seam around all four outer edges of the pillow cover.
- Turn the entire pillow cover right-side out through the center envelope opening, gently pushing out the corners with your fingers or a blunt tool.
- Sew your three wooden buttons securely onto the Lower Back Flap, aligning them with the buttonholes on the Upper Back Flap.
- Insert your 18” x 18” cushion pad inside, button up the back, and admire your brand new handmade crochet cushion cover!
✅ Checkpoint: Verify that your buttons slide smoothly through the buttonholes and that the cover fits snugly over your 18” x 18” pillow insert without gaping.
Size Customization Tips
- Sizing Up (e.g., 20” x 20” Pillow): Add a 5th round of double crochet clusters to all 8 granny squares, or work an extra round of granny stitches around the perimeter of your joined front and back panels until you reach your target measurement.
- Sizing Down (e.g., 14” x 14” Pillow): Stop your granny squares after just 3 rounds instead of 4, adjusting your cushion insert size to match your finished panel dimensions.
Care Instructions
- Remove the cushion insert before washing.
- Hand wash or machine wash on a gentle wool/delicate cycle in cool water (maximum 30°C / 85°F) using mild detergent.
- Do not bleach or wring out.
- Lay flat to dry on a clean towel, reshaping gently while damp to maintain crisp square corners.
- Cool iron if necessary, avoiding wooden buttons.
Closing
There is nothing quite like cozying up on the couch with home decor handmade by your own two hands! I hope you thoroughly enjoyed making your new Granny Square Crochet Pillow Cover.
If you make one—or a whole set for your sofa—I would love to see your color choices! Please be sure to tag me on social media using #GrannySquarePillow #CrochetCushion #FreeCrochetPattern #GrannySquare #BeginnerCrochet, save this project to your Pinterest boards for later, and leave a comment below letting me know which color combination you chose! Happy crocheting!
📄 Your free PDF pattern