










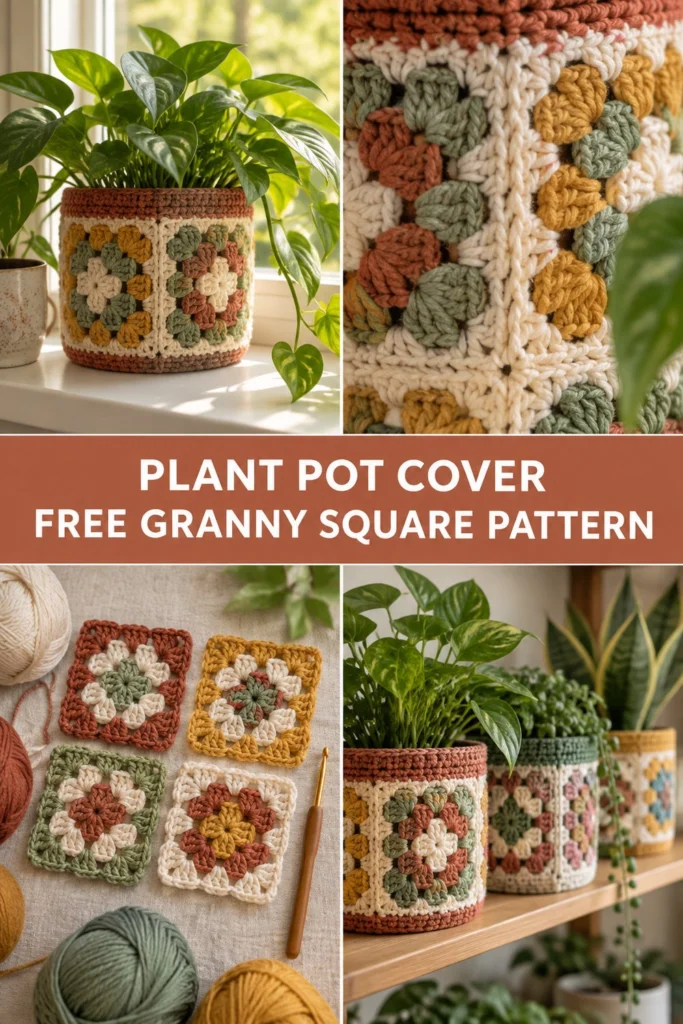
Give a plain plant pot a happy makeover with this classic granny square plant pot cover. Four timeless motifs in earthy terracotta, soothing sage, rich mustard, and creamy off-white are joined into a snug sleeve, finished with simple top and bottom borders that hug a standard six-inch pot.
Quick Facts
- Skill level: Easy / Beginner-Friendly
- Finished size: Fits a standard 6-inch (15 cm) terracotta plant pot (approx. 6.5 in / 16.5 cm diameter at top, 5.5 in / 14 cm diameter at base, 5.5 in / 14 cm height)
- Yarn: Worsted weight / Aran cotton yarn (Category 4) in 4 colors
- Hook: US G/6 (4.0 mm) crochet hook
- Stitches used: Chain (ch), slip stitch (sl st), single crochet (sc), double crochet (double crochet cluster / granny cluster), treble crochet (tr)
- Time to make: Weekend project (approx. 4 to 6 hours)
Size customization tips are included further down in the article.
What Makes This Crochet Plant Pot Cozy Special
Working in the traditional granny square method is one of the most comforting experiences in crochet. Instead of a flat blanket, this granny square project brings those cheerful clusters into your everyday home decor. By joining four identical squares into a continuous band and topping them with neat rows of single crochet, you get a sturdy, structured sleeve that grips your flowerpot securely without slipping down.
Skill Level
- Basic understanding of crochet terminology and working in the round
- Knowing how to make a classic granny square and join motifs as you go or via whip stitch
- Following simple single crochet border rounds
- Reassurance line: If you can make a granny square, you can easily complete this cozy in an afternoon.
Finished Measurements
| Dimension | Inches | Centimeters |
|---|---|---|
| Top Diameter (fitted to pot) | 6.5 in | 16.5 cm |
| Bottom Diameter (fitted to pot) | 5.5 in | 14 cm |
| Total Height | 5.5 in | 14 cm |
| Individual Square Size | 4.5 in x 4.5 in | 11.5 cm x 11.5 cm |
Materials You Will Need
| Colorway | Yarn Shade | Weight | Yards | Meters |
|---|---|---|---|---|
| Color A | Cream / Off-White | Worsted (4) | 50 yds | 46 m |
| Color B | Terracotta / Rust | Worsted (4) | 40 yds | 37 m |
| Color C | Sage Green | Worsted (4) | 40 yds | 37 m |
| Color D | Mustard Yellow | Worsted (4) | 40 yds | 37 m |
- Hook: US G/6 (4.0 mm) crochet hook
- Notions: Tapestry needle for weaving in ends, locking stitch markers, measuring tape
Yarn Suggestions
| Yarn Line | Skein Yardage | Notes |
|---|---|---|
| Lion Brand 24/7 Cotton | 186 yds / 100g | 100% mercerized cotton, gorgeous stitch definition and a slight sheen. |
| Lily Sugar’n Cream | 120 yds / 70g | 100% cotton, budget-friendly with a huge palette of earthy shades. |
| Drops Paris | 82 yds / 50g | 100% combed cotton, soft and thick for a sturdy structured pot cover. |
⚠️ Note: Avoid stretchy acrylic yarns for plant pot covers. Cotton holds its shape tightly around pots and absorbs accidental water splashes much better.
Gauge
- 1 individual granny square = 4.5 in x 4.5 in (11.5 cm x 11.5 cm) using a 4.0 mm hook.
- Gauge is not overly critical for this project, but matching the square size ensures a snug fit on a 6-inch pot.
Abbreviations
- ch: chain
- sl st: slip stitch
- sc: single crochet
- dc: double crochet
- sp: space
- st(s): stitch(es)
- rnd(s): round(s)
- beg: beginning
- rep: repeat
- Cluster: 3 dc worked in the same stitch or space
- Corner: (3 dc, ch 2, 3 dc) in the same ch-2 space
UK: sc = dc, hdc = htr, dc = tr.
Special Stitches Explained
- Classic Granny Cluster: Work 3 double crochets into the designated space or stitch.
- Granny Square Corner: Work (3 dc, ch 2, 3 dc) into the corner chain-2 space.
- Invisible Join: Cut yarn leaving a 6-inch tail, pull tail completely through the last stitch, thread onto tapestry needle, and mimic the top of the first stitch for a seamless finish.
Pattern Instructions
Pattern Notes
- Make 4 identical granny squares, alternating color placements as shown in the photos.
- Turning chains do not count as stitches unless specified.
Section 1: Making the Granny Squares (Make 4)
Using a 4.0 mm hook, follow this 4-round color sequence for all 4 squares.
Rnd 1 (Center): With Color B (Terracotta), start with a magic ring. Ch 3 (counts as first dc), work 2 dc in the ring, ch 2, [3 dc in ring, ch 2] 3 times. Join with sl st to top of beg ch-3. Fasten off Color B. (12 dc, 4 ch-2 spaces)
✅ Checkpoint: You should have 4 small clusters separated by 4 corner chain-2 spaces.
Rnd 2: *Join Color C (Sage Green) in any ch-2 corner sp. Ch 3, (2 dc, ch 2, 3 dc) in same corner sp, ch 1, skip 3 dc, (3 dc, ch 2, 3 dc) in next corner sp; rep from * around, ch 1, join with sl st to top of beg ch-3. Fasten off Color C. (24 dc, 4 ch-1 spaces, 4 ch-2 spaces)
Rnd 3: *Join Color D (Mustard Yellow) in any ch-2 corner sp. Ch 3, (2 dc, ch 2, 3 dc) in same corner sp, ch 1, 3 dc in next ch-1 sp, ch 1, (3 dc, ch 2, 3 dc) in corner sp; rep from * around, ending with ch 1, join with sl st to top of beg ch-3. Fasten off Color D. (36 dc, 8 ch-1 spaces, 4 ch-2 spaces)
Rnd 4: *Join Color A (Cream) in any ch-2 corner sp. Ch 3, (2 dc, ch 2, 3 dc) in same corner sp, [ch 1, 3 dc in next ch-1 sp] across to next corner sp, ch 1, (3 dc, ch 2, 3 dc) in corner sp; rep from * around, ending with ch 1, join with sl st to top of beg ch-3. Fasten off Color A, leaving a 12-inch tail for sewing. (48 dc, 12 ch-1 spaces, 4 ch-2 spaces)
Section 2: Assembly and Seaming
- Lay your 4 finished granny squares flat in a horizontal row, matching the side edges.
- Fold the row of four squares into a square tube, overlapping the first and last square so the right sides face outward.
- Using the long Cream yarn tails and your tapestry needle, whip-stitch the vertical side seams together through the back loops of Rnd 4, creating a continuous ring of four squares.
- Weave in all loose ends inside the tube.
Section 3: Borders and Edging
Bottom Border:
Rnd 1: Join Color B (Terracotta) at the bottom seam of the square tube. Ch 1, work sc evenly along the bottom edge, placing roughly 2 sc per square edge and 1 sc in each corner/joining seam, join with sl st to first sc. (64 sc)
Rnds 2 to 3: Ch 1, sc in each st around, join with sl st to first sc. Fasten off and weave in ends. (64 sc)
Top Border:
Rnd 1: Join Color B (Terracotta) at the top inside seam of the tube. Ch 1, work sc evenly around the top edge, matching the stitch count of the bottom border, join with sl st to first sc. (64 sc)
Rnds 2 to 4: Ch 1, sc in each st around, join with sl st to first sc. Fasten off and weave in ends. (64 sc)
💡 Designer Tip: If your pot tapers heavily at the bottom, decrease 4 evenly spaced single crochets on Rnd 2 of the bottom border to hug the base tightly.
Size Customization Tips
- For a larger 8-inch pot: Add a 5th granny square to the band and increase your border stitches accordingly.
- For a smaller 4-inch pot: Use a smaller hook size (3.25 mm) with sport-weight yarn, or stop your granny square at Rnd 3 instead of Rnd 4.
Care Instructions
Spot clean with a damp cloth and mild soap when needed. If heavily soiled, submerge in lukewarm water with gentle wool wash, press out excess water in a towel, and dry flat over an inverted pot of the same size to maintain shape.
FAQ
Can I use acrylic yarn instead of cotton?
You can, but cotton yarn is strongly recommended because it provides structure, stays rigid around the pot walls, and withstands moisture from watering much better than acrylic.
How do I adjust this pattern for a non-square pot or a cylinder vase?
Since the base is built from four square motifs joined in a ring, you can easily add or subtract squares to match the circumference of any cylindrical container.
Is this project suitable for absolute beginners?
Yes! If you know how to make a basic granny square and perform simple single crochet stitches around an edge, you have all the skills needed for this pattern.
Happy Crocheting!
I hope you enjoy bringing a cozy handmade touch to your houseplant collection. Be sure to save this pin on Pinterest and leave a comment below sharing which color combination you chose for your plant pot cover!
📄 Your free PDF pattern