











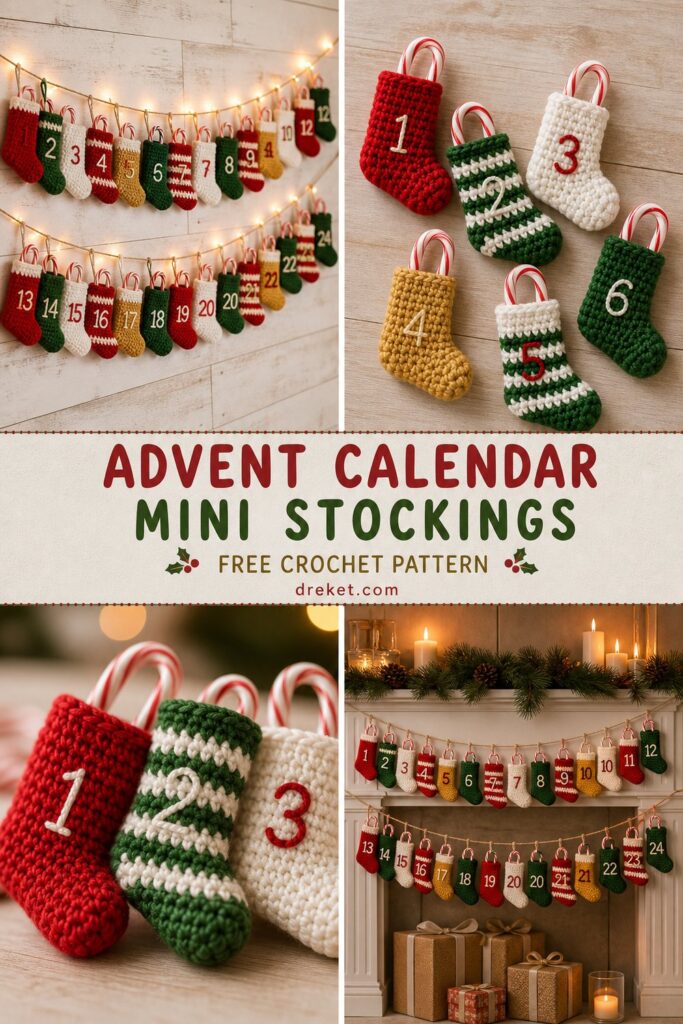
There is nothing quite like the cozy glow of twinkling fairy lights against a whitewashed wall while you count down the days until Christmas with hand-crafted treasures. This charming garland of miniature crocheted stockings brings a nostalgic, heirloom-quality touch to your holiday mantel styling, complete with tiny candy canes nestled inside each one.
Quick Facts
- Stitches Used: Single crochet, half double crochet, front post stitches, surface slip stitch embroidery.
- Size Fit: One size miniature (each stocking measures approximately 4.5 inches / 11.4 cm tall).
- Estimated Hours to Complete: 15–20 hours total for all 24 stockings and string assembly.
- Gift-Appeal Framing: Makes an unforgettable heirloom advent calendar to gift to family or keep as a cherished holiday tradition for decades.
Sizing customization tips are included later in this post to help you adapt the garland length and stocking proportions to your space.
What Makes This Festive Mini Stocking Advent Calendar Special
This design relies on a seamless top-down construction method that builds the stocking cuff, leg, heel flap, and foot in one fluid sequence, eliminating awkward seams and creating a crisp, professional finish. By utilizing firm single crochet stitches worked in the round with a smaller hook, the fabric maintains its structural integrity without needing heavy stuffing or plastic inserts to hold its shape. The alternating color sequence—red, green, white, and gold—naturally mimics classic holiday palettes, while surface-embroidered numerals add a personalized, bespoke touch to every single piece.
Skill Level
- Intermediate: Requires confidence working in continuous spirals, shaping simple heels, changing colors cleanly, and basic surface embroidery.
- Reassurance Line: If you know how to make a basic single crochet and follow simple shaping directions, you can easily master this project by tackling just one stocking a day!
Finished Measurements
| Dimension | Inches | Centimeters |
|---|---|---|
| Stocking Height (Toe to Cuff) | 4.5 in | 11.4 cm |
| Stocking Width (Heel to Toe) | 3.25 in | 8.3 cm |
| Garland Length (24 Stockings) | Approx. 72 in | 182.8 cm |
Materials You Will Need
- Yarn: Sport weight (Fine / #2) 100% cotton yarn for crisp stitch definition.
- Hook: US B/1 (2.25 mm) crochet hook.
- Notions: Tapestry needle, stitch markers, embroidery floss for numbering, small safety pins.
| Color Code / Name | Yarn Weight / Type | Yardage Needed |
|---|---|---|
| Color A (Traditional Red) | Sport / 100% Cotton | 85 yds (78 m) |
| Color B (Forest Green) | Sport / 100% Cotton | 85 yds (78 m) |
| Color C (Snow White) | Sport / 100% Cotton | 85 yds (78 m) |
| Color D (Vintage Gold) | Sport / 100% Cotton | 85 yds (78 m) |
Yarn Suggestions
| Brand & Line | Weight | Yardage per Skein | Notes |
|---|---|---|---|
| Schachenmayr Catania | Sport (#2) | 137 yds (125 m) | Exceptional color range, smooth mercerized cotton with zero fuzz. |
| Knit Picks CotLin | Sport (#2) | 123 yds (112 m) | Linen-cotton blend offering wonderful vintage matte texture. |
| DMC Natura Just Cotton | Sport (#2) | 155 yds (142 m) | Extremely durable, holds crisp geometric shapes wonderfully. |
⚠️ Note: Avoid fluffy acrylic or novelty yarns for this project. They obscure the stitch definition and make the embroidered numbers difficult to read against the fabric.
Gauge
- Stitch Gauge: 24 sts and 26 rows = 4 inches (10 cm) in single crochet using a US B/1 (2.25 mm) hook.
- Motif Size: Each completed stocking measures 4.5 in (11.4 cm) tall by 3.25 in (8.3 cm) wide.
| Measurement Type | Stitches / Rows | Imperial | Metric |
|---|---|---|---|
| Stitch Gauge | 24 sc | 4 in | 10 cm |
| Row Gauge | 26 rows | 4 in | 10 cm |
💡 Designer Tip: Always make a gauge swatch before diving into your first stocking. If your tension is loose, your stockings will be too large and floppy; keep your tension firm and consistent!
Abbreviations
| Abbreviation | Meaning |
|---|---|
| ch | chain |
| sc | single crochet |
| sc2tog | single crochet 2 stitches together (decrease) |
| sl st | slip stitch |
| st(s) | stitch(es) |
| Rnd / Row | Round / Row |
| FO | fasten off |
Special Stitches Explained
- Single Crochet 2 Together (sc2tog): Insert hook into next st, yarn over and pull up a loop (2 loops on hook), insert hook into following st, yarn over and pull up a loop (3 loops on hook), yarn over and pull through all 3 loops on hook.
- Surface Slip Stitch Embroidery: Working on the outside of the finished fabric, insert hook from front to back through a stitch, draw up a loop of contrasting yarn, insert hook a short distance ahead along your pattern line, yarn over and pull through both the fabric and the loop on your hook to form a chain-like surface stitch.
Pattern Instructions
Make 6 stockings in each colorway (Red, Green, White, and Gold) for a total of 24 mini stockings.
Section 1: The Cuff and Leg
Rnd 1: Using Color C (White) for the cuff trim, ch 24, join with sl st to form a ring, taking care not to twist. Ch 1, sc in each ch around, join with sl st to first sc. (24 sc)
Rnds 2-4: Ch 1, working in continuous spirals without joining, sc in each st around. (24 sc)
Rnd 5: Change to main body color (Red, Green, or Gold depending on your colorway schedule). Sc in each st around. (24 sc)
Rnds 6-12: Continue working sc in each st around in continuous rounds. (24 sc)
Section 2: The Heel Flap and Heel Turn
Row 1: Working back and forth in rows across the next 12 sts only (leaving the remaining 12 sts unworked for the front of the foot), ch 1, turn, sc in each of the next 12 sts. (12 sc)
Rows 2-6: Ch 1, turn, sc in each st across. (12 sc)
Row 7 (Heel Turn): Ch 1, turn, sc in first 7 sts, sc2tog, turn, leaving remaining sts unworked. (8 sts)
Row 8: Ch 1, turn, skip first st, sc in next 6 sts, sc2tog working across the turn. (6 sc)
Section 3: The Gusset and Foot
Rnd 1: Resume working in rounds. Pick up and sc 6 sts along the left edge of the heel flap, sc across the 12 unworked front sts from the leg, then pick up and sc 6 sts along the right edge of the heel flap, and sc across the 6 sts of the heel turn. (30 sts)
Rnd 2: Sc around, working sc2tog at the corners where the heel meets the foot on both sides. (28 sts)
Rnd 3: Sc around, working one more sc2tog on each side to reduce back down. (26 sts)
Rnds 4-9: Sc in each st around. (26 sc)
✅ Checkpoint: At the end of Rnd 9 of the foot, count your stitches carefully to ensure you have 26 sc remaining before starting the toe decreases.
Section 4: The Toe and Hanging Loop
Rnd 10 (Toe Shaping): [Sc in next 11 sts, sc2tog] twice. (24 sc)
Rnd 11: [Sc in next 2 sts, sc2tog] around. (18 sc)
Rnd 12: [Sc in next st, sc2tog] around. (12 sc)
Rnd 13: Sc2tog around. (6 sc)
FO, leaving a long tail. Thread tail through remaining 6 stitches, pull tight to close the toe opening, and weave in securely on the inside.
Hanging Loop: Attach yarn to the inside back seam of the cuff, ch 12, sl st back into the same base st to form a secure loop. FO and weave in ends.
Section 5: Embroidery and Assembly
- Using contrasting embroidery thread and referring to your product image layout, use surface slip stitch embroidery to stitch numbers 1 through 24 onto the front cuff of each corresponding stocking.
- Thread a long length of sturdy twine or yarn through the hanging loop of each stocking, spacing them approximately 3 inches apart in an alternating color pattern (Red, Green, White, Gold, repeat).
- Insert a miniature candy cane into the opening of each stocking to complete your festive holiday display.
Size Customization Tips
- To make larger stockings: Use a DK or Worsted weight yarn with a US D/3 (3.25 mm) or E/4 (3.5 mm) hook. This will increase the overall stocking height by approximately 1.5 inches (3.8 cm).
- To make smaller stockings: Use a Lace weight thread with a US Steel 6 (1.75 mm) hook, resulting in a dainty 3-inch (7.6 cm) stocking perfect for a miniature tabletop tree garland.
Care Instructions
Hand wash gently in lukewarm water using a mild wool wash. Do not wring or twist. Press out excess moisture in a clean towel and lay flat to dry in its original shape. Warm iron on cotton setting if needed, avoiding embroidered numbers.
I hope you thoroughly enjoy crocheting this heirloom advent calendar garland for your home! If you make your own set of mini stockings, please share your photos on Instagram and tag me so I can admire your festive creations. Be sure to save this pattern to your Pinterest Christmas boards so you can easily find it year after year, and drop a comment below to let me know which color combination is your absolute favorite!
📄 Your free PDF pattern