











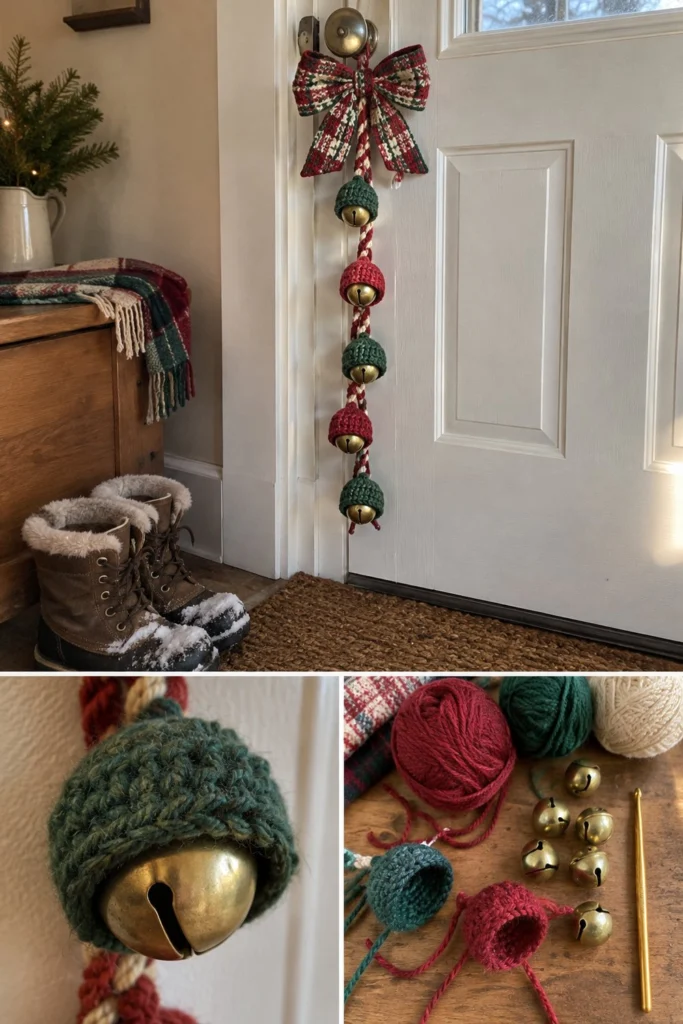
Hear the bells every time the front door opens! This charming crochet door hanger features a twisted red and cream cord with five real brass sleigh bells nestled in little crochet cups, topped with a big, festive bow. It is a quick, beginner-friendly project that uses up your scrap yarn and instantly transforms your entryway for the holidays.
Crochet Jingle Bell Door Hanger Free Christmas Pattern
Quick Facts
- Skill level: Easy / Beginner
- Finished size: Total hanging length approx. 36 in / 91.4 cm; bell cups approx. 2.5 in / 6.4 cm diameter; bow approx. 8 in / 20.3 cm wide
- Yarn: Aran / Worsted weight yarn in Forest Green, Dark Red, and Cream (approx. 60 yards total)
- Hook: 4.0 mm (US G/6) crochet hook
- Stitches used: Ch, sc, hdc, sl st, picot
- Time to make: 2 to 3 hours
Size tips and customization options are included further down the page.
What Makes This Crochet Jingle Bell Door Hanger Special
This holiday decor piece brings together classic seasonal textures and real jingle bells that ring every time someone walks through the door. The project is worked in small, satisfying pieces: five individual bell cups made in alternating forest green and dark red, a twisted two-tone cord that holds everything securely, and a sturdy half-double crochet bow that ties the entire look together at the doorknob.
Skill Level
- Working in the round from a magic ring
- Basic increasing and decreasing
- Making simple crochet cords and bows
- Basic assembly and joining
Don’t worry if you are new to small 3D pieces—the bell cups are quick and easy to whip up!
Finished Measurements
| Part | Width / Diameter | Length / Height |
|---|---|---|
| Bell Cup (each) | 2.5 in / 6.4 cm | 1.75 in / 4.4 cm |
| Twisted Cord | 0.5 in / 1.3 cm | 28 in / 71.1 cm |
| Complete Hanger | 8 in / 20.3 cm (at bow) | 36 in / 91.4 cm (total drop) |
Materials You Will Need
| Material / Color | Type / Weight | Yardage / Quantity |
|---|---|---|
| Forest Green | Aran / Worsted (100% Acrylic) | 25 yards / 23 meters |
| Dark Red | Aran / Worsted (100% Acrylic) | 25 yards / 23 meters |
| Cream | Aran / Worsted (100% Acrylic) | 15 yards / 14 meters |
| Real Brass Sleigh Bells | 30 mm to 40 mm brass craft bells | 5 bells |
| Crochet Hook | 4.0 mm (US G/6) | 1 hook |
| Notions | Tapestry needle, scissors, measuring tape | As needed |
Yarn Suggestions
| Yarn Line | Weight | Notes |
|---|---|---|
| Caron Simply Soft | Aran / Worsted | Great stitch definition and lovely sheen for holidays. |
| Red Heart Super Saver | Aran / Worsted | Durable, holds its shape well for hanging decor. |
| Lion Brand Vanna’s Choice | Aran / Worsted | Excellent structure for small 3D cups and bows. |
⚠️ Note: Avoid novelty fuzzy or eyelash yarns for this project, as you want the clean stitch definition of the bell cups to show clearly against the metal bells.
Gauge
- Bell Cup Base: First 3 rounds of flat circle = 1.5 in / 3.8 cm across using a 4.0 mm hook.
Abbreviations
- ch: chain
- sc: single crochet
- hdc: half double crochet
- sl st: slip stitch
- st(s): stitch(es)
- rnd(s): round(s)
- row(s): row(s)
- rep: repeat
- picot: chain 3, sl st in the 3rd ch from hook
- FO: fasten off
UK: sc = dc, hdc = htr, dc = tr.
Special Stitches Explained
- Magic Ring: Wrap yarn around your index finger twice to form a loop, insert hook, draw up a loop, and work your starting stitches into the ring.
- Picot Edge: Chain 3, then insert your hook back into the slip stitch or base stitch just worked and pull through to create a tiny decorative loop.
Pattern Instructions
Pattern Notes
- Bell cups are worked in continuous spiral rounds without joining, unless otherwise stated. Use a stitch marker to keep track of the first stitch of each round.
- The cord is made by twisting two long chains together securely.
- Space the bell cups roughly 8 cm (approx. 3 inches) apart along the cord during assembly.
Section 1: Bell Cups (Make 3 in Forest Green, Make 2 in Dark Red)
Working in continuous rounds from the top down. Place your bell inside as you work the final rounds to ensure a snug fit.
- Rnd 1: With Forest Green (or Dark Red), make a magic ring, work 6 sc into the ring (6 sc).
- Rnd 2: Work 2 sc in each st around (12 sc).
- Rnd 3: (1 sc in next st, 2 sc in next st) rep around (18 sc).
- Rnds 4 to 6: 1 sc in each st around (18 sc).
- Rnd 7: (1 sc in next 2 sts, 2 sc in next st) rep around (24 sc).
- Rnd 8 (Picot Edge): (1 sc, picot, 1 sc) in next st, sl st in next st rep around, FO, leaving a 6 in / 15 cm tail for weaving (36 sts including picots).
✅ Checkpoint: You should have 3 Forest Green cups and 2 Dark Red cups. Insert one brass bell into each cup—the top loop of the bell should poke out the top center of Rnd 1.
Section 2: Twisted Cord
- Step 1: Using Dark Red, ch 150. Fasten off, leaving a 12 in / 30 cm tail.
- Step 2: Using Cream, ch 150. Fasten off, leaving a 12 in / 30 cm tail.
- Step 3: Hold the Dark Red chain and Cream chain together at one end and tie them securely to the top loop of the uppermost Forest Green bell cup.
- Step 4: Twist the two chains tightly in opposite directions until the cord begins to double back on itself naturally. Secure the bottom end with a knot so it stays twisted.
Section 3: Bow
- Row 1: With Dark Red, ch 11, hdc in 3rd ch from hook (skipped 2 chs count as first hdc), hdc in each ch across, turn (10 hdc).
- Rows 2 to 6: Ch 2 (does not count as st), hdc in each st across, turn (10 hdc). FO after Row 6, leaving a long tail to wrap the center.
- Center Band: Ch 5, sc in 2nd ch from hook and across (4 sc). Work 3 rows of 4 sc. Wrap this small strip tightly around the center of the large bow piece to pinch it into a bow shape, and secure with stitches at the back.
Assembly
- Lay your twisted cord flat. Starting about 4 inches below the top doorknob loop, attach the first Forest Green bell cup by weaving the top loop of the bell and the top of the cup securely to the twisted cord using the yarn tails.
- Space the remaining bells approximately 3 inches (8 cm) apart down the cord in alternating order: Forest Green, Dark Red, Forest Green, Dark Red, Forest Green.
- Securely attach the completed bow to the very top loop of the twisted cord where it hangs over the doorknob.
Finishing
Weave in all remaining yarn ends securely inside the bell cups and at the back of the bow. Trim excess yarn. Hang your completed jingle bell door hanger on your front door knob or a wall hook.
Size Customization Tips
- Make it longer: Add more bell cups and lengthen the starting chains for the twisted cord by increments of 50 chains.
- Make it shorter: Reduce the number of bell cups to three and shorten the chain length to 100 for a more compact hanging decoration.
Care Instructions
Spot clean gently with a damp cloth and mild soap if needed. Do not submerge brass bells in water to prevent tarnishing. Store flat in a dry place during the off-season.
FAQ
Can I use different size bells?
Yes! Just adjust the size of your crochet cup by adding or omitting increase rounds so the cup fits snugly over the top half of your chosen bell.
What yarn weight works best?
Standard Aran or worsted weight acrylic yarn works best because it provides enough structure for the bell cups to hold their shape without flopping.
Is this safe to use around young children and pets?
The brass bells are securely tied inside the crochet cups, but always ensure hanging items are placed out of reach of very small children or pets who might pull on the cord.
Happy Crocheting!
I hope you love hearing your new jingle bell door hanger ring every time family and friends visit this holiday season! Save this pin on Pinterest and leave a comment below to let me know which colors you chose for your door decor.
📄 Your free PDF pattern