











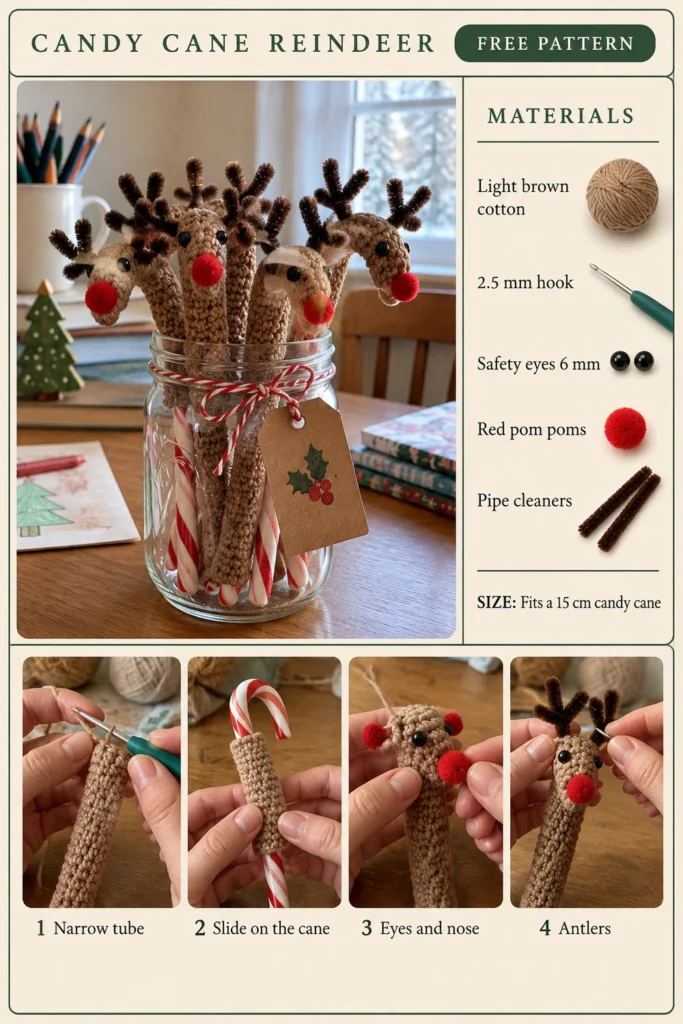
Candy cane reindeer are the classic holiday classroom gift, and this sweet crochet cover turns a simple treat into a festive handmade character. Each cozy is a snug narrow tube that slides right over a standard candy cane, topped with safety eyes, a red pom pom nose, and twisted pipe-cleaner antlers while the curve of the cane creates the reindeer head.
Crochet Candy Cane Reindeer Covers Free Christmas Pattern
Quick Facts
- Skill level: Beginner
- Finished size: Fits a 15 cm candy cane
- Yarn: Light brown cotton
- Hook: 2.5 mm
- Stitches used: ch, sl st, sc
- Time to make: Under 1 hour
Size adjustment tips and customization ideas are included further down.
What Makes This Crochet Candy Cane Reindeer Cover Special
Working in continuous rounds of simple single crochet creates a sturdy, seamless tube that grips the candy cane tightly without slipping. Adding the chenille pipe cleaners for the antlers gives them a wonderful fuzzy, bendable texture that mimics real reindeer antlers, while the tiny red pom pom nose pops against the light brown cotton.
Skill Level
- Basic crochet stitches (chain, slip stitch, single crochet)
- Working in the round in a spiral
- Basic assembly and gluing or hot-gluing small notions
- Beginner friendly with step-by-step photos
Finished Measurements
- Width: 1.5 in / 3.5 cm
- Length: 4.5 in / 11 cm (fits a 15 cm candy cane)
Materials You Will Need
| Material | Description | Amount |
|---|---|---|
| Yarn | Light brown cotton fingering/sport weight | 15 yards / 14 meters |
| Hook | 2.5 mm crochet hook (US C/2 or B/1 equivalent) | 1 hook |
| Safety Eyes | 6 mm black plastic safety eyes with backs | 2 eyes per reindeer |
| Pom Poms | 10 mm red craft pom poms | 1 pom pom per reindeer |
| Pipe Cleaners | Brown chenille stems / pipe cleaners | 1.5 stems per reindeer |
| Notions | Tapestry needle, scissors, craft glue (optional for nose/antlers) | As needed |
Yarn Suggestions
| Yarn Line | Skein Yardage | Notes |
|---|---|---|
| Schachenmayr Catania | 137 yards / 125 meters per 50g | 100% mercerized cotton, holds shape beautifully |
| Hobbii Rainbow Cotton 8/4 | 186 yards / 170 meters per 50g | Soft cotton with great stitch definition |
| DMC Natura Just Cotton | 164 yards / 150 meters per 50g | Excellent matte finish for amigurumi |
⚠️ Note: Avoid fuzzy or novelty yarns for the tube, as they obscure stitch counts and prevent the cover from sliding smoothly onto the candy cane.
Gauge
- 22 sts x 24 rounds = 4 in / 10 cm in single crochet using a 2.5 mm hook.
- Rnds 1 to 3 of the narrow tube = 1.5 in / 3.5 cm across.
Abbreviations
- ch: chain
- sl st: slip stitch
- sc: single crochet
- st(s): stitch(es)
- rnd(s): round(s)
- rep: repeat
- [ ]: work instructions within brackets as directed
UK terms equivalent: sc = dc.
Special Stitches Explained
There are no complex special stitches in this pattern. All pieces are worked in basic single crochet using continuous spiral rounds without joining with a slip stitch at the end of each round unless specified. Use a stitch marker to track the first stitch of each round.
Pattern Instructions
Section 1: Narrow Tube (Light brown cotton, make 1)
Rnd 1: Leaving a 6 in / 15 cm starting tail, ch 10, join with a sl st to the first ch to form a secure ring, or make a magic ring of 10 sc. (10 sc)
Rnds 2 to 33: sc in each st around. (10 sc per rnd)
Fasten off, leaving a 6 in / 15 cm tail for closing the top edge.
✅ Checkpoint: You should have a narrow, sturdy tube measuring approximately 4.5 in / 11 cm in length. Weave in the starting tail inside the tube.
Assembly
- Slide on the cane: Take your crocheted narrow tube and slide it carefully over the straight portion of a 15 cm candy cane, pushing it all the way up until the crook of the candy cane emerges at the top as the reindeer head.
- Close the top: Thread the remaining top yarn tail onto your tapestry needle and weave it through the front loops of the final round of 10 sc. Pull tightly to cinch and close the top opening just beneath the crook of the candy cane. Secure and hide the yarn tail inside.
- Eyes and nose: Insert the 6 mm safety eyes into the upper section of the tube just below the curve, spacing them about 2 to 3 stitches apart. Secure the safety backings inside the tube (or embroider French knots / small stitches with black yarn if making this for a young child). Glue or sew the 10 mm red pom pom centrally between and slightly below the eyes to form the red nose.
- Antlers: Take one brown pipe cleaner, cut it into one main 3 in piece and two smaller 1 in pieces. Twist the smaller pieces around the top of the main piece to form branched antlers. Push the bottom end of the pipe cleaner straight down into the top opening of the tube behind the candy cane crook, bending as needed to secure it firmly.
Size Customization Tips
- If your candy canes are slightly shorter or longer than 15 cm, simply adjust the number of straight rounds in Section 1 (add or subtract rounds as needed before closing the top).
- Each extra 3 rounds adds about 0.5 in / 1.3 cm to the length of the tube.
Care Instructions
Spot clean gently with a damp cloth if needed. Remove the candy cane before cleaning. Do not submerge in hot water to preserve the candy cane and cardboard/paper tags.
FAQ
Can I use hot glue instead of sewing the nose and antlers?
Yes! A tiny dot of hot glue or strong craft glue works wonderfully for securing the red pom pom nose and anchoring the pipe cleaner antlers quickly, which is ideal if you are making a large batch for a classroom.
Are safety eyes safe for toddlers?
Safety eyes have small plastic backs that can pose a choking hazard for children under 3 years old. For classroom gifts intended for toddlers or babies, embroider small French knots or simple black straight stitches for the eyes instead.
What size candy cane does this pattern fit?
This pattern is specifically designed to fit a standard 15 cm (about 6 inches) candy cane snugly.
Happy Crocheting!
I hope you love making these adorable candy cane reindeer covers as much as I do! They make wonderful, quick holiday gifts for classmates, teachers, and coworkers. Save this pattern on Pinterest, and be sure to leave a comment below sharing what colors you used for your reindeer herd!
📄 Your free PDF pattern