












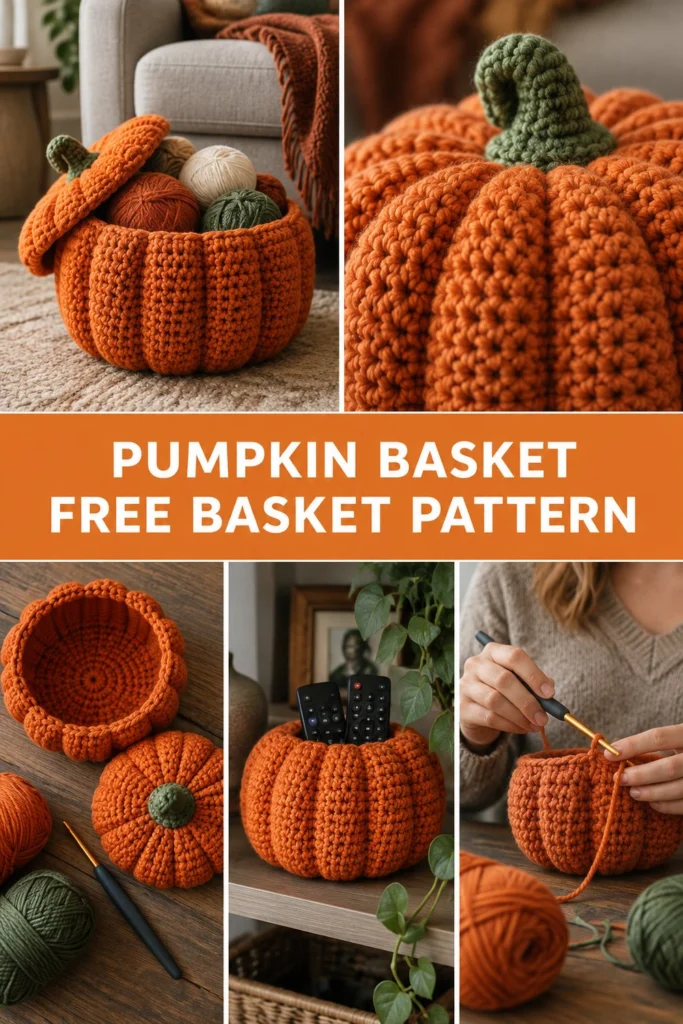
Fall is my absolute favorite time to grab a chunky yarn and a cozy hook, and this adorable pumpkin basket completely steals the show on any living room shelf. Whether you use it to wrangle remote controls on the coffee table or hide your extra yarn balls, it brings instant seasonal charm to your home decor.
Quick Facts
- Skill level: Intermediate
- Finished size: 9 inches (23 cm) in diameter, 6 inches (15 cm) in height (excluding stem)
- Yarn: Bulky weight (No. 5) yarn, held double for maximum sturdiness
- Hook: US L/11 (8.0 mm) crochet hook
- Stitches used: ch, sl st, sc, hdc, dc, FPdc, BLO
- Time to make: 4 to 6 hours
💡 Designer Tip: Size adjustment notes and gauge tips are included further down to help you customize your basket dimensions!
What Makes This Crochet Pumpkin Storage Basket Special
This design relies on a flat circular base that transitions seamlessly into sturdy ribbed sides using Front Post double crochet stitches. Holding your yarn double gives the basket a rigid, self-standing structure so it never slumps over, while the matching lid features a tightly crocheted stem handle that makes opening and closing effortless.
Skill Level
- Working in the round (spiral and joined)
- Front post double crochet (FPdc) texture work
- Back loop only (BLO) turning round
- Working in the round to create a flat base
⚠️ Note: Don’t worry if you haven’t mastered post stitches yet; the step-by-step instructions below guide you through every single round!
Finished Measurements
| Dimension | Inches | Centimeters |
|---|---|---|
| Base Diameter | 7.5 in | 19 cm |
| Total Width | 9.0 in | 23 cm |
| Basket Height | 6.0 in | 15 cm |
| Lid Diameter | 7.5 in | 19 cm |
Materials You Will Need
| Color / Item | Yarn Weight / Type | Yards | Meters |
|---|---|---|---|
| Pumpkin Orange (Main Color) | Bulky (No. 5) acrylic/wool blend | 350 yds | 320 m |
| Stem Green (Contrast Color) | Bulky (No. 5) acrylic/wool blend | 50 yds | 46 m |
- Crochet Hook: US L/11 (8.0 mm)
- Notions: Yarn needle for weaving ends, stitch markers (2), scissors, fiberfill stuffing (small handful for the stem)
Yarn Suggestions
| Brand | Yarn Line | Weight | Notes |
|---|---|---|---|
| Lion Brand | Hue + Me | Bulky (No. 5) | Excellent stiffness and stitch definition |
| Bernat | Softee Chunky | Bulky (No. 5) | Soft yet holds shape well when held double |
| Premier Yarns | Deborah Norville Everyday Bulky | Bulky (No. 5) | Durable acrylic with great yardage |
⚠️ Note: Avoid loosely spun roving yarns for this project. You need a sturdy plied yarn that holds its shape when working post stitches.
Gauge
- 8 sts x 8 rows = 4 inches (10 cm) in single crochet with yarn held double using an 8.0 mm hook.
- Rnds 1 to 5 of the flat circle = 5.5 inches (14 cm) across.
Abbreviations
- ch: chain
- sl st: slip stitch
- sc: single crochet
- hdc: half double crochet
- dc: double crochet
- FPdc: front post double crochet
- BLO: back loop only
- inc: increase (work 2 sc in the same st)
- dec: decrease (single crochet 2 stitches together)
- st(s): stitch(es)
- rnd(s): round(s)
- sk: skip
- rep: repeat
- [ ]: work instructions within brackets as directed
UK terminology note: sc = dc, hdc = htr, dc = tr.
Special Stitches Explained
- Front Post Double Crochet (FPdc): Yarn over, insert hook from front to back to front around the post of the specified stitch from the previous row, yarn over, pull up a loop, [yarn over, pull through 2 loops] twice.
- Invisible Decrease (inv-dec): Insert hook into the front loop only of the next stitch, then insert hook into the front loop only of the following stitch. Yarn over and draw through both front loops, yarn over and draw through remaining 2 loops on hook.
Pattern Instructions
Pattern Notes:
– Hold all yarn double throughout the entire project.
– The basket base is worked in continuous spiral rounds; do not join unless specified. Use a stitch marker to track the first stitch of each round.
– The sides and lid use joined rounds. Chain-1 or chain-2 at the start of a round does not count as a stitch unless stated otherwise.
Section 1: Basket Base (Pumpkin Orange, make 1)
Using yarn held double and 8.0 mm hook, make a magic ring.
– Rnd 1: 6 sc in magic ring (6 sc)
– Rnd 2: [inc] x 6 (12 sc)
– Rnd 3: [1 sc, inc] x 6 (18 sc)
– Rnd 4: [2 sc, inc] x 6 (24 sc)
– Rnd 5: [3 sc, inc] x 6 (30 sc)
– Rnd 6: [4 sc, inc] x 6 (36 sc)
– Rnd 7: [5 sc, inc] x 6 (42 sc)
– Rnd 8: [6 sc, inc] x 6 (48 sc)
– Rnd 9: [7 sc, inc] x 6 (54 sc)
– Rnd 10: [8 sc, inc] x 6 (60 sc)
– Rnd 11: [9 sc, inc] x 6 (66 sc)
– Rnd 12: [10 sc, inc] x 6 (72 sc)
✅ Checkpoint: You should have a flat circle measuring 7.5 inches across with 72 stitches.
Section 2: Basket Sides (Pumpkin Orange, make 1)
- Rnd 13: Working in BLO only, sc in each st around, sl st to first sc to join (72 sc)
- Rnds 14 to 22 (9 rounds): Ch 2 (does not count as st), 1 dc in next st, 1 FPdc around the post of the next st below rep from * around, sl st to first dc to join (72 sts)
- Rnd 23: Ch 1, sc in each st around, sl st to first sc to join, fasten off securely and weave in ends (72 sc)
Section 3: Pumpkin Lid (Pumpkin Orange, make 1)
Using yarn held double and 8.0 mm hook, make a magic ring.
– Rnd 1: 6 sc in magic ring, sl st to join (6 sc)
– Rnd 2: Ch 1, 2 sc in each st around, sl st to join (12 sc)
– Rnd 3: Ch 1, [1 sc, inc] x 6, sl st to join (18 sc)
– Rnd 4: Ch 1, [2 sc, inc] x 6, sl st to join (24 sc)
– Rnd 5: Ch 1, [3 sc, inc] x 6, sl st to join (30 sc)
– Rnd 6: Ch 1, [4 sc, inc] x 6, sl st to join (36 sc)
– Rnd 7: Ch 1, [5 sc, inc] x 6, sl st to join (42 sc)
– Rnd 8: Ch 1, [6 sc, inc] x 6, sl st to join (48 sc)
– Rnd 9: Ch 1, [7 sc, inc] x 6, sl st to join (54 sc)
– Rnd 10: Ch 1, [8 sc, inc] x 6, sl st to join (60 sc)
– Rnd 11: Ch 1, [9 sc, inc] x 6, sl st to join (66 sc)
– Rnd 12: Ch 1, [10 sc, inc] x 6, sl st to join, fasten off orange yarn (72 sc)
Section 4: Stem Handle (Stem Green, make 1)
Using stem green held double and 8.0 mm hook, leave a long starting tail.
– Rnd 1: 6 sc in magic ring in center of lid (attach firmly through center loops of Rnd 1 of lid), sl st to join (6 sc)
– Rnds 2 to 6 (5 rounds): Ch 1, sc in each st around, sl st to join (6 sc)
– Rnd 7: Ch 1, [inc] x 6, sl st to join (12 sc)
– Rnd 8: Ch 1, [1 sc, inc] x 6, sl st to join (18 sc)
– Rnd 9: Ch 1, [1 sc, inv-dec] x 6, sl st to join (12 sc)
– Stuff the stem lightly with fiberfill now.
– Rnd 10: Ch 1, [inv-dec] x 6, sl st to join, fasten off leaving a tail (6 sc)
– Using your yarn needle, weave tail through remaining 6 loops and pull tight to close the stem tip.
Assembly & Finishing
- Lid Attachment: Ensure all loose yarn tails from the base and lid are securely woven in on the inside surfaces.
- Shaping: Gently press the base flat and mold the ribbed sides of the basket outward to accentuate the pumpkin ridges.
- Fit Test: Place the lid on top of the basket; it should rest snugly along Rnd 23 of the basket opening.
Size Customization Tips
To make your pumpkin basket wider, simply continue the flat base increase rounds (Rnds 13, 14, etc.) adding 6 stitches per round, and make sure your side stitch count matches your final base count. Each extra base round adds about 0.6 inches to the overall diameter.
Care Instructions
Spot clean your crochet pumpkin basket with a damp cloth and mild soap as needed. Do not submerge completely in water if fiberfill stuffing is packed tightly inside the stem. Lay flat to dry away from direct sunlight.
FAQ
Can I use single strands of super bulky yarn instead of holding bulky yarn double?
Yes! If you prefer not to hold two strands together, you can substitute a single strand of super bulky (No. 6) yarn with an appropriate hook size to maintain a stiff, sturdy fabric.
How do I make the pumpkin basket larger for heavy storage?
To increase capacity, add two more rounds to the flat base (ending with 84 stitches), and work 12 straight ribbed rounds for the sides. Always remember to maintain the 1-to-1 ratio for your dc and FPdc side stitches.
Is this basket safe for children’s toy storage?
Absolutely. Since there are no hard plastic parts, buttons, or wire frames used in this project, it is completely soft and safe for kids’ rooms, nurseries, and playrooms.
Happy Crocheting!
I hope you love making your new fall storage basket as much as I loved designing it! Save this pin on Pinterest so it’s ready when you are, and be sure to drop a comment below sharing what colors you decided to use for your pumpkin. Happy crafting!
📄 Your free PDF pattern