
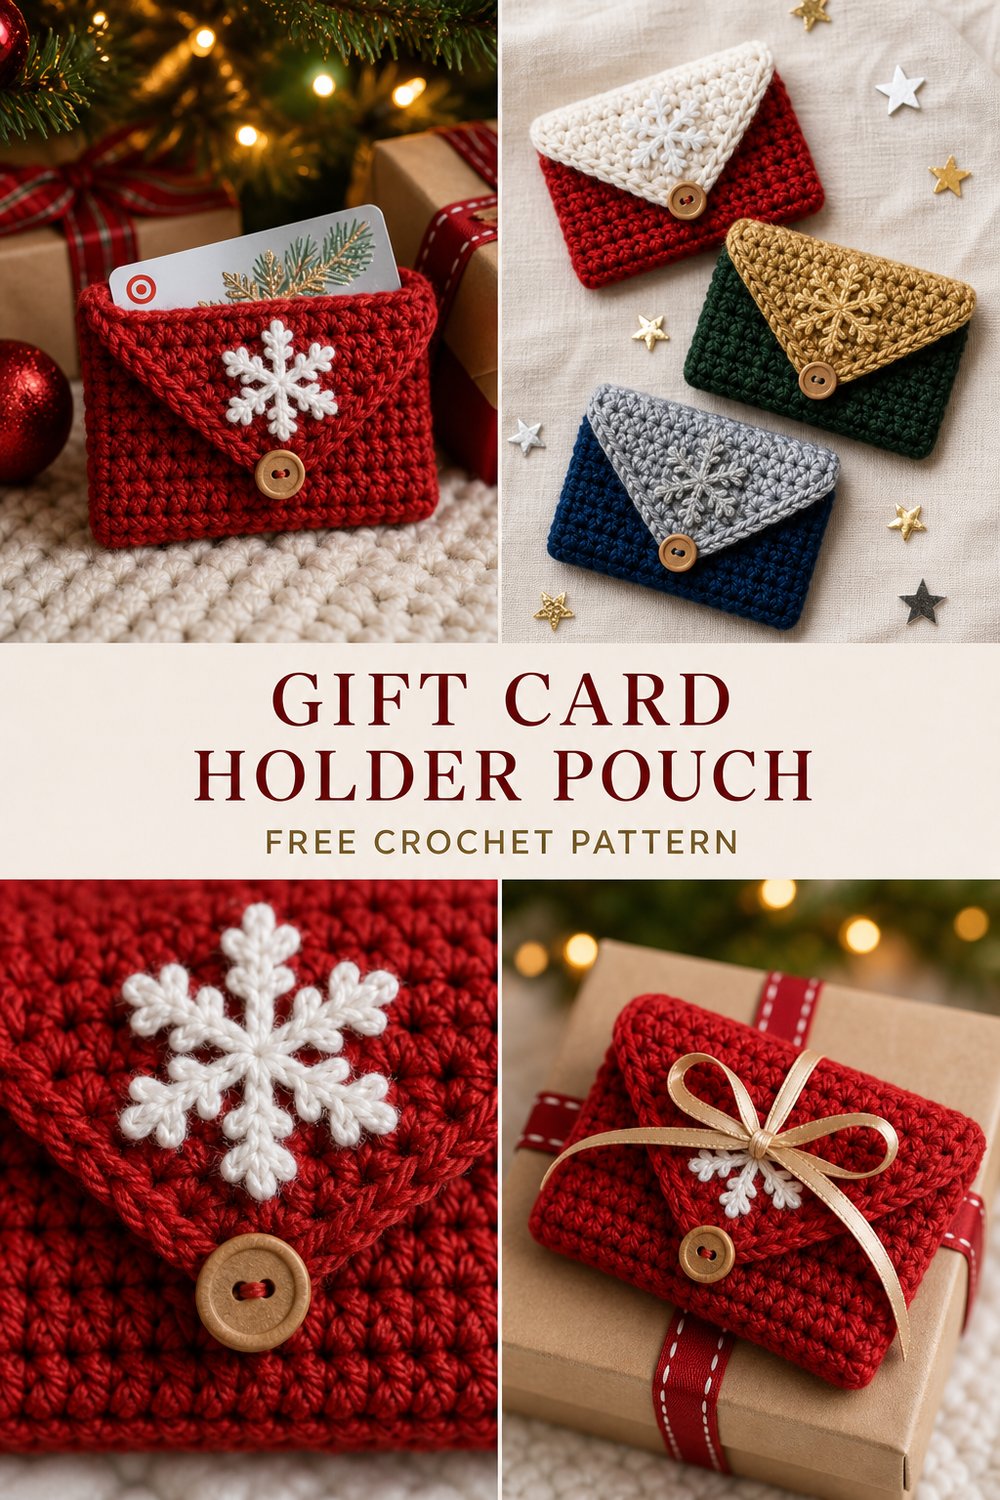
There is nothing quite like tucking a thoughtful present into a handmade envelope under the glow of a twinkling Christmas tree. This little pouch turns a simple gift card into a treasured keepsake that your loved ones will want to save and reuse year after year.
Festive Crochet Gift Card Holder Pouch Free Crochet Pattern
Quick Facts
- Stitches Used: Chain (ch), single crochet (sc), half double crochet (hdc), slip stitch (sl st), surface slip stitch.
- Size Fit: Fits standard credit-card-sized gift cards (approx. 3.375″ x 2.125″ / 8.6cm x 5.4cm).
- Estimated Time to Complete: 1 to 2 hours.
- Gift-Appeal Framing: Quick to whip up, highly customizable, and makes an exceptional last-minute holiday gift, stocking stuffer, or gift topper.
Sizing customization tips are included later in this guide to help you adapt the pouch for chunkier cards or miniature notes.
What Makes This Festive Crochet Gift Card Holder Pouch Special
This design relies on clever construction and crisp textural contrast to deliver a professional finish. Working the pouch body in a sturdy half double crochet fabric ensures the gift card stays secure without stretching out over time. The envelope flap is shaped using simple decreases, folding neatly down over the front pouch and fastening securely with a petite button. Topping it off with a delicate 2-inch white snowflake appliqué transforms a simple utilitarian sleeve into a festive holiday heirloom.
Skill Level
- Beginner-Friendly with Intermediate Details: Requires basic crochet stitches, flat panel working, and optional small appliqué placement.
- Required Skills:
- Working in rows and turning.
- Basic increases and decreases (sc2tog).
- Working simple surface stitches or sewing a flat appliqué.
- Sewing on a small button and weaving in ends securely.
- Reassurance: If you can make a basic washcloth and sew a button, you can easily master this pattern in a single afternoon!
Finished Measurements
| Measurement | Inches | Centimeters |
|---|---|---|
| Width | 4.0 inches | 10.2 cm |
| Height (Closed) | 2.75 inches | 7.0 cm |
| Height (Open Flap) | 4.5 inches | 11.4 cm |
Materials You Will Need
- Yarn Weight: Sport / Fine weight (#2) 100% cotton yarn for crisp stitch definition.
- Hook: US C/2 (2.75 mm) crochet hook.
- Notions: Tapestry needle, scissors, 1 tiny button (approx. 3/8 inch / 10mm diameter), sewing needle and matching thread.
| Color Name & Order | Yarn Weight / Fiber | Estimated Yardage Needed |
|---|---|---|
| 1. Red | Sport Weight / 100% Cotton | 25 yards (23 meters) |
| 2. Forest Green | Sport Weight / 100% Cotton | 25 yards (23 meters) |
| 3. Blue | Sport Weight / 100% Cotton | 25 yards (23 meters) |
| 4. White | Sport Weight / 100% Cotton | 10 yards (9 meters) |
| 5. Gold | Sport Weight / 100% Metallic Thread or Cotton | 5 yards (4.5 meters) |
💡 Designer Tip: Feel free to mix and match your colorways as shown in the flat-lay trio: pair Red with White, Forest Green with Gold, and Blue with Silver for a cohesive holiday set!
Yarn Suggestions
| Yarn Brand & Line | Weight | Yards per Skein | Notes |
|---|---|---|---|
| Schachenmayr Catania | Sport (#2) | 137 yds (125 m) | Exceptional color range, beautiful stitch definition, 100% mercerized cotton. |
| Knit Picks CotMera | Sport (#2) | 125 yds (114 m) | Wonderfully soft yet sturdy, holds its shape exceptionally well for small pouches. |
| Hobbii Rainbow Cotton 8/6 | Sport (#2) | 115 yds (105 m) | Budget-friendly with a huge palette of festive shades. |
⚠️ Note: Avoid fuzzy acrylic or mohair yarns for this project. They obscure the stitch definition, catch on the gift card edges, and hide the sharp geometric lines of the envelope flap.
Gauge
| Measurement Type | Stitches / Rows | Imperial | Metric |
|---|---|---|---|
| Hdc Gauge | 20 sts x 16 rows | 4 inches | 10 cm |
| Snowflake Motif | Diameter | 2.0 inches | 5.0 cm |
⚠️ Note: Gauge is not strictly critical for a gift card holder, but maintaining a firm tension ensures your pouch stays neat and prevents the card from slipping through the stitches. Take time to swatch if you are a loose crocheter!
Abbreviations
| Abbreviation | Full Term |
|---|---|
| ch | Chain |
| sc | Single crochet |
| hdc | Half double crochet |
| sl st | Slip stitch |
| st(s) | Stitch(es) |
| sc2tog | Single crochet 2 stitches together (decrease) |
| hdc2tog | Half double crochet 2 stitches together (decrease) |
| FO | Fasten off |
Special Stitches Explained
- sc2tog (Single Crochet 2 Together): Insert hook into next stitch, yarn over, pull up a loop (2 loops on hook). Insert hook into following stitch, yarn over, pull up a loop (3 loops on hook). Yarn over and pull through all 3 loops on hook.
- hdc2tog (Half Double Crochet 2 Together): Yarn over, insert hook into next stitch, yarn over, pull up a loop (3 loops on hook). Yarn over, insert hook into following stitch, yarn over, pull up a loop (5 loops on hook). Yarn over and pull through all 5 loops on hook.
Pattern Instructions
Section 1: Pouch Body & Flap
Working from the bottom up in one continuous piece.
- Row 1: Leaving a 6-inch starting tail, ch 21, working in the back bumps of the chain, hdc in 3rd ch from hook (skipped 2 chs count as first hdc), hdc in each ch across, turn. (20 hdc)
- Row 2: Ch 2 (counts as first hdc here and throughout), hdc in each st across, turn. (20 hdc)
- Rows 3–10: Repeat Row 2. (20 hdc)
- Row 11 (Start of Flap Shaping): Ch 1, sc2tog, sc in next 16 sts, sc2tog, turn. (18 sc)
- Row 12: Ch 1, sc across, turn. (18 sc)
- Row 13: Ch 1, sc2tog, sc in next 14 sts, sc2tog, turn. (16 sc)
- Row 14: Ch 1, sc across, turn. (16 sc)
- Row 15: Ch 1, sc2tog, sc in next 12 sts, sc2tog, turn. (14 sc)
- Row 16: Ch 1, sc2tog, sc in next 5 sts, ch 2 (creates buttonhole loop), skip 2 sts, sc in next 3 sts, sc2tog, turn. (10 sc, 1 ch-2 space)
- Row 17: Ch 1, sc2tog, sc in next 3 sts, work 2 sc into ch-2 space, sc in next 3 sts, sc2tog. (10 sc)
- FO, weave in starting tail securely.
✅ Checkpoint: At the end of Row 17, your piece should measure approximately 4 inches wide by 4.5 inches tall when laid completely flat.
Section 2: Snowflake Appliqué (Make 1 in White)
- Rnd 1: Magic ring, ch 1, work 6 sc into ring, join with sl st to first sc. (6 sc)
- Rnd 2: (Ch 5, sl st in 2nd ch from hook and next 3 chs, sl st into next sc of ring) repeat 6 times total around the ring. (6 snowflake points)
- FO, leaving a 12-inch tail for sewing.
Section 3: Assembly & Finishing
- Fold the Pouch: Lay the main piece flat with the right side facing you. Fold the bottom straight edge upward to meet the start of the flap shaping (Row 11). This creates a pocket that is 10 rows deep (approx. 2.5 inches tall).
- Seam Sides: Using your starting/ending tails or a matching length of yarn, whipstitch or mattress-stitch the left and right side seams closed from the fold up to the top of the pocket opening.
- Attach Snowflake: Position the 2-inch white snowflake appliqué centrally onto the front triangle of the pointed flap. Secure it neatly using the 12-inch tail and tapestry needle.
- Attach Button: Fold the pointed flap down over the front pouch. Mark the placement of the button through the center of the ch-2 buttonhole loop. Sew the tiny button securely onto the front of the pouch body using sewing thread.
- Final Press: Weave in all remaining loose ends cleanly on the inside of the pouch. Slip a gift card inside, button closed, and enjoy!
Size Customization Tips
- To fit wider cards or multiple cards: Increase your foundation chain by multiples of 2 sts (e.g., ch 23 instead of 21), ensuring you adjust your side row counts to match the new width. Each increase of 2 stitches adds approximately 0.4 inches (1 cm) to the total width.
- To make a taller pouch: Add 2 to 4 extra rows of hdc before beginning the flap shaping in Row 11.
Care Instructions
- Hand wash gently in cool water using mild wool or cotton detergent.
- Do not bleach or tumble dry.
- Lay flat to dry on a clean towel, reshaping gently while damp.
- Warm iron on cotton setting if needed, avoiding the button.
Festive Crochet Gift Card Holder Pouch
Thank you so much for crocheting along with me today! I hope you thoroughly enjoyed making this festive gift card pouch. If you make one (or a whole forest of them for the holidays!), please share your creations online. Tag me on social media using #FestiveGiftCardPouch and #HookedByDesign, save this pattern to your holiday DIY boards on Pinterest, and drop a comment below to let me know which colorway is your favorite! Happy crocheting!