
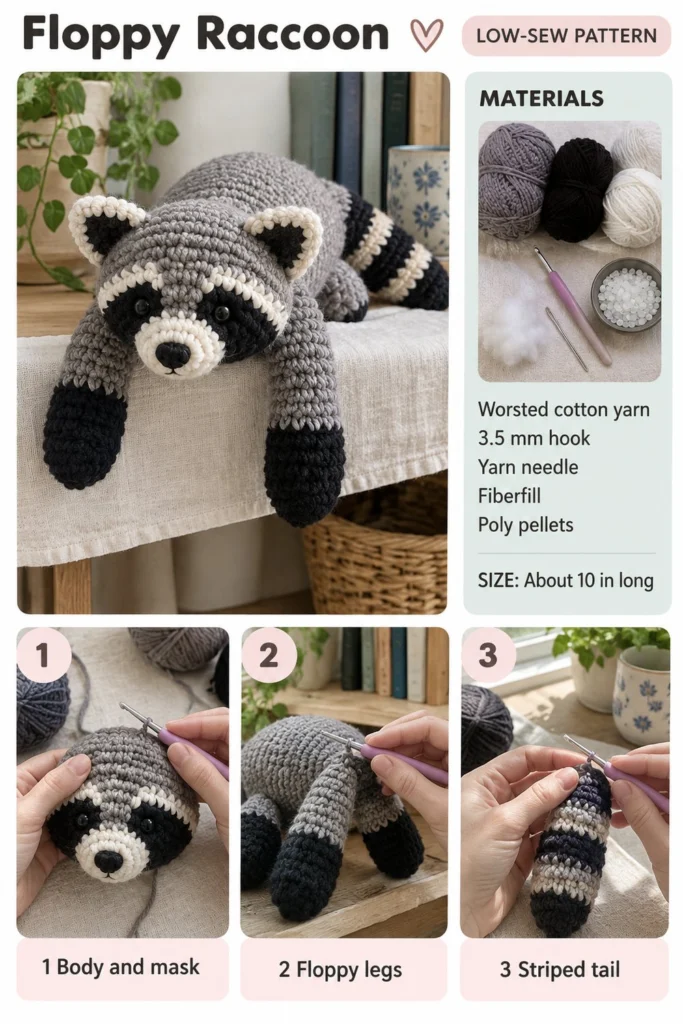
Crochet yourself an adorable, floppy woodland companion with this free low-sew amigurumi pattern! Featuring a signature bandit mask, weighted pellet belly, and striped tail, this cute little raccoon is a wonderful handmade gift that comes together surprisingly quickly.
Cute Crochet Floppy Raccoon – Free Low-Sew Amigurumi Pattern
Quick Facts
- Skill level: Intermediate
- Finished size: About 10 inches long from nose to tail tip
- Yarn: Worsted weight cotton yarn in Grey, Black, and Cream
- Hook: 3.5 mm (US E/4) crochet hook
- Stitches used: sc, inc, dec, sl st
- Time to make: 4 to 6 hours
Size customization tips are included further down in the guide.
What Makes This Crochet Floppy Raccoon Special
This pattern is designed with a low-sew construction approach, meaning the head, body, and tail are worked in continuous rounds seamlessly or attached with minimal stitching. The arms and legs are weighted with poly pellets for that floppy, huggable feel, and the raccoon’s distinct facial mask is worked directly into the head color changes so you don’t have to fiddle with felt pieces.
Skill Level
- Working in continuous spiral rounds (amigurumi style)
- Making invisible decreases and color changes in sc
- Basic sewing and stuffing techniques
You do not need to be an expert amigurumi maker to tackle this project—just take it one round at a time!
Finished Measurements
- Length: 10 inches (25.4 cm)
- Body Width: 3.5 inches (8.9 cm)
Materials You Will Need
| Material | Description / Color | Quantity | Yards / Meters |
|---|---|---|---|
| Worsted Cotton Yarn | Grey | 1 skein | ~100 yds (91 m) |
| Worsted Cotton Yarn | Black | 1 skein | ~60 yds (55 m) |
| Worsted Cotton Yarn | Cream | 1 small ball | ~25 yds (23 m) |
| Crochet Hook | 3.5 mm (US E/4) | 1 | – |
| Notions | Yarn needle, stitch marker, scissors | 1 set | – |
| Filling | Polyester fiberfill | As needed | – |
| Weighting | Poly pellets (and small fabric pouch if needed) | 1/2 cup | – |
Yarn Suggestions
| Yarn Line | Skein Yardage | Notes |
|---|---|---|
| Lion Brand 24/7 Cotton | 186 yds / 100g | Great stitch definition and sturdy cotton |
| Drops Paris | 82 yds / 50g | Soft, matte finish, budget-friendly |
| Lily Sugar’n Cream | 120 yds / 71g | Readily available worsted cotton |
⚠️ Note: Avoid fuzzy or novelty yarns for this project, as they make it difficult to see the stitches and color changes required for the mask and stripes.
Gauge
- Stitch Gauge: 5 sts x 5 rows = 1 inch in single crochet using a 3.5 mm hook.
- Circle Gauge: Rnds 1 to 6 of the flat circle = 2 inches across.
Abbreviations
- ch: chain
- sc: single crochet
- inc: single crochet increase (2 sc in one stitch)
- dec: invisible single crochet decrease (sc 2 together through front loops)
- sl st: slip stitch
- st(s): stitch(es)
- rnd(s): round(s)
- rep: repeat
- FO: fasten off
UK terms equivalent: sc = dc, hdc = htr, dc = tr.
Special Stitches Explained
- Magic Ring: Wrap yarn around your index finger twice, insert hook under loops, pull up a loop, ch 1, and work the first round of stitches into the ring. Pull tail to close.
- Invisible Decrease (dec): Insert hook into the front loop only of the next stitch, then insert hook into the front loop only of the following stitch (3 loops on hook). Yarn over and pull through first 2 loops, yarn over and pull through remaining 2 loops.
Pattern Instructions
Pattern Notes: Work in continuous spiral rounds without joining unless specified. Use a stitch marker to keep track of the first stitch of each round. Stuff firmly as you go, adding poly pellets to the bottom of the body and limbs for the signature floppy weight.
Section 1: Head and Body (Grey, Black, and Cream)
Start at the snout with Cream.
– Rnd 1: 6 sc in a magic ring (6 sc)
– Rnd 2: inc x 6 (12 sc)
– Rnd 3: (1 sc, inc) x 6 (18 sc)
– Rnd 4: sc in each st around (18 sc)
Change to Black for the bandit mask.
– Rnd 5: (2 sc, inc) x 6 (24 sc)
– Rnds 6 to 7: sc in each st around (24 sc)
Change to Grey.
– Rnd 8: (3 sc, inc) x 6 (30 sc)
– Rnd 9: (4 sc, inc) x 6 (36 sc)
– Rnds 10 to 14: sc in each st around (36 sc)
Note: Insert safety eyes between Rnds 6 and 7 across the black mask area, about 6 sts apart. Embroider nose and muzzle details.
– Rnd 15: (4 sc, dec) x 6 (30 sc)
– Rnd 16: (3 sc, dec) x 6 (24 sc)
– Rnd 17: (2 sc, dec) x 6 (18 sc)
Start stuffing the head firmly with fiberfill.
– Rnd 18: (1 sc, dec) x 6 (12 sc)
Transition to body increases.
– Rnd 19: (1 sc, inc) x 6 (18 sc)
– Rnd 20: (2 sc, inc) x 6 (24 sc)
– Rnd 21: (3 sc, inc) x 6 (30 sc)
– Rnd 22: (4 sc, inc) x 6 (36 sc)
– Rnd 23: (5 sc, inc) x 6 (42 sc)
– Rnds 24 to 35: sc in each st around (42 sc)
Add poly pellets and fiberfill to the body.
– Rnd 36: (5 sc, dec) x 6 (36 sc)
– Rnd 37: (4 sc, dec) x 6 (30 sc)
– Rnd 38: (3 sc, dec) x 6 (24 sc)
– Rnd 39: (2 sc, dec) x 6 (18 sc)
– Rnd 40: (1 sc, dec) x 6 (12 sc)
– Rnd 41: dec x 6 (6 sc)
FO, leaving a long tail. Thread through front loops of Rnd 41 and pull tightly to close.
✅ Checkpoint: You should now have a fully formed, stuffed head-and-body cylinder with the black mask positioned under the eyes.
Section 2: Ears (Grey and Cream, make 2)
Start with Cream inner ear.
– Rnd 1: 4 sc in a magic ring (4 sc)
– Rnd 2: inc x 4 (8 sc)
Change to Grey.
– Rnd 3: (1 sc, inc) x 4 (12 sc)
– Rnds 4 to 5: sc in each st around (12 sc)
FO, leaving a long tail for sewing. Do not stuff. Fold flat and sew to the top of the head between Rnds 10 and 13.
Section 3: Arms (Black and Grey, make 2)
Start at paw with Black.
– Rnd 1: 6 sc in a magic ring (6 sc)
– Rnd 2: inc x 6 (12 sc)
– Rnds 3 to 5: sc in each st around (12 sc)
Change to Grey.
– Rnds 6 to 14: sc in each st around (12 sc)
Lightly stuff the paw with fiberfill and pellets, leaving upper arm unstuffed for flop factor.
– Rnd 15: Fold opening flat and sc across both sides to close (6 sc). FO, leaving a long tail. Attach to upper body sides below the head.
Section 4: Legs (Black and Grey, make 2)
Start at foot with Black.
– Rnd 1: 6 sc in a magic ring (6 sc)
– Rnd 2: (1 sc, inc) x 3 (9 sc)
– Rnd 3: (2 sc, inc) x 3 (12 sc)
– Rnds 4 to 6: sc in each st around (12 sc)
Change to Grey.
– Rnds 7 to 16: sc in each st around (12 sc)
Lightly stuff foot, leaving leg upper section loose and floppy.
– Rnd 17: Fold opening flat and sc across both sides to close (6 sc). FO, leaving a long tail. Attach to the lower rear of the body.
Section 5: Striped Tail (Grey, Black, and Cream, make 1)
Start at tip with Black.
– Rnd 1: 6 sc in a magic ring (6 sc)
– Rnd 2: inc x 6 (12 sc)
– Rnds 3 to 4: sc in each st around (12 sc)
Stripe Color Rotation: Work 2 rounds each in Cream, Black, Grey, Black, Cream, Black, Grey, Black.
– Rnds 5 to 20: Continue working 12 sc per round following the color rotation.
Stuff lightly as you go.
– Rnd 21: (2 sc, dec) x 3 (9 sc)
– Rnd 22: sc in each st around (9 sc)
FO, leaving a long tail. Sew the tail securely to the back of the body opposite the head.
Assembly & Finishing
- Head Attachment: If made separately, sew head securely to the front body opening.
- Facial Embroidery: Use black embroidery floss to add a small triangular nose on the cream snout and whiskers if desired.
- Weaving Ends: Secure all yarn tails and weave them neatly inside the amigurumi body.
Size Customization Tips
To make a larger raccoon, switch to a bulky chenille yarn and a 5.0 mm hook. Each extra 6-stitch increase round added to the body increases the overall circumference by about 1.2 inches.
Care Instructions
Hand wash gently in cool water with mild soap. Lay flat to dry. Do not tumble dry, as the poly pellets and cotton can warp under high heat.
FAQ
Can I use safety eyes for babies?
For children under 3 years old, it is recommended to embroider the eyes using black embroidery floss instead of using plastic safety eyes to prevent any choking hazards.
How do I make the legs extra floppy?
Simply avoid stuffing the upper half of the legs and arms. Leaving them empty of fiberfill allows them to drape naturally when the raccoon is picked up.
Can I change the yarn weight?
Yes! You can use sport weight or DK yarn with a smaller hook for a miniature raccoon, or bulky yarn for a giant snuggle buddy. Just be sure to adjust your hook size so your stitches stay tight enough to keep the stuffing inside.
Happy Crocheting!
I hope you love making your new floppy raccoon! Be sure to save this pattern on Pinterest for later, and drop a comment below sharing what colors you decided to use for your forest friend. Happy hooking!
📄 Your free PDF pattern