
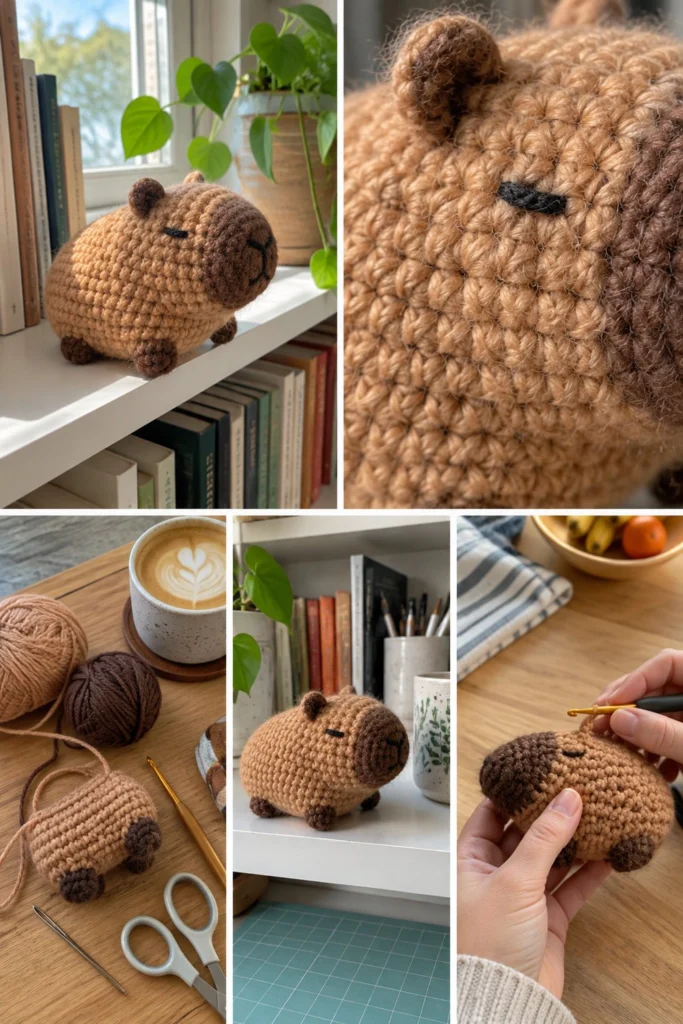
The calmest animal on the internet is now small enough to fit right in the palm of your hand. This adorable little amigurumi makes a wonderfully relaxing project and a treasured gift for animal lovers of all ages.
Cute Crochet Capybara Plushie – Free Amigurumi Pattern (Beginner Friendly)
Quick Facts
| Category | Detail |
|---|---|
| Skill level | Beginner friendly |
| Finished size | Approx. 5 inches (13 cm) long and 3.5 inches (9 cm) tall |
| Yarn | Worsted weight (Medium 4) in Caramel and Cocoa |
| Hook | US E/4 (3.5 mm) crochet hook |
| Stitches used | US terminology (MR, sc, inc, dec, sl st) |
| Time to make | 3 to 4 hours |
Size customization tips are included further down in the guide.
What Makes This Crochet Capybara Plushie Special
This pattern is designed to capture the iconic loaf shape of a real capybara with clean, continuous single crochet rounds. The body uses an even increase and decrease rhythm to build a chubby, self-supporting shape that sits flat on its tiny stubby legs. Embroidered sleepy eyes give it that trademark serene expression, while simple color changes on the snout create a realistic two-tone face.
Skill Level
- Basic understanding of amigurumi and working in the round
- Magic ring (MR)
- Single crochet (sc)
- Increasing (inc) and invisible decreasing (dec)
- Basic surface embroidery for the eyes and nose
Don’t worry if you are new to amigurumi—this pattern guides you through every step with clear counts and checkpoints!
Finished Measurements
| Dimension | Inches | Centimeters |
|---|---|---|
| Length | 5.0 in | 13.0 cm |
| Height | 3.5 in | 9.0 cm |
| Width | 3.0 in | 7.5 cm |
Materials You Will Need
| Material / Color | Type / Weight | Quantity |
|---|---|---|
| Caramel | Worsted Weight (Medium 4) Acrylic or Cotton | approx. 50 yards (45 meters) |
| Cocoa | Worsted Weight (Medium 4) Acrylic or Cotton | approx. 15 yards (14 meters) |
| Black (scrap) | Embroidery floss or yarn for eyes and nose | small amount |
| Hook | US E/4 (3.5 mm) crochet hook | 1 |
| Notions | Polyfill fiberfill stuffing | as needed |
| Notions | Yarn needle, stitch markers, embroidery needle, scissors | 1 set |
Yarn Suggestions
| Brand | Line | Skein Yardage | Notes |
|---|---|---|---|
| Lion Brand | Vanna’s Choice | 145 yds (133 m) per 100g | Great stitch definition for toys |
| Red Heart | Super Saver | 236 yds (215 m) per 141g | Budget-friendly and widely available |
| Paintbox Yarns | Simply Aran | 201 yds (184 m) per 100g | Huge range of caramel and brown shades |
⚠️ Note: Avoid novelty furry yarns for your main body, as they make it difficult to see your stitches while learning amigurumi shaping. Stick to smooth worsted weight yarns.
Gauge
- 16 sts x 18 rows = 4 inches (10 cm) in single crochet.
- Rnds 1 to 6 of the body flat circle = 1.75 inches (4.5 cm) across.
💡 Designer Tip: Keep your tension firm and consistent so the fiberfill stuffing does not poke through your stitches.
Abbreviations (US Terms)
| Abbreviation | Meaning |
|---|---|
| ch | chain |
| sc | single crochet |
| inc | increase (work 2 sc in the same st) |
| dec | invisible decrease (insert hook in front loops of next 2 sts, yo, pull through, yo, pull through) |
| sl st | slip stitch |
| st(s) | stitch(es) |
| MR | magic ring |
| Rnd(s) | round(s) |
| […] | repeat instructions inside brackets |
UK: sc = dc, hdc = htr, dc = tr.
Special Stitches Explained
- Magic Ring (MR): Wrap yarn around your index finger twice to create a ring, insert hook through the center, grab working yarn and pull up a loop, ch 1, and work your starting stitches into the ring. Pull the tail to close.
- Invisible Decrease (dec): Insert your hook under the front loop only of the next stitch, then immediately insert your hook under the front loop only of the following stitch. Yarn over and pull through both front loops, yarn over and pull through remaining two loops on hook.
Pattern Instructions
Pattern Notes
- The body, snout, and ears are worked in continuous spiral rounds without joining. Use a stitch marker to keep track of the first stitch of each round.
- Stuff the body firmly as you go, ensuring the bottom stays relatively flat so your capybara sits nicely on flat surfaces.
Body (Caramel and Cocoa)
Starting at the snout in Cocoa:
Rnd 1: Start 6 sc in a magic ring in Cocoa (6 sc)
Rnd 2: [inc] x 6 (12 sc)
Rnd 3: [1 sc, inc] x 6 (18 sc)
Rnd 4: [2 sc, inc] x 6 (24 sc)
Rnd 5: [3 sc, inc] x 6 (30 sc)
Rnd 6: sc in each st around (30 sc)
Switch to Caramel yarn on the last pull-through of Rnd 6.
Rnd 7: [4 sc, inc] x 6 in Caramel (36 sc)
Rnd 8: [5 sc, inc] x 6 (42 sc)
Rnd 9: [6 sc, inc] x 6 (48 sc)
Rnds 10 to 22: sc in each st around (48 sc)
✅ Checkpoint: At Rnd 22, embroider the eyes and nose before closing up the body. Place the nose on the front center of the cocoa snout using black yarn or embroidery floss. Stitch small slanted sleepy eyes across Rnds 9 to 10, about 6 stitches apart, positioned just behind the color change line.
Rnd 23: [6 sc, dec] x 6 (42 sc)
Rnd 24: [5 sc, dec] x 6 (36 sc)
Rnd 25: [4 sc, dec] x 6 (30 sc)
Start stuffing the body firmly with fiberfill.
Rnd 26: [3 sc, dec] x 6 (24 sc)
Rnd 27: [2 sc, dec] x 6 (18 sc)
Rnd 28: [1 sc, dec] x 6 (12 sc)
Finish stuffing completely.
Rnd 29: [dec] x 6 (6 sc)
Fasten off, leaving an 8-inch tail. Thread the tail through the front loops of the remaining 6 stitches and pull tight to close the opening. Weave in the end securely inside the body.
Ears (Make 2 in Cocoa)
Rnd 1: Start 5 sc in a magic ring in Cocoa (5 sc)
Rnd 2: [inc] x 5 (10 sc)
Rnd 3: sc in each st around (10 sc)
Fasten off, leaving a 6-inch tail for sewing. Do not stuff the ears; flatten them slightly before attaching.
Legs (Make 4 in Cocoa)
Rnd 1: Start 6 sc in a magic ring in Cocoa (6 sc)
Rnd 2: [inc] x 6 (12 sc)
Rnds 3 to 4: sc in each st around (12 sc)
Fasten off, leaving a 6-inch tail for sewing. Lightly stuff each stubby leg before attaching.
Assembly
- Ears: Sew the two ears onto the top back of the head, positioned between Rnds 12 and 15, roughly 8 stitches apart from each other.
- Legs: Sew the four stubby legs to the underside of the body. Place the front legs around Rnds 10 to 13 and the back legs around Rnds 18 to 21, ensuring they are even so the capybara sits stable and balanced on a shelf.
Finishing
- Weave in all remaining yarn tails securely inside the body parts.
- Use a strand of black embroidery floss to add a gentle horizontal line for the mouth just below the nose if desired.
Size Customization Tips
- To make a larger capybara, use bulky weight yarn (Weight 5) and a US J/10 (6.0 mm) hook. Each extra increase round added to the body adds approximately 1.5 inches to the overall length.
- To make a miniature capybara, use sport or fingering weight yarn with a 2.0 mm or 2.5 mm hook.
Care Instructions
- Hand wash gently in lukewarm water with mild detergent.
- Do not wring or twist.
- Reshape while damp and allow to air dry completely on a flat surface.
FAQ
Can I use safety eyes instead of embroidery?
Yes, you can use 6mm black safety eyes inserted between Rnds 9 and 10. However, embroidered eyes are strongly recommended if you are gifting this plushie to a baby or child under 3 years old to prevent any choking hazards.
How do I make sure the capybara sits flat without rolling over?
When stuffing the lower body and attaching the four stubby legs, make sure the bottom belly area is stuffed slightly flatter and position the legs evenly so they create a stable base.
What is the best way to get a clean color change between the cocoa snout and caramel body?
To avoid a jagged color step, work the final stitch of Rnd 6 up to the last yarn-over, then drop the Cocoa yarn and pull through with the Caramel yarn to start Rnd 7 cleanly.
Happy Crocheting!
I hope you adore stitching your very own sweet capybara plushie. Be sure to save this free crochet capybara plushie pattern to your favorite Pinterest boards, and leave a comment below to let me know what colors you used for your little loaf!
📄 Your free PDF pattern