
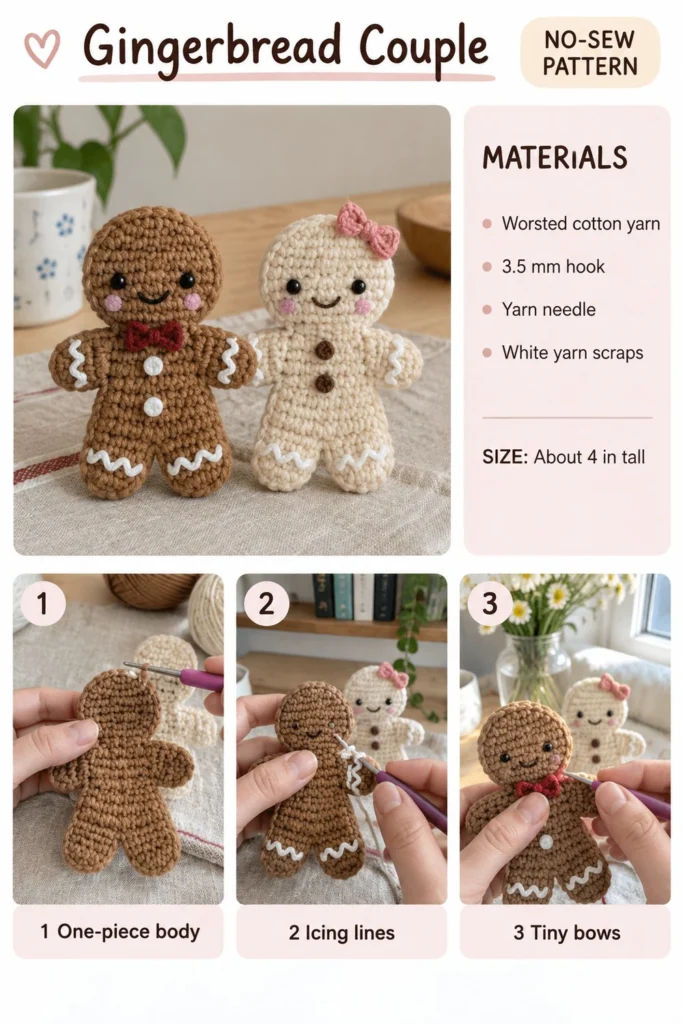
There is nothing quite like a pair of cute holiday figures to brighten up your winter home. This sweet pair of gingerbread friends features charming embroidered icing, rosy cheeks, and adorable tiny bows. Best of all, they are worked entirely in one continuous piece with zero sewing required!
No-Sew Crochet Gingerbread Couple – Free Amigurumi Pattern
Quick Facts
- Skill level: Easy
- Finished size: About 4 inches tall
- Yarn: Worsted weight cotton yarn
- Hook: 3.5 mm (E/4)
- Stitches used: US terms (sc, inc, dec, sl st)
- Time to make: 2 to 3 hours per figure
Size adjustment tips and customization guides are included further down the page.
What Makes This Gingerbread Couple Special
This project uses continuous rounds and a clever single-piece construction method to build the head, arms, body, and legs seamlessly. No separate limb attachments or sewing sessions are needed. The characteristic gingerbread look comes together with simple surface slip stitch embroidery for the white icing details and quick stitched bows.
Skill Level
- Working in continuous spiral rounds without joining
- Basic amigurumi increases and invisible decreases
- Surface slip stitch embroidery for icing
- Basic yarn needle embroidery for facial features
Don’t worry if you are new to amigurumi; the step-by-step instructions below guide you through every single turn.
Finished Measurements
- Width: 2.5 inches (6.5 cm) at the widest point across the arms
- Height: 4 inches (10 cm) tall from top of head to base
- Depth: 1.25 inches (3.2 cm)
Materials You Will Need
| Material | Color / Description | Yarn Weight | Amount |
|---|---|---|---|
| Main Yarn A | Cinnamon Brown (Boy) | Worsted cotton | 35 yards (32 meters) |
| Main Yarn B | Cream / Ecru (Girl) | Worsted cotton | 35 yards (32 meters) |
| Accent Yarn C | Burgundy (Boy Bow) | Worsted cotton | 2 yards (2 meters) |
| Accent Yarn D | Soft Pink (Girl Bow) | Worsted cotton | 2 yards (2 meters) |
| Accent Yarn E | White (Icing) | Worsted cotton | 5 yards (5 meters) |
| Face Details | Black embroidery floss | Thread | 1 yard (1 meter) |
| Stuffing | Polyfill fiber stuffing | Non-allergenic | Small handful |
| Hook | 3.5 mm (US E/4) | Crochet hook | 1 |
| Notions | Yarn needle, stitch markers, scissors | Tools | As needed |
⚠️ Note: Avoid novelty, eyelash, or fuzzy yarns for this project, as they hide stitch definition and make continuous-round amigurumi counting difficult. Stick to smooth worsted weight cotton yarns for crisp stitch definition.
Gauge
- Amigurumi Gauge: Rnds 1 to 6 of the flat circle base = 1.5 inches across using a 3.5 mm hook.
- Gauge is not critical for amigurumi toys, but ensure your stitches are tight enough that polyfill stuffing does not peek through.
Abbreviations (US Terms)
- ch: chain
- sc: single crochet
- inc: single crochet increase (2 sc in the same st)
- dec: invisible single crochet decrease (insert hook in front loops of next 2 sts, yarn over, pull through both, yarn over, pull through remaining 2 loops)
- sl st: slip stitch
- st(s): stitch(es)
- Rnd(s): round(s)
- FO: fasten off
- [ ]: work instructions within brackets as directed
UK terms equivalent note: UK sc = US dc, UK hdc = US htr, UK dc = US tr.
Special Stitches Explained
- Invisible Decrease (inv-dec): Insert hook under the front loop only of the next stitch, then immediately insert hook under the front loop only of the following stitch. Yarn over and pull through both front loops (2 loops on hook). Yarn over and pull through both loops to complete the stitch.
- Magic Ring: Wrap yarn around your index finger to form a loop. Insert hook into center of loop, yarn over, and pull up a working loop. Work initial chains or stitches directly into the center of the ring.
Pattern Instructions
Pattern Notes:
– The entire body is worked in continuous spiral rounds without joining. Use a stitch marker to keep track of the first stitch of each round.
– Make one Gingerbread Boy in Cinnamon Brown with a Burgundy bow, and one Gingerbread Girl in Cream with a Soft Pink bow and bow hair clip.
Section 1: One-Piece Body (Cinnamon Brown for Boy, Cream for Girl, make 2)
We start at the top of the head and work downward in continuous rounds, shaping the head, arms, body, and legs all in one piece.
Rnd 1: Start 6 sc in a magic ring (6 sc)
Rnd 2: [inc] x 6 (12 sc)
Rnd 3: [1 sc, inc] x 6 (18 sc)
Rnd 4: [2 sc, inc] x 6 (24 sc)
Rnd 5: [3 sc, inc] x 6 (30 sc)
Rnds 6 to 10: sc in each st around (30 sc)
Rnd 11: [3 sc, dec] x 6 (24 sc)
Rnd 12: [2 sc, dec] x 6 (18 sc)
✅ Checkpoint: Stop here to embroider the facial features and buttons before stuffing. Using black embroidery thread, embroider two French knot eyes across Rnds 7-8, spaced 4 stitches apart. Add a small smile centered between the eyes on Rnd 6. For the boy gingerbread, embroider two stacked white french knot buttons on the chest (Rnds 13 and 15).
Stuff the head firmly with polyfill fiber stuffing. Continue working down the body.
Rnd 13: 4 sc, inc, 8 sc, inc, 4 sc (20 sc)
Rnd 14: sc in each st around (20 sc)
Rnd 15: [3 sc, dec] x 4 (16 sc)
Now we split for the legs.
Left Leg:
Rnd 16: 8 sc for left leg, skip remaining 8 sts of Rnd 15, join to first st of leg to work in round: 8 sc (8 sc)
Rnds 17 to 18: sc in each st around (8 sc)
FO, leaving a 6-inch tail. Stuff the leg firmly. Thread tail through front loops of final 8 stitches and pull tight to close the bottom of the leg.
Right Leg:
Join yarn to the remaining 8 unworked stitches at the bottom opening of Rnd 15.
Rnd 16: 8 sc around the open loop (8 sc)
Rnds 17 to 18: sc in each st around (8 sc)
FO, stuff firmly, and close the bottom just like the left leg. Stuff the lower body and legs fully before closing completely.
Section 2: Icing Lines and Details (White Yarn E)
Using your yarn needle and White yarn scraps, embroider wavy surface slip stitch lines or straight lines along the outer edges of the hands and feet to resemble piped royal icing. Add two small white French knots on the torso for the girl gingerbread buttons.
Section 3: Tiny Bows (Burgundy for Boy, Soft Pink for Girl)
Bow Body:
Ch 4, work 3 dc into the 4th ch from hook, ch 3, sl st into the center ring. Ch 3, work 3 dc into the center ring, ch 3, sl st into the center ring. FO, leaving a 6-inch tail. Wrap the tail tightly around the center of the bow 3-4 times to create the pinched bow shape, then secure tightly at the back.
Assembly
- Attach the Burgundy bow to the neck of the Gingerbread Boy centered under the face using the secure yarn tails.
- Attach the Soft Pink bow to the top right side of the Gingerbread Girl’s head as a hair bow.
- Weave in all remaining yarn ends securely inside the amigurumi body.
Size Customization Tips
- To make a larger gingerbread figure (about 6 inches tall), switch to a bulky weight yarn and a 5.0 mm hook, increasing the starting magic ring to 8 sc and adjusting round multipliers accordingly.
- To create matching ornaments, simply attach a 6-inch loop of matching yarn to the top of the head before closing.
Care Instructions
- Spot clean gently with a damp cloth and mild soap.
- Do not submerge fully in water or machine wash to protect the internal fiber stuffing and embroidered features.
FAQ
Can I use safety eyes instead of embroidery?
Yes, you can use 6mm safety plastic eyes if these figures are intended as adult desk decorations or holiday tree ornaments. However, for babies and young children under age 3, always embroider the facial features with thread to prevent choking hazards.
How do I make the gingerbread figures stiffer?
If you want your gingerbread couple to remain extra stiff and flat-faced, you can insert a small piece of lightweight cardboard cut to body shape inside the body cavity just before final stuffing.
Can I crochet these in different colors?
Absolutely! While traditional gingerbread is cinnamon brown or cream, you can use mint green, soft blue, or holiday red for a colorful, playful set of holiday cookies.
Happy Crocheting!
I hope you love making this sweet Gingerbread Couple as much as I did! Be sure to save this pin on Pinterest to your holiday crochet board, and leave a comment below sharing what colors you chose for your festive pair. Happy crocheting!
📄 Your free PDF pattern