











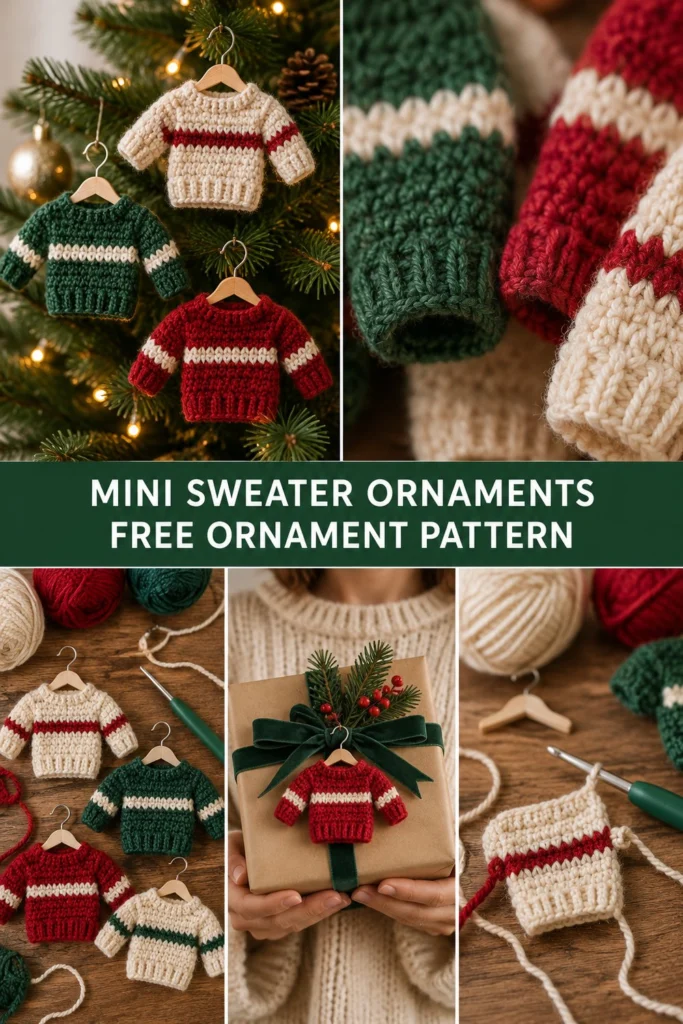
Nothing brings a festive, homespun charm to the holidays quite like miniature handmade details. These adorable crochet sweater ornaments look just like real cozy jumpers shrunk down for your Christmas tree, complete with ribbed hems, contrasting stripes, and tiny wooden hangers.
Quick Facts
- Skill level: Easy
- Finished size: Approximately 4 inches (10 cm) wide from cuff to cuff, and 3.5 inches (9 cm) tall including the ribbed collar
- Yarn: Worsted weight (Category 4) scrap yarn in Cream, Forest Green, and Burgundy
- Hook: US G/6 (4.0 mm) crochet hook
- Stitches used: Chain (ch), single crochet (sc), back loop only (blo), slip stitch (sl st), fasten off (fo)
- Time to make: About 1 to 1.5 hours per sweater
Size customization tips and gauge details are included further down in this guide.
What Makes This Crochet Sweater Ornament Special
These mini jumpers are constructed just like full-sized sweaters, worked in two flat panels (Front and Back) with integrated ribbed bands. Working in the back loops only (BLO) creates the authentic ribbing texture visible on the cuffs and hem in the close-up photo. The sleeves are worked directly into the side edges of the panels, and the entire piece is seamed together around a miniature wooden hanger for instant holiday display.
Skill Level
- Basic crochet stitches (ch, sc, sl st)
- Working in the back loop only (BLO) for ribbing texture
- Simple seaming of two flat crochet pieces
- Color changing across rows for classic holiday stripes
💡 Designer Tip: This project is ideal for using up leftover yarn scraps from larger winter projects. Feel free to mix and match your favorite holiday colors!
Finished Measurements
- Width (Cuff to Cuff): 4 inches / 10 cm
- Body Width: 3 inches / 7.5 cm
- Height (Shoulder to Hem): 3.5 inches / 9 cm
Materials You Will Need
| Material | Description / Color | Quantity / Details |
|---|---|---|
| Yarn A | Worsted Weight (Cream/Off-White) | Approx. 15 yards (14 meters) |
| Yarn B | Worsted Weight (Forest Green or Burgundy) | Approx. 15 yards (14 meters) |
| Crochet Hook | US G/6 (4.0 mm) | Standard crochet hook |
| Notions | Mini wooden hangers (approx. 3 inches wide) | 1 per ornament |
| Notions | Yarn needle | For weaving ends and seaming |
| Notions | Stitch markers | Optional, for holding pieces together |
Yarn Suggestions
| Yarn Line | Weight | Notes |
|---|---|---|
| Red Heart Super Saver | Worsted (4) | Excellent stiffness, holds its sweater shape well, huge color range |
| Caron Simply Soft | Worsted (4) | Soft sheen, drapes nicely for miniature garments |
| Lion Brand Vanna’s Choice | Worsted (4) | Great stitch definition for ribbed hems and cuffs |
⚠️ Note: Avoid extremely fluffy or novelty yarns (like eyelash yarn) for this pattern, as they obscure the stitch definition and hide the clean stripes that give these mini sweaters their classic look.
Gauge
- 16 sts x 18 rows = 4 inches (10 cm) in single crochet using a 4.0 mm hook.
- Gauge is not strictly critical for ornaments, but maintaining a firm tension helps the sweater keep its shape on the hanger.
Abbreviations
- ch = chain
- sc = single crochet
- blo = back loop only
- sl st = slip stitch
- st(s) = stitch(es)
- fo = fasten off
- [ ] = repeat instructions between brackets as directed
UK terms equivalent: sc = dc.
Special Stitches Explained
- Back Loop Only (BLO): Instead of inserting your hook under both top loops of the stitch, insert your hook under the back loop only. This leaves a distinct horizontal ridge on the front of your work, creating the ribbed look on hems, cuffs, and collars.
Pattern Instructions
Note: Ch 1 at the beginning of a row does not count as a stitch unless otherwise specified. Always work your first stitch of the row into the very first stitch.
Front Panel (Make 1)
Using Yarn A (Cream):
– Row 1: Ch 13, work 1 sc in 2nd ch from hook and in each ch across, turn (12 sc)
– Row 2 (Ribbing): Ch 1, working in blo, 1 sc in each st across, turn (12 sc)
– Row 3: Ch 1, working in blo, 1 sc in each st across, turn (12 sc)
Switch to Yarn B (Forest Green or Burgundy):
– Rows 4 to 6: Ch 1, working in both loops, 1 sc in each st across, turn (12 sc)
Switch to Yarn A (Cream):
– Row 7: Ch 1, 1 sc in each st across, turn (12 sc)
– Row 8: Ch 1, 1 sc in each st across, turn (12 sc)
Switch to Yarn B (Forest Green or Burgundy):
– Rows 9 to 11: Ch 1, 1 sc in each st across, turn (12 sc)
Switch to Yarn A (Cream):
– Rows 12 to 13: Ch 1, 1 sc in each st across. Fo, leaving a 12-inch tail for seaming (12 sc)
✅ Checkpoint: Your Front Panel should measure approximately 3 inches wide by 3.5 inches tall with clear horizontal stripes.
Back Panel (Make 1)
Repeat all instructions for the Front Panel, working the exact same color sequence and row counts. Fo, leaving a 12-inch tail for seaming (12 sc).
Sleeves (Make 4 total — 2 per panel)
With the right side of the panel facing you, attach Yarn B (matching your body color) to the side edge of the sweater body, spanning across rows 9-11 (the upper arm area).
– Row 1: Ch 1, work 6 sc evenly along the side edge of the panel, turn (6 sc)
– Row 2: Ch 1, 1 sc in each st across, turn (6 sc)
Switch to Yarn A (Cream):
– Row 3: Ch 1, 1 sc in each st across, turn (6 sc)
– Row 4 (Cuff): Ch 1, working in blo, 1 sc in each st across. Fo, leaving an 8-inch tail to seam the sleeve seam closed (6 sc)
Repeat the sleeve instructions on the opposite side edge of both the Front Panel and the Back Panel.
Assembly and Finishing
- Lay the Back Panel flat on your work surface, and place the Front Panel directly on top of it with matching sides aligned.
- Using your yarn needle and the long tail threads, whipstitch or mattress stitch the side seams of the body closed, and then seam the underarms and lengths of the sleeves closed.
- Weave in all loose yarn ends securely inside the sweater.
- Slip the finished crochet sweater ornament onto a mini wooden hanger. You can add a small dab of craft glue to the inside shoulder seams if you want to secure the sweater permanently to the hanger hook.
Size Customization Tips
Because these ornaments are worked in simple rectangular panels with side-attached sleeves, you can easily adjust the scale. Adding 2 foundation chains to the starting row will widen the sweater body by approximately 0.5 inches (1.2 cm).
Care Instructions
Spot clean gently with a damp cloth and mild soap if needed. Do not submerge in water if using wooden hangers or glued elements.
FAQ
Can I use any yarn scrap for these sweater ornaments?
Yes! Any worsted weight (Category 4) yarn scrap works wonderfully. You can also use DK weight yarn with a slightly smaller hook (like a 3.5 mm) for a daintier ornament.
How do I hang these on the Christmas tree?
The mini wooden hangers come with built-in metal hooks and twine loops, allowing you to hang them directly from tree branches or use them as personalized gift tags.
Are these suitable for absolute beginners?
Definitely. If you know how to chain and make basic single crochet stitches, you can easily complete this project in under an hour.
Happy Crocheting!
I hope you enjoy making these cozy little sweater ornaments for your holiday tree or to gift to friends and family. Save this pattern to your Pinterest board, and leave a comment below sharing what color combinations you decided to use!
📄 Your free PDF pattern