










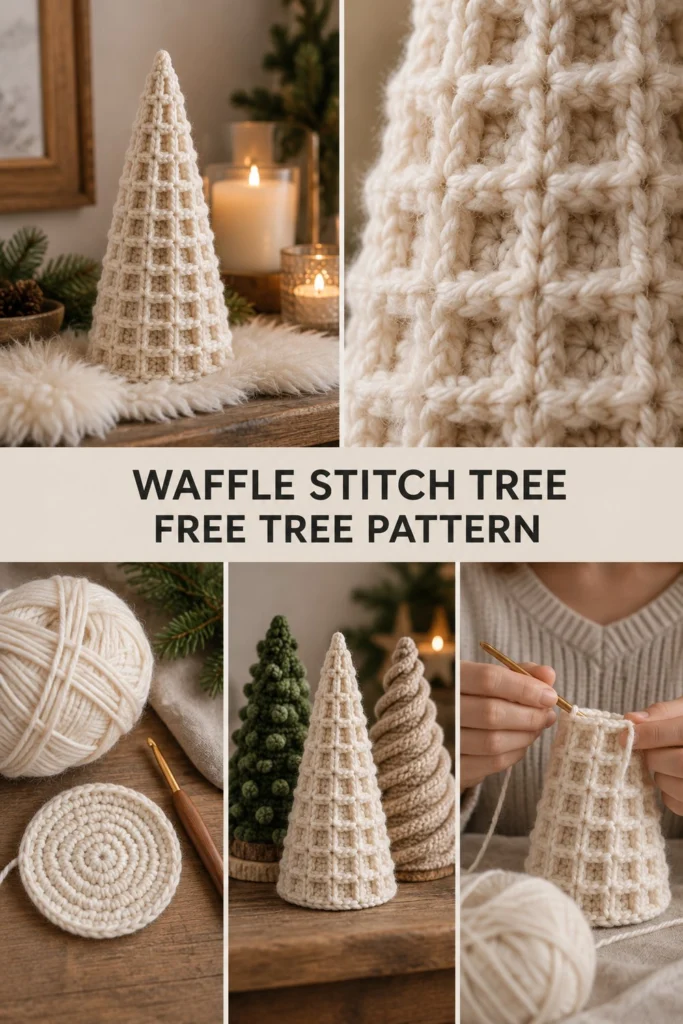
Like a chunky sweater turned into holiday decor, this textured cone tree brings instant warmth and charm to any winter vignette. Worked from the bottom up in joined rounds, front post double crochets create a deep, tactile waffle grid while a sturdy flat base keeps the tree standing steadily on your mantel or shelf.
Quick Facts
- Skill level: Intermediate
- Finished size: 4.5 inches (11.5 cm) wide at the base, 8.5 inches (21.5 cm) tall
- Yarn: Bulky weight (5) wool or acrylic blend, approx. 120 yards (110 meters)
- Hook: US K/10.5 (6.5 mm) crochet hook
- Stitches used: ch, sl st, sc, dc, fpdc
- Time to make: 3 to 4 hours
💡 Designer Tip: Size adjustment tips are included further down if you want to make a whole forest of varying heights!
What Makes This Crochet Cone Tree Special
The magic of this design lies in combining a flat circular foundation with a dimensional grid texture built directly in the round. Front post double crochets wrap around posts from the previous round, sinking the background stitches inward to form a crisp waffle pattern reminiscent of cozy winter knitwear. For more holiday inspiration, check out the emerald green spiral christmas tree free pattern, the rustic alpine spiral christmas tree free pattern, and the modern forest spiral christmas tree free pattern.
Skill Level
- Comfortable working in joined rounds
- Familiarity with front post double crochet (fpdc) stitches
- Basic understanding of decreasing while maintaining a stitch pattern
- Confidence in shaping three-dimensional items
Don’t worry if you are new to post stitches—take it slow on the first waffle rounds and your grid will quickly pop into place!
Finished Measurements
| Dimension | Inches | Centimeters |
|---|---|---|
| Base Diameter | 4.5 in | 11.5 cm |
| Height | 8.5 in | 21.5 cm |
Materials You Will Need
| Material | Description / Color | Quantity |
|---|---|---|
| Yarn | Bulky Weight (5) / Cream (Scandi look) | 120 yds / 110 m |
| Crochet Hook | US K/10.5 (6.5 mm) | 1 hook |
| Notions | Tapestry needle, stitch markers, polyester fiberfill stuffing | As needed |
Yarn Suggestions
| Yarn Line | Weight | Skein Yardage | Notes |
|---|---|---|---|
| Lion Brand Hue + Me | Bulky (5) | 137 yds (125 m) | Excellent stitch definition and structure |
| Patons Alpaca Blend | Bulky (5) | 120 yds (110 m) | Soft halo with great warmth |
| Knit Picks Brava Bulky | Bulky (5) | 136 yds (124 m) | Durable acrylic that holds a cone shape firmly |
⚠️ Note: Avoid super-plush velvet or novelty eyelash yarns for this pattern; they hide the post stitches and obscure the waffle texture completely.
Gauge
- 10 sts x 6 rows = 4 in (10 cm) in waffle stitch pattern using a 6.5 mm hook.
- Rnds 1 to 5 of the flat base disc = 4.5 in (11.5 cm) across.
Abbreviations (US Terms)
- ch = chain
- sl st = slip stitch
- sc = single crochet
- dc = double crochet
- fpdc = front post double crochet
- inc = increase (work 2 sc in the indicated stitch)
- dec = decrease (sc2tog)
- st(s) = stitch(es)
- rnd(s) = round(s)
- rep = repeat
- sk = skip
- yo = yarn over
UK translation note: sc = dc, hdc = htr, dc = tr.
Special Stitches Explained
- Front Post Double Crochet (fpdc): Yo, insert your hook from front to back to front around the post of the specified stitch from the row below, yo, pull up a loop, [yo, pull through 2 loops] twice.
- Invisible Decrease (dec): Insert hook into the front loop only of the next two stitches, yo, draw through both front loops, yo, pull through remaining two loops on hook.
Pattern Instructions
Pattern Notes:
– The tree is worked from the bottom base disc up to the tip in joined rounds.
– Joining is done with a slip stitch to the first stitch of the round unless otherwise stated.
– Ch 2 at the start of rounds does not count as a stitch.
Section 1: Base Disc
Cream Yarn
– Rnd 1: Start with a magic ring, work 8 sc in the ring, join with sl st to first sc (8 sc)
– Rnd 2: Ch 1, 2 sc in each st around, join (16 sc)
– Rnd 3: Ch 1, (1 sc, inc) rep around, join (24 sc)
– Rnd 4: Ch 1, (2 sc, inc) rep around, join (32 sc)
– Rnd 5: Ch 1, (3 sc, inc) rep around, join (40 sc)
– Rnd 6: Ch 1, (4 sc, inc) rep around, join (48 sc)
– Rnd 7: Ch 1, (7 sc, inc) rep around, join (54 sc).
Section 2: Tree Body
Join Cream yarn to any stitch on the outer edge of the base disc.
- Rnd 1: Ch 2, dc in each st around, join (54 dc)
- Rnd 2: Ch 2, dc in next 2 sts, fpdc around next st) 18 times rep around, join (54 sts)
- Rnd 3: Ch 2, dc in next 2 sts, fpdc around next st) 18 times rep around, join (54 sts)
- Rnd 4 (Decrease Rnd): Ch 2, dc2tog over next 2 sts, fpdc around next st rep around, join (36 sts)
- Rnd 5: Ch 2, dc in next st, fpdc around next st rep around, join (24 sts)
- Rnd 6: Ch 2, dc in next st, fpdc around next st rep around, join (24 sts)
- Rnd 7 (Decrease Rnd): Ch 2, dc2tog over next 2 sts, fpdc around next st rep around, join (24 sts)
- Rnd 8: Ch 2, dc in next st, fpdc around next st rep around, join (16 sts)
✅ Checkpoint: At Rnd 8, your piece is forming a distinct tapering cone. Begin stuffing firmly with polyester fiberfill now, continuing to add stuffing as you narrow the top.
- Rnd 9 (Decrease Rnd): Ch 2, dc2tog over next 2 sts, fpdc around next st rep around, join (16 sts)
- Rnd 10: Ch 2, dc in next st, fpdc around next st rep around, join (8 sts)
- Rnd 11 (Decrease Rnd): Ch 2, dc2tog over next 2 sts, fpdc around next st rep around, join (8 sts)
- Rnd 12: Ch 2, fpdc around each post around, join (8 fpdc)
- Rnd 13: Ch 1, dec rep around, join (4 sc). Fasten off, leaving a 6-inch tail. Thread tail through remaining 4 stitches and pull tight to close the tip. Secure and weave in ends.
Assembly & Finishing
- Ensure all ends are securely woven into the inside of the tree.
- Shape the cone gently with your hands to distribute the internal fiberfill evenly so the base sits flat and stable.
Size Customization Tips
To make a taller tree, work extra straight repetition rounds (like Rnds 2-3, 5-6, or 8) before executing the next decrease round. Each full set of straight waffle rounds adds about 1.2 inches of height.
Care Instructions
Spot clean with a damp cloth and mild detergent as needed. Do not submerge fully in water if heavily stuffed to protect the internal shape. Reshape while damp and air dry.
FAQ
Can I use cotton yarn instead of wool?
Yes, cotton yarn works wonderfully and gives the waffle grid very crisp, defined squares, though it will result in a slightly heavier tree.
How do I keep the base completely flat?
Working in the round from the flat disc ensures stability, but you can also insert a small circle of heavy cardboard or plastic canvas cut to size inside the base before joining the body.
Are these trees safe for young children?
These decorative crochet trees are intended as holiday display items rather than soft toys, so keep them out of reach of very young children if small internal weights are used.
Happy Crocheting!
I hope you love stitching up your new holiday tree! Be sure to save this pin on Pinterest to your favorite crochet boards, and leave a comment below to let me know whether you made yours in classic cream, forest green, or a snowy white.
📄 Your free PDF pattern